Mercruiser Inliner Swap Progress...165 Rebuilt I6 replacing the old 470

Bondo

Moderator
Staff member
Joined
Apr 17, 2002
Messages
70,526
Re: Mercruiser Inliner Swap Progress...165 Rebuilt I6 replacing the old 470

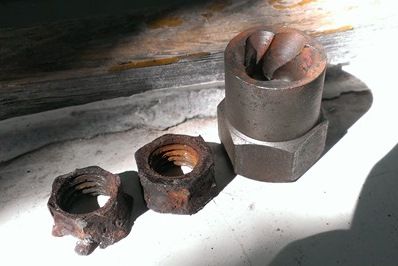
Gotcha. Yeah, I got stranded once 1st season I ran the boat, when all the sudden my boat came to a screeching halt and the smell of burning rubber...I had just blown a coupler. That was cool to look at when I had the part in my hands.

Hey do these newer style couplers have longer splines? or are they just a protective sleeve? Looks like they have a handy grease fitting as well?
MerCruiser 12-3/4" Engine Coupler
View attachment 217911

Ayuh,... Same splines, the collar helps control purged grease from the grease fittin's,..

The coupler ya use, has to match the flywheel cover ya use,...
 

WOEISMEIGOTTA470

Petty Officer 1st Class
Joined
Aug 31, 2012
Messages
375
Just wanted to check in from the long winter break. I started up work again, been at it for a few weeks on and off, but finding time to work has been difficult for me so the project has been moving slow. I had some things holding me back this spring with moving residences and other personal crap.

Anyways, with an updated Pertronix II kit & coil (91163A), I got the engine running perfectly now it’s all leaned out and tuned up great. However, before the engine goes in, I still have to the following to complete.

So here’s my to do list:
  • Foam the port side deck
  • Reinstall fuel tank
  • Cut-out new fuel tank floor section and seal up tank compartment
  • Cut-out wood bases for seats, battery boxes, O/D trim pump, and port & stbd. shelves
  • Finish fiberglassing in new wood shelves, wood bases, etc., smooth out deck floor (fairing)
  • Gelcoat deck floor
  • Reassemble transom gimbal assy.
  • Install engine and controls
  • Reinstall O/D

Oh, and BTW BONDO, the transom is 2.5” thick, so yea a bit oversized but hopefully should all work out.
So I got a lot to do, I hope I can get it done before I miss too much of the season…
-Jim
 

WOEISMEIGOTTA470

Petty Officer 1st Class
Joined
Aug 31, 2012
Messages
375
UPDATE:

So I finished foaming up the deck. Used up 2 gallons of the 2lb density (USCG) foam kit. Took one gallon foam kit to fill each side (port, stbd.) which netted an area of ~10 cubic feet of expanded foam per side. So I have a total of around 20 cu-ft of foam under the deck. Took a little practice to get the hang of it, overall it went really well. I have the boat on a good incline that let the foam run down towards the stern, and just worked my way up the deck letting gravity do the work.

I also have the fuel tank reinstalled, and hooked up the new fill & vent lines. It's all pre-wired as well. I used 1/8" silicone rubber w/ adhesive backing (free scraps from work), and stuck them on the belly of the tank before I dropped it in place. It is very low durometer (shore 10 or 20A) which is quite soft and tacky, providing a little cushion and space underneath for moisture to drain away. I anchored it in place with three 1/4" s.s. lag screws on each end coated w/ 3M 5200.

After that I worked on the tank floor replacement section. I constructed this from 1/2" BC sanded ply, with 3/4"x1.5" poplar reinforcement bracing. I doubled up the 1/2" ply on the rear half section for I will install a recessed access port in that area. I finished off the underneath with a layer of 1708 biax.

Right now the floor section is ready to be glassed in place, and the floor to be leveled out smooth and gelcoated. Before I do that I want to get the cuddy-cabin bulkhead pieces tabbed in place, as well as the fuel fill hose pass-thru area located at the transom.

That’s all for now. Pics to follow.
 

WOEISMEIGOTTA470

Petty Officer 1st Class
Joined
Aug 31, 2012
Messages
375
0xeTyl8.jpg


fkOTB00.jpg


7MXDzwU.jpg
 
Last edited:

WOEISMEIGOTTA470

Petty Officer 1st Class
Joined
Aug 31, 2012
Messages
375
Progress Update:
OK so...hard to believe it's already August...
facepalm.gif
. Time is running out fast!! It's really time to push to get this interior business wrapped up. I did a TON of sanding, borrowed my girlfriend's father's porter cable belt sander with 36 grit paper, worked awesome!! I also sanded up onto the hull sides to prep areas where I'll be glassing in the shelving and cabin bulkhead pieces.

To add some support for the steering console, I fabbed a floor mount that I'll 'glass into the console and bulkhead as well. I figure it'll also come in handy to mount my fire extinguisher and I may even add a step on there for climbing over the windshield.

Next steps are to tab in the bulkhead pieces, and shelving.

Console support piece:
Pzi8CBN.jpg


qwTA73C.jpg


Floor Sanded:
EAZgPG7.jpg
 
Last edited:

WOEISMEIGOTTA470

Petty Officer 1st Class
Joined
Aug 31, 2012
Messages
375
Figure I'll post some photos of yesterday evening, went for a sail with my work buddy on his 'ol reliable 22' O'Day. I was the helmsman for most of the trip, so the captain got to relax on his on own ship for a change...

ksvcKH5.jpg


A0dMGyM.jpg


5brDBqM.jpg

Oh, and I made a vow to not shave until my boat hits the water...:fish2:
I'd like to make it in by the end of the month, the last weekend of August there's a huge party at the local lighthouse by me, a music fest where a whole lot of boats gather to chill all day and listen to good music from bands that play atop of the lighthouse itself! The last two years I've kayaked out on the bay and had a great time.
 
Last edited:

jarruiz13

Seaman Apprentice
Joined
Jul 19, 2014
Messages
33
So far I can say good Job! Keep up the good work. I have a question where did you get your motor mounts? As well to the front motor support did you replace the bushing as well with the same type of motor mount? I need to begin searching, so I can replace mine as well. Thank you Keep it up, I hope my looks great as your boat!
 

WOEISMEIGOTTA470

Petty Officer 1st Class
Joined
Aug 31, 2012
Messages
375
So far I can say good Job! Keep up the good work. I have a question where did you get your motor mounts? As well to the front motor support did you replace the bushing as well with the same type of motor mount? I need to begin searching, so I can replace mine as well. Thank you Keep it up, I hope my looks great as your boat!

Thanks for the kind words, Jarruiz13! I did press in new rear engine mounts into the flywheel housing, using an automotive ball-joint style pressing tool and a socket (like this one http://www.harborfreight.com/ball-joint-service-kit-for-2wd-and-4wd-vehicles-60827.html). Those rear mounts are part no. 865329A02. The front mount I have is in good enough condition I didn't replace it. The front bushing IS DIFFERENT than the rears. I personally like this site for ordering M/C parts...here's a direct link to the parts diagram page for the 165 flywheel housing & front mounting assembly
http://www.perfprotech.com/mercruis...and-engine-support/assembly/1605/8?model=1362

All the best with your project, what do you have?
 

WOEISMEIGOTTA470

Petty Officer 1st Class
Joined
Aug 31, 2012
Messages
375
Mini-update: Not much, a bit of a setback; but I did tab in the starboard shelf. I was set to tab the shelf into the transom, but then I discovered a little soft spot in the upper transom, surrounding the area of the starboard eye bolt. So I worked on cutting out the bad wood and prepping the new filler piece. The first replacement piece I cut out actually didn't fit well because it was too straight, and that area of the transom has a slight bow to its shape. Therefore I got lucky and had a warped piece of 1/2" ply laying around that matched the curve of the transom perfectly! I already got the filler piece soaked in a coat of thinned resin so it's ready to be PB'ed in place :)

IMAG5409_zps5dee18c9.jpg


IMAG5406_zps39fd224a.jpg
 

WOEISMEIGOTTA470

Petty Officer 1st Class
Joined
Aug 31, 2012
Messages
375
The nuts had corroded pretty badly on the U-bolts which made them a bit of a pain to remove. Luckily my air impact gun was up to the task and removed them with relative ease, special thanks also to my craftsman bolt-out tools.

IMAG5412_zps3475cb61.jpg
 

WOEISMEIGOTTA470

Petty Officer 1st Class
Joined
Aug 31, 2012
Messages
375
New piece in place, test fitted. You can see how it needed to be curved.
image_206222.jpg image_206223.jpg
 

Attachments

  • image_206223.jpg
    image_206223.jpg
    159.5 KB · Views: 1
Last edited:

Watermann

Starmada Splash of the Year 2014
Joined
Jan 12, 2013
Messages
13,753
Motor conversions always catch my eye in the forums, they take some re-engineering and planning to pull off successfully. I'll be watching to see how yours goes down, looking good so far :thumb: My conversion was from a 120 HP 2.5L cast iron lump to a 4.3LX 205 HP.

A question about that rotten transom wood you raked out of the one spot, was the transom replaced 5 years ago or just the decking? None of us boat restore types like seeing anything possibly rotten stay in a boat is why i ask.
 

jarruiz13

Seaman Apprentice
Joined
Jul 19, 2014
Messages
33
Thanks for the kind words, Jarruiz13! I did press in new rear engine mounts into the flywheel housing, using an automotive ball-joint style pressing tool and a socket (like this one http://www.harborfreight.com/ball-joint-service-kit-for-2wd-and-4wd-vehicles-60827.html).
All the best with your project, what do you have?

I just bought three weeks ago a 1973 sportsman sportcraft for $80, and it came with mercruiser 165 6 inline. The guy donated the boat to BoatAngel, so I was able to buy it from them, so I lucked out. The boat came with its trailer, the elder man was getting no time for the boat and was overwhelmed. Now its my turn to turn this boat by May 2015. No excuse for that deadline lol
 

WOEISMEIGOTTA470

Petty Officer 1st Class
Joined
Aug 31, 2012
Messages
375
Motor conversions always catch my eye in the forums, they take some re-engineering and planning to pull off successfully. I'll be watching to see how yours goes down, looking good so far :thumb: My conversion was from a 120 HP 2.5L cast iron lump to a 4.3LX 205 HP.

A question about that rotten transom wood you raked out of the one spot, was the transom replaced 5 years ago or just the decking? None of us boat restore types like seeing anything possibly rotten stay in a boat is why i ask.

Thanks Watermann, I'll be sure to check out your pages. Yeah about 5-6 years ago I replaced the transom and floor. The transom didn't go bad or anything since, it's just that I found a little soft spot in an area of the transom that I didn't fix. The main portion of the transom I had completely replaced with new 3/4" ply laminated with 1708. I actually overbuilt it a tad thick, (1/4") by mistake or lack of knowledge at the time.

Below is my original introductory post from two years ago with some old "before" pictures.
 

WOEISMEIGOTTA470

Petty Officer 1st Class
Joined
Aug 31, 2012
Messages
375
I just bought three weeks ago a 1973 sportsman sportcraft for $80, and it came with mercruiser 165 6 inline. The guy donated the boat to BoatAngel, so I was able to buy it from them, so I lucked out. The boat came with its trailer, the elder man was getting no time for the boat and was overwhelmed. Now its my turn to turn this boat by May 2015. No excuse for that deadline lol

Nice, $80 boat! No excuses, famous last words!! :)
 

WOEISMEIGOTTA470

Petty Officer 1st Class
Joined
Aug 31, 2012
Messages
375
No Title

::Sigh::...well labor day weekend has come and gone, and I must sadly admit defeat for another summer season gone passed me by...anyhoo any free time I got I still devote to working on this tub...trying to get a splash in this month, we'll see :-/

Attached is a photo from last weekend, enjoyed the music from the bands playing at the lighthouse in the middle of the bay. My girl and I took the 'yaks out to meet up with friends for some food and drinks on their 22' Grady.
 

Attachments

  • photo208297.jpg
    photo208297.jpg
    139.5 KB · Views: 1

WOEISMEIGOTTA470

Petty Officer 1st Class
Joined
Aug 31, 2012
Messages
375
So progress wise; I finished up the small transom repairs, holes are filled in, and it has been faired and sanded. I just need to throw a layer of cloth on it before gelcoat.
The ½” ply repair section went in perfectly as planned; I rolled CSM on the inside face, before bedding the section in ‘hairy’ PB. I believe I then laid-up 3 layers of 1708, and 1 final layer of CSM.
The port side holes I simply filled in with a couple of small scraps of 1708, and CSM.

 
Top