Maxwell Smart, "Missed it by that much"

alldodge

Moderator
Staff member
Joined
Mar 8, 2009
Messages
42,054
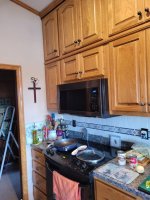
Installing new microwave and all went well unit the last inch. Top of microwave came in contact with upper cabinet edge.

Go back to dimensions wide 30 x deep 15 x high 16.5
Old microwave was 16.25 high, dang all that work

So remove the bracket and need to drop it 1/4 inch. The back splash is 3x3 ceramic tile and need to grind off 1/4 to lower bracket.

Will a vibrating tool do it or is something else better?

Oh and for your enjoyment pleasure:
Both MW's use 3 screws same type and length but their in different locations. Just why would they put them in the same place :mad:.

Also the old wanted a 1.5 inch hole for the power cord near right front, and new wants 1.75 hole in the right rear, (can't even use the wood plug to help cover the old hole. If I would have noticed sooner I would have just cut a 1.5 hole
 

flashback

Captain
Joined
Jun 28, 2002
Messages
3,963
A diamond wheel in a grinder would be my choice, I don't have a vibrator tool so don't know there capabilities.
 

alldodge

Moderator
Staff member
Joined
Mar 8, 2009
Messages
42,054
A diamond wheel in a grinder would be my choice, I don't have a vibrator tool so don't know there capabilities.
Good thought, I have one that will fit in my skill saw but won't be able to use water where it is. Can use a shop vac and dry (have done that before) sure is dusty.

Thanks for the thought
 

flashback

Captain
Joined
Jun 28, 2002
Messages
3,963
You might be able to fill the space behind the microwave so it's flush with the tile?
 

alldodge

Moderator
Staff member
Joined
Mar 8, 2009
Messages
42,054
You might be able to fill the space behind the microwave so it's flush with the tile?
No don't see that working, that would make it off level. Could use 1/4 plywood but that will pitch the lower out farther then the top. If I was dead nuts on precise with the 1/2 holes for the bolts holding the top, it could move top forward. But most likely I'm thinking would need to re-drill holes in the top cabinet because it would move the unit out 1/4 inch, and a 1/2 holes doesn't sound good
 

Scott Danforth

Grumpy Vintage Moderator still playing with boats
Staff member
Joined
Jul 23, 2011
Messages
49,538
a cut-off wheel in the angle grinder will be a 4 minute job, including time to debur. 3or4 cut-off blades in the oscilating tool will be a 30 minute job, then change to sand-paper head and spend 10 minutes deburring..
 

64osby

Admiral
Joined
Jul 28, 2009
Messages
6,816
I would not cut the tile. Fill the back flush to the tile. Redrill holes in the cabinet, use fender washers to cover the holes. Drill a new 1.5" filler and glue it in place. No one sees the inside bottom of the cabinet unless the are 6' 5" tall.

I just sold a project to someone that had cut tile in that location. They switched to a range hood. Had to have a stainless panel made to cover the space and the tile.

I sell upscale remodels and handyman projects for a living. My .05
 

stresspoint

Lieutenant Junior Grade
Joined
Sep 19, 2022
Messages
1,045
wear a quality mask and use a vac to suck debris when cutting any tile or bench tops , silicosis will kill you .
angle grinder with diamond cut off wheel
 

FLATHEAD

Captain
Joined
Dec 29, 2002
Messages
3,163
If you grind or cut. Have someone with a spray bottle of water keep the wheel wet. Dust will be minimal. Agree with avoiding that though. Pack it out to fit if you can.
 

flashback

Captain
Joined
Jun 28, 2002
Messages
3,963
So, what did you do? My wife would put some kind of liner on the cabinet floor and never look at holes in it. LOL
 

alldodge

Moderator
Staff member
Joined
Mar 8, 2009
Messages
42,054
Just got done, I'm tired

Tried the cut wheel and that just wasn't going to work, so installed 1/4 plywood as flashback and 64osby mentioned.

Turns out moving the holes caused one hole to align right on the edge with the previous power cord 1 1/2 hole. Took the 1 3/4 plug and placed in a vice, then used 1 1/2 holes saw and cut half way. Flipped the plug over and cut the other half. Cut 2 pieces of 3/4 ply and used dry wall screws and secured ply under cabinet. Then fastened the new plug in the hole.

Two of the 3 holes I moved were on target, one was not, dang. Used some large washers with 1/2 hole in center. Screws going into MW are cone shaped to self center I guess and that's the reason for the 1/2 hole.

Going to try and pretty tings up inside the cabinet tomorrow

Admirals happy
MW.jpg
 
Last edited:

sangerwaker

Commander
Joined
Jul 29, 2004
Messages
2,038
Looks good AD!

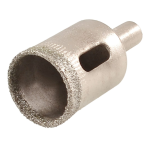
I had a similar issue at my MIL's when I replaced her MW on the tile backsplash. A-holes gave me the wrong back template to mark the holes. Thank goodness it was too short and not the other way. The incorrect holes got covered up, so all was good. But drilling in tile got a lot easier when I discovered these:

1700160626334.png
 

tpenfield

Moderator
Staff member
Joined
Jul 18, 2011
Messages
18,040
Glad you got it sorted AD. (y)

I'm on my 3rd microwave . . . the first 2 were Maytag brand, now it is a GE.

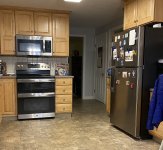
All went in fine, with some adjustments to the back mounting bracket. The real trick these days is getting a new refrigerator. It seems like most all of the models are about 6" higher than the previous generation.

When we recently upgraded our appliances, we had to get something that was called a 'Garage Refrigerator' to fit in under the cabinet. We know of several friends/family that have bought refrigerators that were too tall for the existing location.

IMG_5437.JPG
 

alldodge

Moderator
Staff member
Joined
Mar 8, 2009
Messages
42,054
Haven't run into one being to high yet, but a bit to wide was the previous problem. Picked up a Samsung 3 door for the vacation rental that was about 1/8 to wide (counter to left and pantry to right). Spent some time with a plainer on the pantry side and got it in
 
Top