Laying the Deck Questions

76SeaRay

Lieutenant Junior Grade
Joined
Aug 24, 2017
Messages
1,071
I read through the decking sticky and it seemed to imply that the deck is just screwed down on the stringers dry. Is that what most everyone does or do you coat the stringer tops with wet resin or peanut butter so that there is a resin bond between the underside of the decking and the top of the stringers? I have tapered the edges of the plywood where it runs along the sides of the boat and plan to lay peanut butter there then set the decking into it.
 

Chris1956

Supreme Mariner
Joined
Mar 25, 2004
Messages
27,852
I used strips of FG cloth, saturated with resin, laid on the ends of the stringers, and stainless steel screws. I also coat the underside of the plywood deck with resin, before installation.
 

76SeaRay

Lieutenant Junior Grade
Joined
Aug 24, 2017
Messages
1,071
I planned to coat the underside of the deck with a layer of CSM. So, sounds like I should go with a wet joint. Will have to work quickly as these are sheets that are 8 foot long. I have the center lines of the stringers drawn on the top side of the deck plywood and I can drill/countersink the screw holes ahead of laying them to make it faster.

What size screws to use and how far apart should I set them? I am using 1/2 inch marine plywood for the deck and putting the screws into two layers of 3/4 inch marine plywood on edge for the fastening point along the top of the stringers. The extra fastening strip along the top edge of the stringer has fiberglass between it and the stringer. Don't want to split the top of the stringer with a screw that is too large.
 
Last edited:

todhunter

Canoeist
Joined
Sep 15, 2020
Messages
1,311
Mix your PB on the slow side...somewhere around 0.75%. Have all your screw holes pre-drilled and pre-countersunk so all you've got to do is lay it down and run the screws in. After drilling and countersinking, make some alignment marks on the deck relative to some fixed place inside the boat so you can drop the deck down and line it up before you start running in screws. I coated each screw's threads in 5200 before running it in. If working in a warm area and you're worried about your PB kicking, having a 2nd set of hands to put 5200 on the threads of the screws then hand them to you so you can run them in will help.

I used square drive SS countersunk screws and spaced them 6" apart...could have probably gotten away with 12" apart. I chose square drive because I didn't want to deal with screws stripping out the heads. I think my screw lengths were 1.25", also using 1/2" plywood decking.
 

JASinIL2006

Vice Admiral
Joined
Feb 10, 2012
Messages
5,674
The easy way would be to put your PB down, lay the deck boards on top and weigh them down along the stringers (so you're sure they are bedded nicely), and let the PB kick off and harden. Then, drill your holes and screw down. That would be much easier than racing around trying to drive in screws before the PB kicks.

You could maybe drive in a couple screws right away to make sure the deck board is where you want it, but I don't see any advantage in drilling and driving screws as the PB is kicking off.
 

Chris1956

Supreme Mariner
Joined
Mar 25, 2004
Messages
27,852
I like solid P/t lumber, very dry, for the stringers. Plywood on edge doesn't hold screws very well. Stainless steel screws should be 6-8 in apart.; Cover them in glass/resin. JMO
 

JASinIL2006

Vice Admiral
Joined
Feb 10, 2012
Messages
5,674
#8 or #10 stainless. If you can find them, Torx or square slotted screws work much better than Phillips.
 

76SeaRay

Lieutenant Junior Grade
Joined
Aug 24, 2017
Messages
1,071
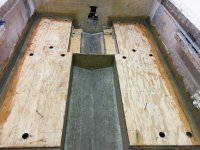
Finally got the back half of the deck down and now ready for pour foam. I have my shop heating but don't think I can get it to 80 degrees in there. Anyway, what angle do you typically need to tilt the bow up to flow the pour foam to fill to the back? Max distance from hole to hole front to back is about 48 inches.

Rear Floor.JPG
 

todhunter

Canoeist
Joined
Sep 15, 2020
Messages
1,311
Wow, seems like yesterday mine looked just like that. I ran a kerosene heater in addition to my heat pump and was able to get my shop up to 89 degrees. Had my wife turn it on about 3 hours before I got home from work. I just jacked my trailer up as high as I was comfortable going - you don't need a crazy angle. The liquid foam will flow a little but as it expands it will push the rest of the way. Get a mechanic's mirror and a flashlight to look down in the holes and see how far the foam is progressing. It may take a 2nd (or even 3rd) pour to get the big chambers full.
 

Scott Danforth

Grumpy Vintage Moderator still playing with boats
Staff member
Joined
Jul 23, 2011
Messages
49,574
put a halogen light under the boat and heat the hull from underneath as well. no need to heat the whole shop if you can warm the hull area
 

Grub54891

Admiral
Joined
Jun 17, 2012
Messages
6,077
I drilled more holes than that, just so I could see the progress. Worked well, then took the plugs from the holes and glassed them in also.
 

76SeaRay

Lieutenant Junior Grade
Joined
Aug 24, 2017
Messages
1,071
The two chambers to the outside are 96 inches long. The bigger chambers are shorter and divided by the bulkhead. Each of those chambers have two holes. I think I will start with the outside chambers first to see how it goes. I saw one video where the guy drilled 3/8 inch vent holes. Not sure if that is needed with the larger fill holes.

I live in Washington State and we just had a rain storm move in. Looks like a couple of days of rain then a couple of days of partly sunny. The humidity is 99% outside right now and everything I have read says don't pour above 60% humidity. I will have to round up a humidity meter to check inside my shop with it heated. I certainly don't want to wait until summer to get the foam into place.
 

76SeaRay

Lieutenant Junior Grade
Joined
Aug 24, 2017
Messages
1,071
Heat gun is a great idea so will add that to the arsenal of tools. I have a small heat pump but it can't get the shop temp high enough (big 3 bay shop) however the output blows right into the back of the boat from above on the wall. I ran a 1500 watt electric heater blowing underneath the transom last night. Checking with my HF infrared temperature gun the hull temperature under the deck boards measures about 74 degrees in the back and about 68 degrees up at the front of the 8 foot length. I just moved my house weather station to the shop and initially it looks like the humidity in the shop is about 72%. I will check it in about 2 hours. Going to run to the local Tractor Supply and pick up a second heater like the one from last night. I think the two electric heaters from below and the heat pump from above will get the temp high enough. Hopefully keeping the shop very warm for a few days will lower the humidity without using a dehumidifier.
 

JASinIL2006

Vice Admiral
Joined
Feb 10, 2012
Messages
5,674
I used a heat gun in the holes, lights underneath to heat the hull, and I tented the cockpit with a tarp and put in a space heater. I was able to foam that way in cold Midwest winter.
 

76SeaRay

Lieutenant Junior Grade
Joined
Aug 24, 2017
Messages
1,071
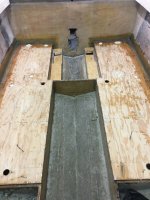
With the second heater running, the rear most chambers got up near 80 degrees and the humidity dropped to 60%. So I got the back half of the two outside 8 foot chambers and the two 42 inch chambers on each side of the engine bay. Evening was setting in with temp outside dropping and humidity rising to about 65% so I called it a day with the four sections done. Will try again tomorrow for the rest. I used a gallon of Part A and a gallon of Part B so far. Based upon my calculations I hit just about 25 to 1 on the foam expansion.

Rear Floor 2.JPG
 
Top