Lag Bolt Hole Striped (Engine Mount To Hull)

cyauch

Petty Officer 3rd Class
Joined
Jul 10, 2020
Messages
91
So putting engine back into boat after addressing a water leak around transom seal after underwater strike. Transom checks out good and all is back together.

First, lag bolts came out looking brand new when i removed the engine. But verified no water, moisture, or any rot.

Figured i'd install them with the pads first before installing engine. Of the 4 bolts, one felt 'soft' as i snugged them up. Used 4200. But, had to remove them because with the engine mounts installed to hull, motor just wont go in. darn near put a hole in the oil pan!

So i removed them, cleaned the holes back out, dropped engine in and yep, that one bolt will not snug up at all. Removed engine and just tried that bolt by itself and it never snugged. the other 3 feel pretty good. And when i say snug, with a 10' rachet, two fingers only. once i had to 'strain' i stopped just do i didn't do this.

So this brings me to how to address. I've read a number of interesting threads on here buy many seem to end with your stringers are rotted (which they aren't), delve off into something else, or the OP never posted back with final action. So i'm hoping i can get some opinions here. Options i'm thinking about

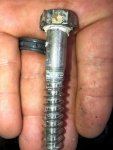
lag bolts are 3 1/2"

1. Remove the two 1/2 pads in image, using next size drill, bore the hole out bigger (only way i can get existing 4200 / factory caulk out of there or get it clean?). Mix Resin and pour into hole. Re-drill correct size

2. Same as #1 EXCEPT coat lag bolt with a non-stick cooking spray and stick bolt into hole after pouring Resin

My concern with these is the heat generated as it cures. Any tricks to managing that? I'd like to go with #1 or #2, but there's a couple others i've thought about.

#3 drill existing holes deeper. There's enough depth left to go another 1/2 - 1" . Maybe even more. My concern here though is say i go an inch, well, that's only an inch of thread contact to hold an engine mount. Drill deeper and i start worrying about an overly long lag bolt, potential structural integrity, etc. It is a 15 yo old boat :)

#4 During my service as a Seabee, i've seen a few things. One thing i saw was putting very thin strips or splinters of wood (like off a wood pallet) into a hole then putting the bolt back in. Not sure i'd want to try that in this case but ....

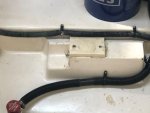
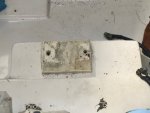
I've attached pics of one of the lag bolts. They all came out nice and shiny with no indications of water or corrosion. Also shown is the port and stbd mount pads (the 1/2 piece can come off). But the pics show should i have to, deepening the hole may not be that risky. And, if i go with #1 or #2, maybe the heat won't be an issue either?

Any thoughts, suggestions, tips, or tricks always appreciated. Thanks!
It's a 2005 Regal 2450 Cuddy. VP 5.0. I think my sig has all this info but just in case....
 

Attachments

  • lagbolt.jpg
    lagbolt.jpg
    53.9 KB · Views: 8
  • stbd_engine_hull_mount_pad.jpg
    stbd_engine_hull_mount_pad.jpg
    21.2 KB · Views: 8
  • port_engine_hull_mount_pad.jpg
    port_engine_hull_mount_pad.jpg
    20 KB · Views: 8

Scott Danforth

Grumpy Vintage Moderator still playing with boats
Staff member
Joined
Jul 23, 2011
Messages
49,539
assuming your wood in the mounts is not rotten
drill hole 1-1/4", fill hole with epoxy and drive in a section of 1-1/4" white oak dowel
let cure, cut off dowel
re-drill the hole

if wood is rotten - cut motor mounts off and make new
 

cyauch

Petty Officer 3rd Class
Joined
Jul 10, 2020
Messages
91
Thanks! Again, no rot indicators...yet...so my assumption is there is no wetness or rot...for now. I'm gonna drill the hole out and inspect the shavings from that just to make sure.

Do I / Should i be concerned about the amount of heat that will be generated from the epoxy resin curing? I saw what the Fast Cure did to a plastic measuring cup and it wasn't pretty :)

I have WS 105 Resin and WS 205 Hardner (Fast). Would the Slow Hardner (206 i think?) generate less heat? Sorry for asking the obvious. But i am Epoxy illiterate :) I would assume a longer pot or working time equals less generated heat
 

Scott Danforth

Grumpy Vintage Moderator still playing with boats
Staff member
Joined
Jul 23, 2011
Messages
49,539
larger the container, the larger amount of epoxy, the more heat

your only mixing up about an ounce of epoxy to glue the dowel in. not much heat there.
 

cyauch

Petty Officer 3rd Class
Joined
Jul 10, 2020
Messages
91
Glad the site is back up :) Been a little dormant due to Sally rolling over us then right back it prepping for Delta. Hate it for west La, but glad it passed west of us. So now i have time to focus back on this.

I was able to only oversize the hole to 3/4 (biggest drill i had). Tried a 3/4 hole saw first but it wandered do i didn't bother switching that out to a 1".

BUT no wet wood came out so....i feel MUCH better about that. Prior to oversize i prodded with a screw driver and to get it to stick was to put some serious pressure on it so i was pretty confident it was sound. better safe than sorry i guess :)

So now i have this 3/4 hole that i want to fill. i have a 3/4 dowel but now i'm kinda worried. While this site was being upgraded, i read elsewhere that the grains in a dowel run up and down which is not good for strength but good for allowing water to seep in. I get the epoxy would for a barrier but still curious on what ya'll think.

I've read the West System tutorial's / instructions on bonding hardware. They recommend using a filler (i have 404) and mix like peanut butter. pack into hole, let cure for a few days, drill, then fasten. No probs there. But i also read. I do plan on also using just a resin / hardner mix to wet the hole prior to pack with the resin/hardner/404 mix
 

Baylinerchuck

Commander
Joined
Jul 29, 2016
Messages
2,726
Just keep in mind that the epoxy is super hard when cured and may be impossible to thread a lag bolt into. You may actually snap the lag bolt in the hole greatly complicating things. This was the reason a dowel rod was suggested. You may be able to use a hack saw and cut across the threads on one lag bolt and use this to thread the epoxy, slowly. You could also forego the lag bolt and tap 3/8-16 holes, installing standard cap screws. The epoxy would be plenty strong to hold those threads, like steel.
 

cyauch

Petty Officer 3rd Class
Joined
Jul 10, 2020
Messages
91
Thanks Bay!
I went the dowel route as suggested earlier. But, like always, screwed that up! I think SD mentioned in one of his many posts that i've read the past few days to glean info stated BOAT = Break Out Another Thousand. I'm gonna modify that to BOAT = Bend Over, Another Thousand (needed)!

So the issue here is i thought (wrongly) what the heck, i'll bore the hole out to 3/4. No problem. Wood in great shape. So, figured I'd get a 3 1/2" lag bolt to replace the 3". Thinking (wrongly again) a 'fresh' 1/2" plus the 2 or so in the new dowel and good to go for another 15 years. Nope. Not today. Piloted the new 1/2" and didn;t make it an 1/8th before it went clean through. Figured what they hell, bored that out to 3/4. Then pure fright took over. I couldnt' see my shop floor but i still flew out the boat saying 10 hail mary's and a number of our fathers. No hole in hull. breathing resumed.

There went my plan to squirt some epoxy in the hole, push the dowel in, then dress the top.

So what i did, and i dont feel this is gonna work, is coated the dowel, wrapped in some fiber cloth (i think its called bi-axial, not the woven kind), and pushed into the hole. But is sank about 1/4' lower than i wanted. can't really do anything until it hardens up at least. figured if i screwed with it it would drop and roll around in the void area under the bilge.

Near as i can tell the only way to fix is either cut he top off, dig everything out, blah blah. I may let it harden, tap, and see how that goes. I can always drill it out again. My worry is the dowel rotten from the bottom up if there's a chance of moisture from below. Or, when i screw the lag back in punching a hole to expose the dowel and lag. Given its a little lower than i wanted, and i plan on adding two washers to the head of the bolt when engine in installed i think i should be ok.

Point is, i guess I'll keep an eye on it. Pretty sure the proper fix is to cut the top, dig it out, glass in a patch over that hole, new wood, glass top, and motor on.
 

Baylinerchuck

Commander
Joined
Jul 29, 2016
Messages
2,726
Thanks Bay!
I went the dowel route as suggested earlier. But, like always, screwed that up! I think SD mentioned in one of his many posts that i've read the past few days to glean info stated BOAT = Break Out Another Thousand. I'm gonna modify that to BOAT = Bend Over, Another Thousand (needed)!

So the issue here is i thought (wrongly) what the heck, i'll bore the hole out to 3/4. No problem. Wood in great shape. So, figured I'd get a 3 1/2" lag bolt to replace the 3". Thinking (wrongly again) a 'fresh' 1/2" plus the 2 or so in the new dowel and good to go for another 15 years. Nope. Not today. Piloted the new 1/2" and didn;t make it an 1/8th before it went clean through. Figured what they hell, bored that out to 3/4. Then pure fright took over. I couldnt' see my shop floor but i still flew out the boat saying 10 hail mary's and a number of our fathers. No hole in hull. breathing resumed.

There went my plan to squirt some epoxy in the hole, push the dowel in, then dress the top.

So what i did, and i dont feel this is gonna work, is coated the dowel, wrapped in some fiber cloth (i think its called bi-axial, not the woven kind), and pushed into the hole. But is sank about 1/4' lower than i wanted. can't really do anything until it hardens up at least. figured if i screwed with it it would drop and roll around in the void area under the bilge.

Near as i can tell the only way to fix is either cut he top off, dig everything out, blah blah. I may let it harden, tap, and see how that goes. I can always drill it out again. My worry is the dowel rotten from the bottom up if there's a chance of moisture from below. Or, when i screw the lag back in punching a hole to expose the dowel and lag. Given its a little lower than i wanted, and i plan on adding two washers to the head of the bolt when engine in installed i think i should be ok.

Point is, i guess I'll keep an eye on it. Pretty sure the proper fix is to cut the top, dig it out, glass in a patch over that hole, new wood, glass top, and motor on.
If you do cut the top of the mount box off, you can dig out all the nastiness, clean, then fill with Seacast. All you do is cover the SeaCast with a layer or two of glass and you’re good to go. SeaCast is a little pricey, but you can do both boxes, and it’s a permanent rot proof repair.
 

JASinIL2006

Vice Admiral
Joined
Feb 10, 2012
Messages
5,673
As a 2005 boat, I'm wondering if your stringers/mounts are fiberglass filled with foam, with a block of wood glued/epoxied under the upper surface of mount, to give the lag screws something to bite into. If that is the case, the mount could be more or less hollow under the block of wood. (I believe this is how my mounts were constructed; they were not solid wood, but there was wood under the upper surface of fiberglass. That wood is what the lag screws were catching when tightened.)

If your mounts are similarly constructed, it could make it rather tricky to epoxy in your dowel without it dropping as you describe.
 

cyauch

Petty Officer 3rd Class
Joined
Jul 10, 2020
Messages
91
thanks Bay and Jasin! First, after thinking about it for another day i decided to leave as is....for now. While it doesn't get stoopid cold here on the Gulf Coast of MS, its is getting cooler and school sports are in full swing so my time to play with this is closing fast. Plus, i really need to get this thing out on sea trials to make sure the transom seal leak is fixed (posted about that in the VP area. hard underwater strike). Previous owner should be hung out on yard arm for the bs way that was put together. Thank gawd the transom was solid as a rock and no moisture there :) but i digress.

I drilled the dowel out and ran the lag bolt into. WOW! makes the other 3 feel really tired! Was gonna try and drop the engine in tonight but may just enjoy the night off :)

Assuming no transom leaks and i didn't screw anything up putting all that back together, then i may just think about this for another week or two and make it a winter project. I'm not sold on the idea of that dowel sitting about a 1/4" down, but it appears solid (for now). I didn't measure the final torque yet, but i'd have to guess ~30 - 40 ft/lbs to get that motor mount to where i could tap it out of place. Bolt came out good (have to install engine with mounts out cuz its easier).

And i agree with Jasin. i think it is hollow underneath the boxes. All i had was a shop light and it was dark. course, i was crapping myself thinking i compromised the hull first so those 10 minutes or so are like a blur.

So my OCD is killing me and I'll probably re-do the boxes anyway. The wood shavings that came out when i drilled for dowel where nice and clean, bright, and you could smell the wood. pissed at myself for making an opening like that on the bottom.

But i'll keep the SeaCast in mind. I know I'll be back here to read more info about re-doing the boxes and sure I'll have a ton of questions about that. Now i know why glass guys charge what they charge. Like a sheetrock mudder or roofer, there is definitely a skillset the average person will never have. I know i won't.

Thanks to all who put up with this noob and offered advice and suggestions, as well as other threads you may have commented in. It helped allot!
 

froggy1150

Master Chief Petty Officer
Joined
Nov 3, 2017
Messages
843
You could make a 1/4 inch thick dowel piece, drill a hole in it like a washer and glue that in. It will eliminate a void to collect water. Glue in, sand flush and when you install if you use a bit of 3m 4200 it will be sealed frim water
 

JASinIL2006

Vice Admiral
Joined
Feb 10, 2012
Messages
5,673
Yeah, fill the 1/4" with dowel, or Marine-tex or PC-11 epoxy and use it for a while. You should find out fairly soon if it's going to hold up. If not, then you can plan your winter project.
 

cyauch

Petty Officer 3rd Class
Joined
Jul 10, 2020
Messages
91
thanks guys. you must have been reading my mind when i did just that. I cut another small piece of the 3/4" dowel, put a hole in the center and used that to fill the void. I plan on putting 4200 there when i drop the engine in.
 
Top