I haven't posted here in a while, but I spent a bunch of time over the last year working on the boat on and off.
Right now it's at the shop. I'm having some experts look over the motor to make sure I reinstalled the wiring and controls correctly. I'd hate to get it out to the lake and find myself stranded because something isn't adjusted right.
As for the repairs, here's the rundown.
I got some 1/8" aluminum to cover the holes in the transom and sealed that up and put in solid rivets to hold it in place. It should last a long time, several years at least. By then I'll probably want a different boat anyway. I also coated the entire inside of the transom skin with Gluvit just to be safe.
I made a new transom using 2 layers of 3/4" marine grade plywood and sealed it all up using Total Boat Penetrating Epoxy before putting it back in the boat. I also made a new inner transom skin and had a local metal shop make me a new aluminum splash well and transom cap.
I made all the new floors and other wood pieces using 3/4" marine grade plywood and sealed all of them up, both top and bottom with more penetrating epoxy. I also made the wood steering wheel support to go under to console. At this time I also added a 6 position switch panel (2 switches unused right now) and a fuse block.
I made a forward battery box for my trolling motor battery and ran flexible rubber outdoor conduit to run the wires in up to the front panel where the trolling motor connection is.
I also ran more of that conduit in the boat for running the other wiring. I needed. It's all plastic and rubber so corrosion shouldn't be an issue.
I decided this was the perfect time to paint the boat. I washed it and then scuffed the sides with some 220 grit before wiping it all down with acetone.
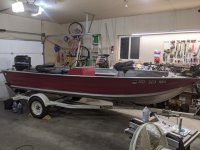
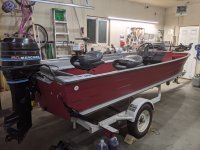
I had decided on Rustoleum Satin Granite Gray for the inside and Rustoleum Satin Colonial Red on the outside down to the top of the chine.
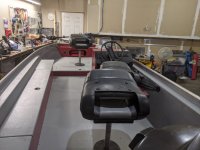
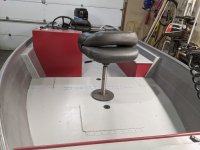
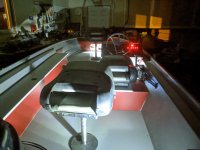
I got the inside primered in gray and I decided I wanted some color inside the boat. So the console, rod locker and front locker as well as the front of the livewell all got painted in red rather than gray.
Once all the wires were run I started foaming the boat.
I wanted to make it easier to pour the 2 part foam into the boat, so what I did was mix a batch of foam, pour it in, then set down a 2' x 4' sheet of plywood with 6 mil poly on it. Then I sat on it. The foam expanded and when it hit the poly backed by the plywood, it went sideways. After a bit I could stand up and simply peel the poly off leaving the foam right at floor level. Doing this ensured I never poured in too much foam and risked popping the rivets and also let me go back and fill in any voids I missed. It also means that if I absolutely have to, I can remove the floor without trying to pry it off the foam.
With the foam in I could finally install the wood. I didn't want to use carpet, so I bought Total Tread boat floor paint in a light gray color. I painted the floors before installation then screwed them down once they were dry. I installed the console as well as all the hatches and latches plus lighting for the lockers. I also installed a master battery disconnect.
Some more work got all the miscellaneous stull like the nav lights, cleats and trolling motor bracket installed. I also lined the inside of the lockers with some floor padding material I got at Northern Tool. I stuck it in using 3M Super 77 Spray Adhesive.
My brother helped me mount the motor and I ran the contol cables.
This brings me up to 2 weeks ago.
I called a local company that makes custom tarps and had a nice heavy duty cover made in a light gray color That alone cost me $775, but they say they have covers that have lasted 15 years, so I figure it's cheaper than replacing a cheap Walmart cover every year. I also didn't want the weather to destroy all the work I put into the boat.
The snow from the last storm melted this last weekend, so I took the boat to the shop for final adjustments.
Enough with the talking, here's the boat.
I also took some pictures of the boat with the locker lights on and the garage lights off.
Trust me when I tell you this is a VERY condensed version of the story of the rebuild.


