Johnson outboard mounting.

GTP091

Cadet
Thread starter
Joined
Sep 9, 2014
Messages
18
I'm restoring a mid 80's 16' Glascon runabout. The boat needs refinishing which I'm currently doing. Replaced the deck and wired it up. Next is sanding and using interlux marine paint. . I'm planning on using a Johnson 75 v4sl on it 1960, old but runs great. The previous boat owner had planned on using a 40hp Johnson on it which is a clamp mount motor so fiberglassed over the Johnson mounting holes on the transom. I sanded the transom down to prep for paint and exposed One of the holes. It's very likely I'll end up using the hole again so will inspect it and seal of course if it's in the right spot. Mostly I'm unclear how to mount the 75 hp I have to the boat. It looks like the bolts go through the the transom from the interior side and thread into the motor. The Johnson seems to be threaded for bolts and not just simply a bolt and nut setup like a lot of mercy are. I don't see any holes on the motor mount where the bolts would pass and nuts used. Can anyone confirm how to mount the Johnson to my boat? Possibly the thread size and pitch?
 

GTP091

Cadet
Thread starter
Joined
Sep 9, 2014
Messages
18
Anybody have any input on this?? I also tried rollin and tippin last night on the splash well, did not go so good. I couldn't get it on thick enough fast enough to prevent brush streaks. Does anybody have any input on spraying this on with a HVLP gun?
 

jbcurt00

Moderator
Staff member
Joined
Oct 25, 2011
Messages
25,352
Moved the Johnson OB forum

Start a new topic in the resto forum if you want input on spraying Interlux.
 

F_R

Honorary Supreme Mariner
Joined
Jul 7, 2006
Messages
28,226
No Title

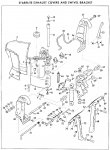
Don't even think about using those threaded holes. Those were used only for holding the motor in the shipping carton. That motor uses mounting brackets #67. The brackets bolt to the transom, motor slips down into place behind them. Standard transom drilling pattern applies.
 

Attachments

  • photo252569.jpg
    photo252569.jpg
    182 KB · Views: 2

GTP091

Cadet
Thread starter
Joined
Sep 9, 2014
Messages
18
Damn. I was worried you were going to say that and I can hear the dreaded wife 'I told you not to buy that old boat' ... The old guy I bought the motor from said they weren't needed and didn't have them. Clearly he was wrong. I rebuilt the lower leg and saw the brackets on a website. Unfortunately they will be worth what I paid for the motor by the time I get em shipped to Canada.

Mod EDIT: please remember Iboats is an online retailer and dont try to defeat the servers edit out of competitive retailers.

And solicitations and requests for parts from other members is prohibited in the open forum​
 
Last edited by a moderator:

oldboat1

Fleet Admiral
Joined
Apr 3, 2002
Messages
9,612
Try the antique outboard site: http://www.aomci.org . Free ads. You know what the new cost is, so have a sense of what the used price would be -- and may be surprised how well you might do with a trade or purchase.

On any holes exposed, btw, will want to seal them against water intrusion. Epoxy is good, maybe varnish. Let it soak in and dry before inserting bolts, and don't seal the bolt in with something permanent (like epoxy). I use some 5200 when setting bolts.
 
Last edited:

GTP091

Cadet
Thread starter
Joined
Sep 9, 2014
Messages
18
Well I found some online but theyre $75. Guess I don't have much choice. Sorry about the part solicitation. Most forums encourage asking other members for part swapping/selling/buying wasn't aware that was a no no here.
 

oldboat1

Fleet Admiral
Joined
Apr 3, 2002
Messages
9,612
AOMCI classified site is set up for that (used parts) -- recommend it.
 

GTP091

Cadet
Thread starter
Joined
Sep 9, 2014
Messages
18
Well I got the stern brackets. Looks like they're the exact parts i need. In looking at how they sit on the transom I see an issue with the transom itself. It has about a 1 inch overhang or overlap where the top cap goes over the bottom hull. So essentially at the top of the transom where the motor should go it's not flush so the brackets won't be flush to the surface of the transom. I'm not sure how this is usually gotten around as I have no basis to go by. Do I cut this overlap out and refiberglass the seam closed or do I need to build the Transom out with some kind of spacer. I would think for stability the motor and the brackets should be tight against the transom with no gaps. Please let me know what you guys think. I'll try and get a picture up.
 

racerone

Honorary Supreme Mariner
Joined
Dec 28, 2013
Messages
40,028
The brackets bolt to the transom.--------Then the motors slides in from the top.---------Pins are tightened.---------No problem.-------------Clamp the brackets on with a big c-clamp for a trial fit.
 

GTP091

Cadet
Thread starter
Joined
Sep 9, 2014
Messages
18
I wish it were that simple. There's no holes in the transom. The previous owner fibre glassed over them. I need to re drill the holes. Possibly the old holes will still line up but it could have been a mercy on there. I don't think mercy and johnsons have same pattern. Newer johnsons might even be different? I know most guys use a marine sealant to prevent water from getting in between the motor mount and the transom. Maybe helps vibration? I don't think having the motor touching two points on the transom is a good idea when it should spread over the whole face of the mount?
 

racerone

Honorary Supreme Mariner
Joined
Dec 28, 2013
Messages
40,028
Most shops will have the experience to drill those holes in a matter of minutes.---No points arguing this.
 

GTP091

Cadet
Thread starter
Joined
Sep 9, 2014
Messages
18
I wouldn't pay a shop to drill 6 holes when I have every drill bit i would ever need. The previous holes are certainly not for the brackets my Johnson uses. I've filled them in now with fibreglass and resin. I was just hoping one of you guys could answer the question of how the brackets don't sit on transom square because of the lip. I'll keep digging and figure it out.
 

hemi rt

Petty Officer 1st Class
Joined
Jul 1, 2010
Messages
321
I would cut the top of the transom off and seal it with a good sealer, fiberglass won't hold to metal very well, I take it the top of the transom is capped with aluminum.
 

GTP091

Cadet
Thread starter
Joined
Sep 9, 2014
Messages
18
No aluminum up there. Fibreglass top cap and fibreglass hull. The top cap comes over the back of the transom and down with about an inch of lip. The lip is roughly 3/16" thick and runs the length of the transom until the seam is covered with the aluminum rub rail. I'm pretty sure it'll be ok to cut this lip off and build it back up with fibreglass. Thanks for the response. I'd post a pic but not to the min posts yet I guess.
 

F_R

Honorary Supreme Mariner
Joined
Jul 7, 2006
Messages
28,226
I've never seen a boat constructed in such a manner. But the retaining brackets are only half the problem. The stern brackets of the motor need a flat surface to mount/push against. How about a spacer plate below the lip to provide a large flat surface? Just suggesting, since I can't actually see the situation.
 

GTP091

Cadet
Thread starter
Joined
Sep 9, 2014
Messages
18
I have a big piece of aluminum that's thick enough to cover the area. Not sure how to attach it. I've seen the marine adhesive sealant that's used for transom to motor. Would that be good or some other stuff? Epoxy only seems to hold for 5 years and then gets brittle. Would probably want to keep water out between the plate and transom for freezing reasons I bet.
 

F_R

Honorary Supreme Mariner
Joined
Jul 7, 2006
Messages
28,226
3M Marine sealant 4200 will do the job. It can be disassembled if ever necessary. 5200 is considered permanent where it never has to come apart.
 

82rude

Rear Admiral
Joined
May 8, 2012
Messages
4,082
You could simply bolt plate to transom.Had same motor, 4 bolts are quite adequate to hold motor on transom.On a previous post you mentioned drilling 6 holes.Not need.Most all outboards have several holes each side and that's to raise motor higher up on the transom not for bolting every hole.Some motors for whatever reason may need to sit an 1 or 2 above transom that's why you have several holes each side .Mine has 5 each side.
 
Last edited:

oldboat1

Fleet Admiral
Joined
Apr 3, 2002
Messages
9,612
Did you replace the transom core when rehabbing the hull? Sounds like you are adding weight and torque, and know at least that there are previous mounting holes (maybe water intrusion). Standard procedure is to do some testing to see if the core is rotted.

Assuming the core is solid, a mounting plate should work for you. I would use sealed plywood, attached with 4200/5200 and screws -- through-bolting for mounting the motor also secures the plate. The mounting plate can also be used to fair the transom if necessary.
 
Top