Johnson 150 Rebuild/Remanufacture Guidance

ct1762@gmail.com

Master Chief Petty Officer
Joined
Jan 17, 2019
Messages
858
i've taken a dremel and cutoff wheel to those powerhead to adapter mounting bolts. was the only option, as drilling at that angle would surely snap the bit off, and bolts too rusted for an extractor to bight into. as mentioned, salt water is a nightmare with these dissimilar metals. i have dealt with alot of it. usually its not the threads, but the unthreaded portion that literally welds itself to the aluminum. 1200 ft lbs of impact wrench didn't stand a chance! recently to get the bolts i mentioned off, i let them soak with "free-all". amazing stuff and seemed to work great. it eats the rust and lubricates.
 

racerone

Supreme Mariner
Joined
Dec 28, 2013
Messages
37,795
The cavity for the long bolts gets water / moisture in there.-----Possibly salt water.-----Then NATURE takes over and OXYGEN joins with the aluminum,-----The white powder is aluminum oxide.-----There is now more material there since oxygen has packed itself in there one molecule at a time.-----That is why that bolt will NOT turn.
 

Faztbullet

Supreme Mariner
Joined
Mar 2, 2008
Messages
15,902
When I work on salty dogs and have this problem a used adapter plate is needed. I driill thru plate and bolt about 1" below powerhead, soak it good with ATF/acetone mix, twist drilled in hafl bolts out if possible. the heat with red wrench and pop it off with big hammer and pry bars
 

Terrapin

Petty Officer 2nd Class
Joined
Jan 15, 2006
Messages
160
i've taken a dremel and cutoff wheel to those powerhead to adapter mounting bolts. was the only option, as drilling at that angle would surely snap the bit off, and bolts too rusted for an extractor to bight into. as mentioned, salt water is a nightmare with these dissimilar metals. i have dealt with alot of it. usually its not the threads, but the unthreaded portion that literally welds itself to the aluminum. 1200 ft lbs of impact wrench didn't stand a chance! recently to get the bolts i mentioned off, i let them soak with "free-all". amazing stuff and seemed to work great. it eats the rust and lubricates.
Were you able to fill the slot/slit you opened up with the Dremel motor tool and reuse the Adapter Plate, or did you buy a new/used adapter plate and replace?
 

ct1762@gmail.com

Master Chief Petty Officer
Joined
Jan 17, 2019
Messages
858
I simply pulled the powerhead off once the bolt heads were cut. Yes, I did cut a decent chunk/s out of the adapter, but thankfully the machined surface the powerhead rests on was undamaged. Used ones are like $30, so was a risk I took. i'm sure if the bolt shanks were really welded like usual, i'd be looking at a new adapter and 2 hours of cutting, but in this case the free-all worked well.
 

Terrapin

Petty Officer 2nd Class
Joined
Jan 15, 2006
Messages
160
I simply pulled the powerhead off once the bolt heads were cut. Yes, I did cut a decent chunk/s out of the adapter, but thankfully the machined surface the powerhead rests on was undamaged. Used ones are like $30, so was a risk I took. i'm sure if the bolt shanks were really welded like usual, i'd be looking at a new adapter and 2 hours of cutting, but in this case the free-all worked well.
I'll pick up some Free All at Auto Zone. I twisted the head off two of the six bolts. I'll try and pull the powerhead first, but I am thinking these two bolts may have to be cut off a half inch below the powerhead to get the head to pop off.
Thanks for the quick response!
 

ct1762@gmail.com

Master Chief Petty Officer
Joined
Jan 17, 2019
Messages
858
I'll pick up some Free All at Auto Zone. I twisted the head off two of the six bolts. I'll try and pull the powerhead first, but I am thinking these two bolts may have to be cut off a half inch below the powerhead to get the head to pop off.
Thanks for the quick response!
yea pain in the neck. spray the free-all and let it do its magic overnight. you will be happy with the results as long as it can get to the bolt. racers method of drilling a hole to get to it sounds like good advice.
 

Terrapin

Petty Officer 2nd Class
Joined
Jan 15, 2006
Messages
160
i've taken a dremel and cutoff wheel to those powerhead to adapter mounting bolts. was the only option, as drilling at that angle would surely snap the bit off, and bolts too rusted for an extractor to bight into. as mentioned, salt water is a nightmare with these dissimilar metals. i have dealt with alot of it. usually its not the threads, but the unthreaded portion that literally welds itself to the aluminum. 1200 ft lbs of impact wrench didn't stand a chance! recently to get the bolts i mentioned off, i let them soak with "free-all". amazing stuff and seemed to work great. it eats the rust and lubricates.
How do you get your Dremel and blade close to the powerhead mating surface? Is there a way to drop the "Lower Housing Cover" and/or the "Frame and Seal Assembly" (p/n 0392494) ? I currently have everything free except the two long bolts that snapped. I'm trying to pull the powerhead with a shop crane, but its not moving !
 

Terrapin

Petty Officer 2nd Class
Joined
Jan 15, 2006
Messages
160
How do you get your Dremel and blade close to the powerhead mating surface? Is there a way to drop the "Lower Housing Cover" and/or the "Frame and Seal Assembly" (p/n 0392494) ? I currently have everything free except the two long bolts that snapped. I'm trying to pull the powerhead with a shop crane, but its not moving !
OK, I was able to get the "Frame and Seal Assembly" bolts removed and I slid it out the front of the powerhead and above the "Lower Housing Cover". This seems to give me a little bit of access for a Dremel.
I'll have to research the Dremel Cutting Wheels for one that will cut aluminum/stainless.
I still fear I am going to cut these bolts and still have a tough time popping the powerhead off. I'm open to additional suggestions. Thanks !
 

ct1762@gmail.com

Master Chief Petty Officer
Joined
Jan 17, 2019
Messages
858
OK, I was able to get the "Frame and Seal Assembly" bolts removed and I slid it out the front of the powerhead and above the "Lower Housing Cover". This seems to give me a little bit of access for a Dremel.
I'll have to research the Dremel Cutting Wheels for one that will cut aluminum/stainless.
I still fear I am going to cut these bolts and still have a tough time popping the powerhead off. I'm open to additional suggestions. Thanks !
No i know there's a good couple inches room before you cut the adaptor... just threw that in there to make sure nothing gets anywhere near it. don't ask my why i said that ha. as for cutoff wheels... i use the ones from Dremel. I know they have a few, so forgot the exact ones but they did say metal cutting for hard metals like steel. It's too bad you can't get those bolts out! Just did a 70hp (saltwater of course) powerhead removal this weekend. Bolts rounded off, but just BARELY got them off by hammering in a 1/2'' removal socket (ones with the reverse teeth) and got em' all out with the impact. not fun.
 

Terrapin

Petty Officer 2nd Class
Joined
Jan 15, 2006
Messages
160
Well, late Sunday evening we had a minor miracle occur here and the powerhead popped off after cutting the two bolts approximately 1/2" below the powerhead mating surface, lots of various penetrating oils, and some heat in the area above the cuts. I utilized my Dremel motor tool with the Heavy Duty Cut Off Wheels (No. 420 & a few of them) and a larger diameter metal cutting disc from my Dremel EZ Lock Cutting Kit. Due to limited access the cuts are at about 45 degrees from vertical and provide a nice supporting gusset for the mating surface above. I also used my Fein Multimaster with the corner of a metal cutting blade to get the last few thousands of an inch of the bolt diameter. The Multimaster is not the best at cutting the aluminum. Miraculously, I did not penetrate the internal walls of the Adapter Plate, only the outer wall surrounding the bolt. I'm thinking I can reuse the Adapter Plate given my luck in preserving the internal walls. Let me know if you have any thoughts on reuse.
 

ct1762@gmail.com

Master Chief Petty Officer
Joined
Jan 17, 2019
Messages
858
awesome! now just don't over-torque the adapter bolts to prevent a hairline crack and you should be good to go.
 

Terrapin

Petty Officer 2nd Class
Joined
Jan 15, 2006
Messages
160
ct1762, racerone, Faztbullet, thanks for all your help in getting me through this powerhead removal.
So I'm at a crossroads, do the rebuilt myself or send the powerhead out? Mechanically, I am thinking I could get through the rebuild. The big question I have is, how hard is it to get the powerhead running after the rebuild? What am I up against after the rebuild? I don't want to get the powerhead back together and then run into problems (damage a cylinder or cylinders) because I am not picking up on something after/if I get it started and running. I'm looking for some guidance. . .
 

Terrapin

Petty Officer 2nd Class
Joined
Jan 15, 2006
Messages
160
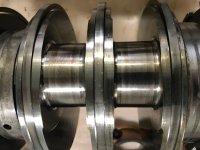
I now have this powerhead pulled apart and I am waiting on return of the block. I have a question in regard to the crankshaft bearing journals. All 6 are very smooth with no uneven wear, scoring, or pitting. However, the surfaces have some tan or light brown surface coloration. Should these be polished up at all prior to reassembly, or left alone and reassembled?
 

Attachments

  • Crank.jpg
    Crank.jpg
    528.5 KB · Views: 7

racerone

Supreme Mariner
Joined
Dec 28, 2013
Messages
37,795
Some would argue-------I use 220 grit polishing cloth strips.----Lightly polish that and put a crosshatch pattern on those journals and bore of the rods.----Been doing that for years.
 

Terrapin

Petty Officer 2nd Class
Joined
Jan 15, 2006
Messages
160
So if I understand correctly, polish up the crank journals by wet sanding with a 220 silicone carbide strip of abrasive and work up through finer abrasives? Honestly, I would have no idea how to put a crosshatch pattern over that narrow journal and the rod bores. If you could point me to something I would take a look. Thanks
 

Faztbullet

Supreme Mariner
Joined
Mar 2, 2008
Messages
15,902
Take a green scotbrite or dishwashing pad and cut into strip wide enough to fit journal and polish. Wont hurt anything if you leave em alone either.
 

racerone

Supreme Mariner
Joined
Dec 28, 2013
Messages
37,795
Some will argue.-----I use 220 grit only.---Strip about 1/4" wide.----Work it gently to establish a cross hatch finish..-----No need for finer grit to have a mirror finish !!-----I do the same procedure on lower unit shafts.
 
Top