"It Happened!" Transom has to be replaced! (NOW W/PICS)

Stumpalump

Chief Petty Officer
Joined
Dec 5, 2013
Messages
413
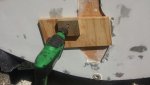
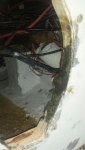
The edge between the bottom of the hull and transom should be a sharp 90. The factories all round them so they will release from the mold but those that blueprint the hull make that edge sharp. Go faster with less drag and fuel consumption. Might also be a good time to run a straight edge from the transom foward to look for hook, bumps or low spots as well. That bottom part may be another day for you but while you have to goop out you should at least look for really bad spots. The sharp 90 almost always gives 1mph or more and sometimes the last 3 or four feet can add even more. I've never had a boat that did not respond very well to sanding and filling that 90 sharp. Do at least that for sure.
 

LX Kid

Ensign
Joined
Sep 5, 2008
Messages
993
The edge between the bottom of the hull and transom should be a sharp 90. . The sharp 90 almost always gives 1mph or more and sometimes the last 3 or four feet can add even more. I've never had a boat that did not respond very well to sanding and filling that 90 sharp. Do at least that for sure.

Thanks. I'll give that a little more attention and make sure it's 90 degree.
 

LX Kid

Ensign
Joined
Sep 5, 2008
Messages
993
All in all had a good day with the filler. Put first coat on the low spots sanded. After sanding I used a pencil to shade in areas that were still a little low. Put on a second coat and things are really looking good. Tomorrow I'll do a wet sanding and see/feel how the surface is. Getting real close to doing the painting.
 

LX Kid

Ensign
Joined
Sep 5, 2008
Messages
993
Been filling and sanding last couple of days. I think I've got it "smooth enough" where I wouldn't be embarrassed to say " I did that." LoL Now I have to drill holes for gimbal housing and saw out the "keyhole" for the gimbal housing to pass thru transom. Plan to seal all the holes with the Evercoat "or" should I use resin?

Why is the keyhole cut out on the bevel instead of straight thru? Only moving part is at the top by the tiller arm.
 

zool

Captain
Joined
Aug 19, 2012
Messages
3,432
Use the resin for waterproofing the holes, the compound is basically for cosmetics...
 

LX Kid

Ensign
Joined
Sep 5, 2008
Messages
993
No Title

This morning I drilled all the necessary holes thru the transom. Made a fixture to use as a guide when drilling the gimbal holes. Used piece of plywood, with board screwed on on top, then used drill press to make a 90 degree 1/2" hole thru both. In this manner the plywood is flush against the transom for the correct drilling angle.

Before I cut out the gimbal keyhole, is there a reason the keyhole is cut at an angle rather than straight thru? I can see why, maybe at the top, for the pilot arm to move but nothing else moves below that.

Note: If you drill holes straight thru transom, 90 degrees to ground, the gimbal housing will not pull up flush to transom and is guaranteed to leak!
 

Attachments

  • photo280727.jpg
    photo280727.jpg
    98.6 KB · Views: 0
  • photo280728.jpg
    photo280728.jpg
    95.1 KB · Views: 0

LX Kid

Ensign
Joined
Sep 5, 2008
Messages
993
No Title

Cut my keyhole this afternoon but not without a couple of boo-boo's. I was too aggressive on the angle of the cut and cut into the stub bolt holes. "Maybe" it doesn't matter cause the gimbal mounting plate sandwiches the transom in between the two. Just the same I'm going to put 1/2" wood dowel in two of the holes and fiberglass over them. Once dry I will just drill the dowel out.
 

Attachments

  • photo280738.jpg
    photo280738.jpg
    104.4 KB · Views: 0
  • photo280739.jpg
    photo280739.jpg
    106.3 KB · Views: 0
  • photo280740.jpg
    photo280740.jpg
    374 KB · Views: 0

LX Kid

Ensign
Joined
Sep 5, 2008
Messages
993
Can't believe all the help and suggestions I've received. 8356 views with over 300 posting! Thanks to everyone for your help and support!

Oh, and by the way, the job's far from done. So please keep helping. Thanks
 
Last edited:

JASinIL2006

Vice Admiral
Joined
Feb 10, 2012
Messages
5,588
Not sure why you cut your keyhole on a bias... the keyhole itself should be a 90 degree cut, with only the upper part (the slot where the steering arm rides) cut on an angle. Was your old transom cut that way? I'm not sure it will hurt anything if there's enough for the interior transom plate to grab, but it seems you made it unnecessarily hard for yourself.

Also, make sure all the edges of the keyhole are well sealed. Don't want any water intrusion there!
 

LX Kid

Ensign
Joined
Sep 5, 2008
Messages
993
Not sure why you cut your keyhole on a bias... 'm not sure it will hurt anything if there's enough for the interior transom plate to grab, but it seems you made it unnecessarily hard for yourself.

Too little info too late. I had been asking for couple days but no suggestions so I cut it the same way the old transom was cut. Would have been ok if my sawzall blade wasn't wondering. It all good though I'll build it back up with some fiber cloth and re-drill holes. Thanks
 
Last edited:

LX Kid

Ensign
Joined
Sep 5, 2008
Messages
993
No Title

Put on the first coat of Kitty Hair. DO another coat this afternoon.
 

Attachments

  • photo280801.jpg
    photo280801.jpg
    314.2 KB · Views: 0
  • photo280802.jpg
    photo280802.jpg
    368.5 KB · Views: 0

kcassells

Fleet Admiral
Joined
Oct 16, 2012
Messages
8,625
Lx did you seal the wood w/resin first? looks raw. If not you should do it now.
 

LX Kid

Ensign
Joined
Sep 5, 2008
Messages
993
Lx did you seal the wood w/resin first? looks raw.

I was hoping no one would notice. No, and I don't think the Kitty Hair is going to stick to the bare wood. Means I gotta peel it off and seal with resin and then put the Kitty Hair on again. (B00-Hoo)


bang-head-here.jpg
 

LX Kid

Ensign
Joined
Sep 5, 2008
Messages
993
I just tried chiseling the Kitty Hair off and it is "stuck" on there. It's pulling up wood fiber with it's removal. Thinking of sealing the rest of the keyhole with resin and adding some more Kitty Hair over what's already there.
 

kcassells

Fleet Admiral
Joined
Oct 16, 2012
Messages
8,625
Put a sander to it and get to the raw wood...no biggy. That area is like the vangaurd from getting rot. All the other stuff is done. This part pretty important.
Grinder would do it too.
And thanks..I got your cold just from replying to your thread! Nasty stuff says I.

Ucandoit!
 
Last edited:

LX Kid

Ensign
Joined
Sep 5, 2008
Messages
993
Put a sander to it and get to the raw wood...no biggy. That area is like the vangaurd from getting rot. All the other stuff is done. This part pretty important.
Grinder would do it too.
And thanks..I got your cold just from replying to your thread! Nasty stuff says I.

Ucandoit!

Sorry for your cold! I'll send you some chicken soup.
Removed all the Kitty Hair and will seal the keyhole with resin tomorrow. Gonna take the rest of the day off. Now I'll have to buy "another" can of Kitty Hair!!
 

kcassells

Fleet Admiral
Joined
Oct 16, 2012
Messages
8,625
Tiger hair is nothing more than torn/pulled csm or other glass mixed w/resin. Make up yourself if you have glass to use.
 

LX Kid

Ensign
Joined
Sep 5, 2008
Messages
993
Cut up CSM this morning and added it to my resin sauce! Everything seems to have worked out great. Thought it was kicking a little slow but turned rock hard after about thirty minutes.

20171113_105652_resized.jpg
 
Last edited:

kcassells

Fleet Admiral
Joined
Oct 16, 2012
Messages
8,625
So now you can at least shape it and get rid of the bias/angle cut you referred to earlier.
 
Top