I have returned... with a Starcraft this time!

Watermann

Starmada Splash of the Year 2014
Joined
Jan 12, 2013
Messages
13,798
So I got started this morning.

Didn't take long at all to remove the seats, bench and other stuff from the boat. Once I started trying to remove the decking screws I ran into the situation where they'd been painted over. Some came out, some just stripped. Am thinking I need to go buy a cold chisel and pop the heads off the stubborn ones. And some screws along the longitudinal axis seem to be self tapping machine screws. They didn't offer much resistance so I wonder if they're actually tapping into the main stringer or not. :suspicious:

It looks like the PO had glued much of the decking down with expandable foam. Some is visible along the edges, etc. and that could be holding the stripped screws in place.

BTW - most of the screws that did come out appear to be drywall screws. Are they acceptable in this application? :confused:

Any recommendations?

No deck screws are about that last thing you should use. Personally I would only use large flange blind rivets like the factory did. An angle grinder with a cutting wheel would be the fastest way to buzz through those stripped screw heads.
 

BWR1953

Admiral
Joined
Jan 23, 2009
Messages
6,201
No deck screws are about that last thing you should use. Personally I would only use large flange blind rivets like the factory did. An angle grinder with a cutting wheel would be the fastest way to buzz through those stripped screw heads.
Angle grinder. Didn't even think of that. Duh. :facepalm:

I do have a Harbor Freight cheapie angle grinder around here somewhere. I'll pick up a cutting wheel for it and use that to cut the screw heads.

I don't have any kind of riveter though.
 

BWR1953

Admiral
Joined
Jan 23, 2009
Messages
6,201
Okay guys, I need some coaching here.

Had to make a couple trips to Harbor Freight this morning to get the right parts, but finally did get the correct cutoff wheels and got to work. All the heads of the screws are now removed from the deck.

The decking is in GOOD shape with no rot anywhere or any soft spots. And that is the issue. I did a quick test and it does appear that the decking is "glued" in place at some parts of the boat and it doesn't want to come up. I'll work on it more tomorrow in the cool of the morning and try again. Any suggestions on a way to get the decking up?

IF IT DOESN'T WORK... I am tempted to just find the leaks (already marked) on the outside of the hull and hit those spots with some JB Weld and call it done. The boat doesn't have to be perfect. It just needs to float and stay dry.

I don't want to tear up and ruin perfectly good decking in order to get it removed in order to reach the leaks underneath. Nor do I want to have to pay for replacing the plywood and having to go through all that hassle. This is supposed to be an affordable boat that I can use to fish, not a major overhaul and restoration.

Advice please...
 

hayko1971

Starmada Splash of the Year 2015
Joined
May 24, 2013
Messages
448
My deck was held down with rivets, I drilled them all out and it came right out. Maybe there is some expanding foam under the deck sticking it down? I would think even were that so, you could pop the deck up with a spade or pry are once all the rivets are removed.
 
Last edited:

BWR1953

Admiral
Joined
Jan 23, 2009
Messages
6,201
My deck was held down with rivets, I drilled them all out and it came right out. Maybe there is some expanding foam under the deck sticking it down? I would think even were that so, you could pop the deck up with a spade or pry are once all the rivets are removed.
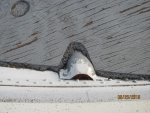
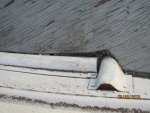
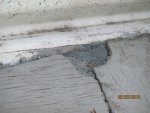
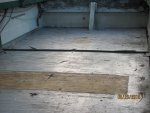
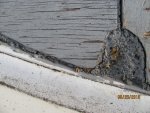
Yes, there is definitely some expanding foam (or something like that) "gluing" the bow decking down for sure. I can't see it at the other locations but the deck really doesn't want to just pop up. In the last pic below, you can see where I tried to pry it up with a pry bar and was only partially successful and ended up damaging the plywood a little. I'll have to examine everything more closely in the morning.

Any thoughts on the JB Weld option?

glue1.jpg glue2.jpg glue3.jpg glue4.jpg glue5.jpg
 

Attachments

  • glue4.jpg
    glue4.jpg
    86.9 KB · Views: 11
  • glue1.jpg
    glue1.jpg
    121.4 KB · Views: 10
  • glue1.jpg
    glue1.jpg
    121.4 KB · Views: 10
  • glue5.jpg
    glue5.jpg
    94.6 KB · Views: 9
  • glue2.jpg
    glue2.jpg
    110 KB · Views: 10

Decker83

Commander
Joined
Apr 5, 2011
Messages
2,593
First thing is to check and my sure you have all the screws out.. The PO could have painted over some of them and made them hard to see..
The next thing I would worry about is the foam being water logged making the boat very heavy.. The wood deck my be good on the top but bad on the bottom..
I would tear up the deck and replace all of it now. If you just use JB Weld and seal in all the water in the foam, you will be replacing the deck in a few years..
Just my 2 cents..
 

BWR1953

Admiral
Joined
Jan 23, 2009
Messages
6,201
First thing is to check and my sure you have all the screws out.. The PO could have painted over some of them and made them hard to see..
The next thing I would worry about is the foam being water logged making the boat very heavy.. The wood deck my be good on the top but bad on the bottom..
I would tear up the deck and replace all of it now. If you just use JB Weld and seal in all the water in the foam, you will be replacing the deck in a few years..
Just my 2 cents..
Okay, I'll double check the screws. Could be that I didn't completely remove all the screw heads and that they're still putting up too much resistance. Might have to pop them with a rubber mallet (if I can find the thing) and see if that loosens them up a bit.

The wood decking is less than 2 years old and has seen very little service in that time. If I can get one panel up, I'll have a better idea of what's going on underneath. Will post pix when I do.

As I said in Post #39, I don't plan on keeping this boat more than a couple years. It's just going to be used for fishing during that time and not as a restoration project. I just can't turn this into a major effort.
 

BWR1953

Admiral
Joined
Jan 23, 2009
Messages
6,201
Well, I have a few minutes for an update.

There were several screws that still had remnants of their heads holding the deck down. PLUS - I figured out that the screws are screws, not rivets! Duh for me. Just because the heads were removed didn't mean that they weren't still firmly attached to the wood as well as the stringers beneath. Rivets have smooth sides and provide a clamping force. Remove the head from a rivet and the wood can simply pop loose. Screws provide clamping AND friction, so they didn't want to let go. I was stuck.

So, I called for backup. And a bigger hammer! I'm 62 (with health & medical issues) and my 73 y.o. neighbor (with his own health & medical issues) came over to offer advice. He was a great help as he's been a handyman kinda guy his whole life. He took a look at the situation, climbed up into the boat and we started working again. Ya'll shoulda seen us two old farts trying to get this job done! LOL

We got one end of the sternmost deck panel slightly raised then started shoving a 2x4 underneath. Clobbered it on the end with an 5 lb. engineers hammer and wedged it toward the recalcitrant screws. Took awhile but we finally got all the panels loose. The T-brace at the bow was problematic but we finally got that loose as well. There were two machine screws beneath the brace, holding the forward bow deck to the stringer beneath.

WHEW! So glad to have this step completed!

The wood and foam are in fine shape. Will be reusing those parts. My wife and stepson will be helping clear that stuff out. I'm going to be running the roads for doc appointments over the next several days, so I don't know how much I'll be able to get done.

From what I can see, there's no gloopy gloppy sticky stuff in the bottom of the boat. Appears to be that it should clean up nicely!

Will update again as progress is made.

So far, I'm a happy camper!
 

Watermann

Starmada Splash of the Year 2014
Joined
Jan 12, 2013
Messages
13,798
As I said in Post #39, I don't plan on keeping this boat more than a couple years. It's just going to be used for fishing during that time and not as a restoration project. I just can't turn this into a major effort.

Uh yeah too late :lol:

fetch
 

Decker83

Commander
Joined
Apr 5, 2011
Messages
2,593
Glad you got it worked out.. I would like to see you two going at it..:D
I'm in the same boat.. I'm 62 and have both legs amputated below the knee.. Should see this old fart moving around in my hull..:facepalm:
 

BWR1953

Admiral
Joined
Jan 23, 2009
Messages
6,201
Glad you got it worked out.. I would like to see you two going at it..:D
I'm in the same boat.. I'm 62 and have both legs amputated below the knee.. Should see this old fart moving around in my hull..:facepalm:
I bet that's interesting for sure!
 

BWR1953

Admiral
Joined
Jan 23, 2009
Messages
6,201
Was gone most of the day today but after dinner we went out and pulled the old foam out of the hull. A few pieces were partially water logged which might have added 10 pounds to the overall weight of the boat. But I've decided to go ahead and replace the old styrene foam with something newer. The question is... pink, blue or noodles? :lol:

Maybe tomorrow I'll be able to start the cleanup.
 

BWR1953

Admiral
Joined
Jan 23, 2009
Messages
6,201
Pics from today. We had some big time rain here yesterday so the boat had a bit of water inside. I raised it up farther and the H2O has now drained out.

IMG_9008a.JPG IMG_9007a.JPG
 

64osby

Admiral
Joined
Jul 28, 2009
Messages
6,826
No noodles for this guy. Pink, blue or green sheets work nice.

Good progress, hoping I'm still able "when I'm 64", (sounds like a song, hmmmm):joyous:
 

Decker83

Commander
Joined
Apr 5, 2011
Messages
2,593
Pics from today. We had some big time rain here yesterday so the boat had a bit of water inside. I raised it up farther and the H2O

The old foam will hold water.. Get er all clean, find your leaky rivets and fix then and put back the new foam and floor and you'll be good..
Wow, that was a mouth full..:laugh:
 
Last edited:

hayko1971

Starmada Splash of the Year 2015
Joined
May 24, 2013
Messages
448
good job getting that deck up! I used a mixture of blue rigid foam and pool noodles. The rigid foam went a few layers o. The hull under the deck, then I topped it with pool noodles to "squish" it down tight, no foam movement or squeaks under my deck. I also stuffed empty spaced between the hull and side panels above deck with pool noodles.
 

BWR1953

Admiral
Joined
Jan 23, 2009
Messages
6,201
Time to buy stuff now! I NEED RECOMMENDATIONS PLEASE. :joyous:

I'll be ordering or purchasing the following:

1 qt. Gluvit (should be enough from what I've read)
1 4x8 sheet of 3/4 inch marine plywood (or exterior grade - non pressure treated)
1 or 2 sheets of foam insulation sheeting. (blue or pink or green)
1 gallon of white vinegar (for aluminum prep)

Fiberglass cloth - from what I've read I think I should get biaxial. But what weight?
The transom is only 60 inches wide by 12 inches tall (with lots of margin) so I won't need yards and yards of cloth. What rollers or other application devices should I get?

Epoxy resin. How much and which type?
 
Last edited:
Top