I cannot believe that I am asking about floor filling! But I am..

frankk

Seaman
Joined
Aug 31, 2003
Messages
63
Well folks.. after 10 days (total) ..... I am thinking (not yet done yet mind you but.. thinking...) of the floor 'stuffing' material.
Too Cute is moving forward, and I am now looking at 'what to stuff the floor with'. This is the area that was 'completely' sealed in the past with glassed in floor and glassed in (full tabbing) on the transoms and stringers. All of the waffles were in their own compartment, separate from the adjacent one..
I can take the approach of filling it with similar material like the material that looks like 'Great Stuff' or similar once the new floor is glassed in or... pour it in place and cut it off in partitions (before the floor is screwed in place and glassed over... then final sand with a sander and #80 or so grit. Or cut 2, 2" holes in each waffle and fill it that way. Any thoughts on this guys?
Here is a URL of my progress, minus the past few days... Finished the stringers from back to front, each one replaced with marine grade plywood and glassed in. Pictures in a few days.. No time, got to get the other stuff in the water. It finally turned to good weather here in Northern Illinois!
http://electronicinstrument.com/toocute.html
 

pckeen

Commander
Joined
Jun 20, 2012
Messages
2,067
Re: I cannot believe that I am asking about floor filling! But I am..

Hi Frankk,

It's getting hard to follow where your rebuild is, as you have a number of threads on this - why don't you get a mod to combine your various rebuild threads into one.
 

jigngrub

Fleet Admiral
Joined
Mar 19, 2011
Messages
8,155
Re: I cannot believe that I am asking about floor filling! But I am..

Your best build will be with the 2 part expanding urethane foam in at least a 2 lb. density. I personally prefer the 4 lb. density because it is more water resistant than the 2 lb.
 

jigngrub

Fleet Admiral
Joined
Mar 19, 2011
Messages
8,155
Re: I cannot believe that I am asking about floor filling! But I am..


To pour your foam easily and avoid cutting a bunch of holes in your nice new fiberglassed deck cut 1 piece of plywood a little wider than the widest rib space and 1" short on the width.

Wrap the bottom of the plywood with 4 or 6 mil plastic sheeting to prevent the foam from sticking. Cut your 2" pour hole out with a hole saw and retain the plug. Cut the hole directly above the center of the drain pipe.

Screw the plywood down to the ribs and screw the 2" plug to a piece of plywood (make sure it's covered with plastic too).

Calculate how much foam you'll need to fill the rib space and mix it up, then dump it in the pour hole and place the plug over the pour hole and stand on it.

If you mixed up enough foam it will completely fill the void and you'll have some excess squeeze out of the 1/2" gaps on both ends.

After 10 minutes remove the plywood and install it over the next rib space and repeat.

Trim off the excess foam at the 1/2" gaps with a sharp knife when you're finished and lay your nice new decking down without any holes in it.

Fasten and fiberglass.
 

frankk

Seaman
Joined
Aug 31, 2003
Messages
63
Re: I cannot believe that I am asking about floor filling! But I am..

Thanks so much. Not sure how to combine threads, sorry for the multiple posts. I like this idea a lot! Thanks jigngrub for the info!
 

frankk

Seaman
Joined
Aug 31, 2003
Messages
63
Re: I cannot believe that I am asking about floor filling! But I am..

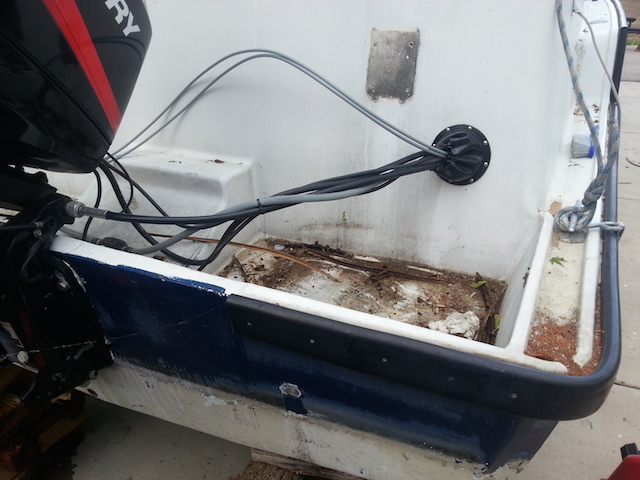
OK, been a few days.. still working on the inside trying to figure out where the water is coming in. FOUND IT. There is a pass-thru from the well in the stern where water runs off the sides and top of the boat. This water is supposed to go into these two pass-thrus to the lake water. It is about 1" dia by 4" long passing thru the hull and this area I mentioned above. If you look close on this picture you can see the pipe within a pipe. It is made of plastic. If I re-do exactly like the past I am sure the movement will shear it again. What about brass?
http://www.electronicinstrument.com/apr 26/drain2.jpg The real problem is that one piece is from the cap and one piece is from the hull so.... they move around. Yeah, I know bad design but it is what it is. Here is the larger picture where the water pools. Even with say a quarter of an inch of rain, it pools a gallon in the well and .. dumps it inside the boat. I know I need to seal from the inside and outside to make sure it does not leak inside but plastic will break so I am thinking of brass. http://www.electronicinstrument.com/apr 26/drain1.jpg
 

jbcurt00

Moderator
Staff member
Joined
Oct 25, 2011
Messages
25,070
Re: I cannot believe that I am asking about floor filling! But I am..

drain1.jpg

That looks like a splashwell, and the thru hull is a splashwell drain. It is not a pipe inside a pipe, or at least it's not supposed to be.

What you've got now looks like a poor attempt to replace a broken or removed drain tube.
drain2.jpg

Brass drains are available, as are aluminum, and plastic:
0210031400d_4.jpg
20368_0.jpg


For the aluminum or brass you'll need the moeller flanging tool:
2563742c_5.jpg


All of the above are available @iboats, and multiple online vendors.

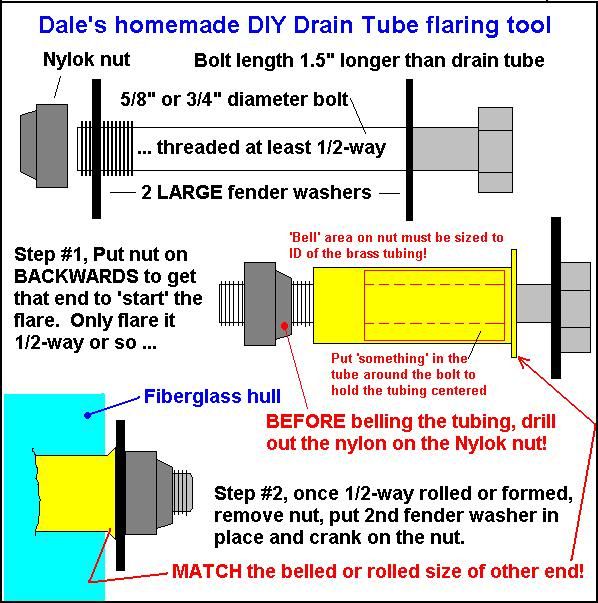
You can also make your own flanging tool:
FlaringTool.jpg

But some have noted that it doesn't work as well as the Moeller does.
 

frankk

Seaman
Joined
Aug 31, 2003
Messages
63
Re: I cannot believe that I am asking about floor filling! But I am..

It REALLY looks bad now lol, thank you for the advise! Will think about the approach I will use while I fiberglass in the stringers this weekend!
More pictures late Sunday...
 

frankk

Seaman
Joined
Aug 31, 2003
Messages
63
Re: I cannot believe that I am asking about floor filling! But I am..

OK, quick question.. (pondering this while on hold on a phone call) If the inside hole is say... 1" what size do I have for the brass tube? Should I allow some play and use very flexible marine caulk take the movement? Or do I want a snug fit? If snug, maybe I drill her out for say 1.5" dis and make it snug that way?
 

jbcurt00

Moderator
Staff member
Joined
Oct 25, 2011
Messages
25,070
Re: I cannot believe that I am asking about floor filling! But I am..

I think the tubes come in 1" & 7/8", you don't want too tight a fit (no room for 3M 4200 or 5200) or too loose, then you have to make sure it doesn't move while curing or the hole might be too big for the flared end to cover & keep it in place.

Does that ^^^ make sense?

Have you replaced the transom? Based on the close up of all that silly-cone around a busted drain tube, isn't good.....
 

frankk

Seaman
Joined
Aug 31, 2003
Messages
63
Re: I cannot believe that I am asking about floor filling! But I am..

I did not replace it but it was replaced a few years ago. Now looking at it from inside "staring" while I scrape... It was a good job. So from what you are saying... loose inside using 3M4200 or 5200 and that is it?
 

jbcurt00

Moderator
Staff member
Joined
Oct 25, 2011
Messages
25,070
Re: I cannot believe that I am asking about floor filling! But I am..

Not too snug & not too loose, then flare the end of the tube, which cinches it down against the fiberglass inside & out.

I don't have a tube in front of me, so I don't know it's outside diameter, or remember exactly what it is. Plus I don't know which you'll buy, Al/Br/plastic, so I don't want to give you a thru hull hole size that won't be correct.

Normally, I could tell you to match the existing thru hull hole size at the exterior transom skin, but given the plywood transom has been replaced and it currently looks like this:
drain2.jpg

normal advice may or may not work, so between snug & loose is the best I can do, for now.
 

frankk

Seaman
Joined
Aug 31, 2003
Messages
63
Re: I cannot believe that I am asking about floor filling! But I am..

OK, got it, so.. assume the 3M4200 or 5200 is to keep it from leaking inside then so liberal application inside before I push the tube through then some on the lip of both glass where the flared out area sits on the glass then?
 

jbcurt00

Moderator
Staff member
Joined
Oct 25, 2011
Messages
25,070
Re: I cannot believe that I am asking about floor filling! But I am..

YEP ^^^

When you get the 3M 42/5200 all over you & the boat, once you've got it flared snug, mineral spirits will clean up the mess.
 

frankk

Seaman
Joined
Aug 31, 2003
Messages
63
OK, now about 90 percent done with the floor. I am using Marine grade plywood and put resin on it all sides before securing it down. I will be placing a layer of glass on it with another coat of resin and then I want to paint it. I want to (kind of) match the interior off-white that the hull has now, to make it look similar. I do not have a gun so will rely on cans or roll it on. Thoughts on which way to go? Manufacturer? Here is my link http://electronicinstrument.com/toocute.html
 

jbcurt00

Moderator
Staff member
Joined
Oct 25, 2011
Messages
25,070
If you used polyester resin on the down side w/out csm, it's not of great value, IMO.
 

Woodonglass

Supreme Mariner
Joined
Dec 29, 2009
Messages
25,928
This ^^^ is true. Without CSM if and when the floor/deck flexes the Poly resin without CSM will crack and peel due to the fact it has no binders. It becomes very brittle once fully cured without CSM
 

frankk

Seaman
Joined
Aug 31, 2003
Messages
63
Yes understand. How about the paint questions, any thoughts? I want to (kind of) match the interior off-white that the hull has now, to make it look similar. I do not have a gun so will rely on cans or roll it on. Thoughts on which way to go? Manufacturer? Here is my link http://electronicinstrument.com/toocute.html It is off-white in color. As everything inside is going to be painted I just want to be close. I hear Rustoleum, do I need primer?
 

Woodonglass

Supreme Mariner
Joined
Dec 29, 2009
Messages
25,928
I still like using the Tractor Paint..See the Last Link in my signature line
 
Top