Hydrolocked in the parkinglot

alldodge

Moderator
Staff member
Joined
Mar 8, 2009
Messages
40,754
Everything was set up by the book.

I would say it was not, or something was damaged when putting together.

Disconnect the cable at the shift plate and see if the cable can be moved until the prop locks in the CCW direction. Then look at the shift foot and see if its facing straight forward
 

gica

Petty Officer 1st Class
Joined
Feb 24, 2016
Messages
393
It is definitely not good yet here's the second video explaining more.
I am going to remove the lower drive again and double check the linkage, the cable and plastic end etc.
In the video I show how the reverse only locks the propeller when I hold it with my fingers.
Why that is is my question.
Once I remove the lower drive the linkage should show if it engages to lock the propeller or not therefore the upper control cable plus mechanisms are at fault or something below not fully engaging the clutches.
 

alldodge

Moderator
Staff member
Joined
Mar 8, 2009
Messages
40,754
Great pic of the foot showing when its in reverse, but no pic of when its in forward. The reverse looks like its one tooth off, as in going to far (why it needs to be pushed wih your finger)
 

Grub54891

Vice Admiral
Joined
Jun 17, 2012
Messages
5,915
Did you replace the lower shift cable? If it hangs up at all you can't adjust it properly. Shooting ideas out here.
 

gica

Petty Officer 1st Class
Joined
Feb 24, 2016
Messages
393
Yes the shift cable is brand new. the remote cables are also semi new. But the remote stuff is not that important the drive doesn't go into reverse even with the cable taken out and pulled manually for reverse. It doesn't pull far enough to engage.
 

Grub54891

Vice Admiral
Joined
Jun 17, 2012
Messages
5,915
Well something is amiss. Wish I was there to get a look for myself.
 

Bondo

Moderator
Staff member
Joined
Apr 17, 2002
Messages
70,525
Great pic of the foot showing when its in reverse, but no pic of when its in forward. The reverse looks like its one tooth off, as in going to far (why it needs to be pushed wih your finger)
Ayuh,..... That's my guess,...
 

nola mike

Vice Admiral
Joined
Apr 22, 2009
Messages
5,073
When it's in forward, does the shaft point straight ahead? Normal behavior for the drive to pop out of gear without a load on it. If you put some pressure on the prop while you turn the shaft it should stay in gear.
@alldodge @achris , how could that shift shaft get off a tooth? Looks like a straight shot to the shift spool on the gen 2, no intermediate shaft in the upper like in a gen 1...
 

alldodge

Moderator
Staff member
Joined
Mar 8, 2009
Messages
40,754
I have yet to see "and would like to see" what the shift foot looks like when its fully locked in forward gear.

Is it dead nuts straight forward or off to one side
 

nola mike

Vice Admiral
Joined
Apr 22, 2009
Messages
5,073
I have yet to see "and would like to see" what the shift foot looks like when its fully locked in forward gear.

Is it dead nuts straight forward or off to one side
Yeah, that's what I was asking above, since it looks like reverse is too far over... But how would it get misaligned?
 

gica

Petty Officer 1st Class
Joined
Feb 24, 2016
Messages
393
Hello thanks to all for commenting on my post. So I was in contact with another guy on a different forum and he actually spent some time with me to give me input on the issues that could cause the shaft foot to not engage reverse.
The shaft foot actually does engage gears if I remove the Mercruiser Upper Lever Arm 45518A3, which I did, then mounted the drive back up without that arm shaft and after raising the drive up I could get my hand inside to turn the shaft foot manually and it was engaging forward and reverse fine. It was a weird experience being down there with the motor running trying to engage the gears. But as I said I bought a new lever arm 45518A3, on mine the roller plastic was a bit chewed up all around. I put it back up again with the new upper shaft arm this time and no reverse, well a bit of reverse but not a permanent solution, mostly gears grinding noise. So I got tired of the back and forth and used a bit of Eastern European ingenuity and Jerry Rigging(back in the old country you solved everything with a hammer:))) and I actually grinded off a portion of the shaft arm that was touching against the wall of the drive, say 3/16 or so. I also grinded part of the cable F looking shift mechanism that the arm moves back and forth(don't remember the name of it right now). It's cast aluminum so it grinded pretty good. Well guys sure enough I put it back together for the 3rd time today and I did get reverse on the short shift cable by pulling on it. Before I could not get it to engage the reverse, just getting the gear grinding noise and no full engaging. So reinstalled the drive and I torqued the 6 bolts reinstalled the hydraulic arms for the trim, I must say it now takes me 2 minutes to remove it all and 4 to put it back. I adjusted the short shift cable to the 6 inches, and then I had a little trouble getting the remote cable to actually engage reverse. But after loosening the 7/16 rear anchor pin(that the head of the lower shift cable attaches to) and moving it a little more than half way up it's slot from the book recommendation of all the way down, it all started to work. I finally got reverse and forward acting the same and engaging before throttle was engaged. the remote cable I adjusted by feel but it is as close to the proper adjustment as it can be. And the cut off switch doesn't get activated to shut off the motor either after some adjustment. The real test will be on water at WOT, but I think no matter what it will still be ok.
Bottom line something moved, got bent the first time I installed the whole thing and the lower shaft foot got ridden by the shaft upon the removal or install of the drive early on. Maybe!
Even though before that I didn't have a smooth reverse engagement either. So maybe the problem was just exacerbated by the two shafts riding each other. Who knows, but the damn thing is great now, quick engagement smooth gears and hard work finally paying off. Remember this whole project started with hydro locking the engine in the parking lot last November. So I had to rebuild the 2BBL carb, remove the manifolds and change flappers, clean manifolds and risers, change rubbers at the elbows,
new gaskets, then new circulation water pump which was actually bad. New raw water pump in the drive, old one looked good though, but did not have water coming out from exhaust and engine was overheating. New seals on the upper drive plus to 2 new bearings on the main shaft that needed to be preloaded with a dial torque wrench. New bellows, hoses, main bearing, and last but not least the gear fluid, and lots of greases.
**** that's a lot of work and I am not so certain it all needed to be done.
But hey I did it myself and saved some money that way.
I will post as soon as I put it on water. I am beat.
 

gica

Petty Officer 1st Class
Joined
Feb 24, 2016
Messages
393
So I finally put it all back together and there was only one issue, the temperature gauge kept going up and down from the middle marker which I assume is 175 to half way to the next marker which would be 185 or so. I mean kept going back and forth between those 2 no matter at what speed I was at.

https://www.dropbox.com/s/omrl3aw4ii...Gauge.mp4?dl=0
 

alldodge

Moderator
Staff member
Joined
Mar 8, 2009
Messages
40,754
Thinking its sucking air or there is an issue with the impeller. Place some clear hose at the thermostat housing on the hose coming from the drive/pump
 

gica

Petty Officer 1st Class
Joined
Feb 24, 2016
Messages
393
I checked and I had bought the 160 thermostat, which should keep temps at or above, my case above. I notice there is a 140 Thermostat guess I will buy that one.
The water hose at the bell housing is brand new so is the impeller and housing plus kit.
Where did you get the clear hose and what size, I assume this comes with a connector/attachment to the existing hose. I have 4 of them at the housing which one did you use?
Mercruiser 5.7 air bubbles in cooling system - YouTube
 
Last edited:

alldodge

Moderator
Staff member
Joined
Mar 8, 2009
Messages
40,754
You can see air coming in, first one right side facing motor
 

gica

Petty Officer 1st Class
Joined
Feb 24, 2016
Messages
393
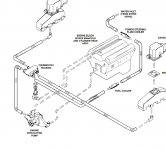
WaterCirculation.jpeg
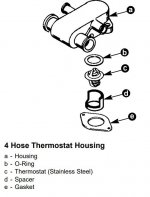
Here is the diagram. Also I have the 4 hose housing and in the manual it says stainless steel thermostat at 160 degrees. I used a 160 stat and temps stay at 175 to 185 back and forth between.
SPECIFICATIONS:
Cooling System Capacity 15 Qts (14.1 L)
Thermostat (Type) Stainless Steel 160° F (71° C)
Thermostat (Type) Brass 143° F (60° C)
That's what I get in the Cooling section
Thermostat.jpeg
 
Top