Hi all, newbie here sharing my fresh project

Dysfunctional_Vet12

Seaman Apprentice
Joined
Mar 9, 2022
Messages
31
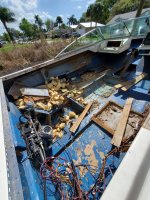
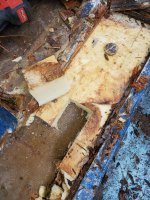
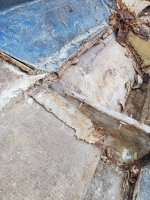
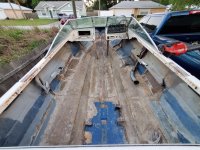
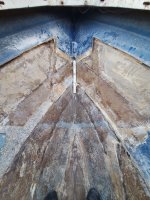
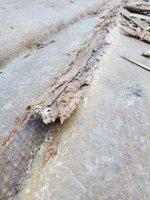
I'll make this a quick one, so I got into tearing the boat down a little bit but had plans over the weekend so I wasn't able to get any further. I started out just doing a few cuts to get an idea of where the Chines come in and make sure I got a good idea of where the hull runs. Also, I did find that cutting the foam like cake and just sliding a putty underneath it would just pop it out with ease so that was a relief.

It wasn't a horrible start but hopefully can get some more done this week since the time change has given a bit more daylight.

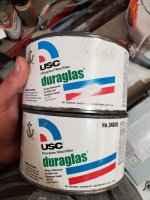
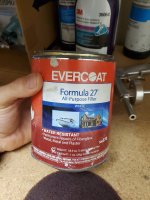
I do have a question though about drill testing the transom, can I use the formula 27 or duraglas filler after the holes are drilled when I'm done? I don't want to allow moisture in if it checks out good. I attached pictures of what I have at my disposal.
 

Attachments

  • 20220313_115540.jpg
    20220313_115540.jpg
    3.1 MB · Views: 23
  • 20220312_173349.jpg
    20220312_173349.jpg
    2.8 MB · Views: 23
  • 20220315_102806.jpg
    20220315_102806.jpg
    1.6 MB · Views: 22
  • 20220315_102633.jpg
    20220315_102633.jpg
    1.6 MB · Views: 23

Scott06

Admiral
Joined
Apr 20, 2014
Messages
6,441
I'll make this a quick one, so I got into tearing the boat down a little bit but had plans over the weekend so I wasn't able to get any further. I started out just doing a few cuts to get an idea of where the Chines come in and make sure I got a good idea of where the hull runs. Also, I did find that cutting the foam like cake and just sliding a putty underneath it would just pop it out with ease so that was a relief.

It wasn't a horrible start but hopefully can get some more done this week since the time change has given a bit more daylight.

I do have a question though about drill testing the transom, can I use the formula 27 or duraglas filler after the holes are drilled when I'm done? I don't want to allow moisture in if it checks out good. I attached pictures of what I have at my disposal.
Id use the duraglass seems to hold up well.
 

Dysfunctional_Vet12

Seaman Apprentice
Joined
Mar 9, 2022
Messages
31
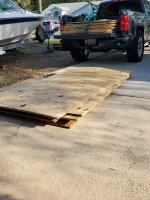
So I have just been messing around a little bit with figuring the best way to tearing the deck/stringers out. I've been limited on time lately in the evenings but I've made a little progress. I did however manage to score even more plywood A LOT MORE!! I now have 21 sheets of exterior and marine plywood that I got for free so I'm still $0 into the boat. Hopefully by Sunday I will be ready to start sanding and looking at ordering my glass materials.
 

Attachments

  • 20220318_174138.jpg
    20220318_174138.jpg
    2.3 MB · Views: 18

Dysfunctional_Vet12

Seaman Apprentice
Joined
Mar 9, 2022
Messages
31
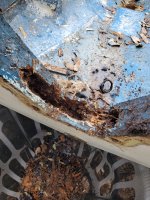
Well, I had prepared for it but received my answer after removing the gimbal housing.
 

Attachments

  • 20220319_170556.jpg
    20220319_170556.jpg
    2.5 MB · Views: 24

racerone

Supreme Mariner
Joined
Dec 28, 2013
Messages
37,828
It is a shame how boats are built.----Good materials are not that much more $$$-----But it is a " GOLDEN RULE " of manufacturing.-----There is no point in building a quality / top notch product if you can not convince people to buy it.----Or people can not afford it.------Most people buying their first boat know nothing about the marine environment.-----Price is what folks look at.-----Many boats out there with owners that are not aware of the dangers.
 

Dysfunctional_Vet12

Seaman Apprentice
Joined
Mar 9, 2022
Messages
31
It is a shame how boats are built.----Good materials are not that much more $$$-----But it is a " GOLDEN RULE " of manufacturing.-----There is no point in building a quality / top notch product if you can not convince people to buy it.----Or people can not afford it.------Most people buying their first boat know nothing about the marine environment.-----Price is what folks look at.-----Many boats out there with owners that are not aware of the dangers.
I agree, the bad part is this boat was "done" in 2014 transom, stringers, and deck. I noticed the gentleman actually was a bit more excessive than the factory did in his attempt at glassing everything in. But it didn't adhere as it should have. I was able to rip up pretty decent sections of the fiberglass in some spots not attached to rotted wood.

It's a shame though because of how thorough that guy was. He went even as far as journaling every single day he touched the boat and saving it to the CD with all the pictures of his process and every reference he used as well as maintenance manuals and anything else you could think of about the boat.

I think I'm going to gel coat everything when I'm done in an attempt at making sure it's sealed up better than it was. I have a little bit of research to do on it first though.
 

Dysfunctional_Vet12

Seaman Apprentice
Joined
Mar 9, 2022
Messages
31
Funny story, I have looked into a thread on here quite a few times from 2012 for the last few weeks and l things started clicking

THIS IS MY BOAT!!!!

It's funny how things can be sometimes.

I've put in a few more hours and am taking my time making sure I have reference pictures and info for my buildup. I will be giving updates as I get a bit further. Nothing spectacular is going on yet.
 

tpenfield

Moderator
Staff member
Joined
Jul 18, 2011
Messages
18,040
You mean that your boat was re-done (on this forum) 10 years ago, and now is rotten? :unsure:

I noticed the person doing the rebuild at the time did not finish the thread, having run into a fuel tank 'fit' issue.

BTW - the glassing on the transom (back in 2012) did not look good . . . dry and air pockets.
 

Dysfunctional_Vet12

Seaman Apprentice
Joined
Mar 9, 2022
Messages
31
You mean that your boat was re-done (on this forum) 10 years ago, and now is rotten? :unsure:

I noticed the person doing the rebuild at the time did not finish the thread, having run into a fuel tank 'fit' issue.

BTW - the glassing on the transom (back in 2012) did not look good . . . dry and air pockets.
Yea, see that is what I can't understand, unless it was just poor glassing. I have the entire left side cut out and every bit of the wood it rotted save for a couple inches here and there. And some spots have very poor adhesion to the hull to the point where I can basically peel it off.

I am taking pictures of things here and there that I want to post to see where it may have been done wrong so as I don't make the same mistakes.

Your take on the transom shows for sure. I was almost able to shop vac the rot out above the drain plug.

Also, ill add that i had thought it was redone even later than that
 
Last edited:

mickyryan

Rear Admiral
Joined
Apr 18, 2016
Messages
4,214
he might have given up and sold it to someone else who knows but big thing is you are here and can do it right :) i have seen far worse work on boats with crazy popular brand names lol
 

Dysfunctional_Vet12

Seaman Apprentice
Joined
Mar 9, 2022
Messages
31
he might have given up and sold it to someone else who knows but big thing is you are here and can do it right :) i have seen far worse work on boats with crazy popular brand names lol
It was completed, the folder I got with the boat had a CD with a bunch of info and pictures, including his finished work.

The guy went all out with it and as I'm tearing it down I've noticed he went a bit above and beyond with his work. one thing I don't understand is why he made the bulkhead continue past the stringers to each side of the boat. It was not originally built like that.

I have not been able to tell where a lot of the moisture was getting in since it was consistently rotted throughout the entire boat, but I have noticed that a lot of his tabbing did not adhere to the hull very well since it comes up in solid pieces with a pry bar here and there.

I do know it has sat for years under a tree uncovered save for the captains seats. it was filled with leaves and had puddles everywhere due to the drains clogging shut. or so I'm told by the individual that had picked it up from the previous owner. I have not spoken to him at all, which would actually be nice.
 

Dysfunctional_Vet12

Seaman Apprentice
Joined
Mar 9, 2022
Messages
31
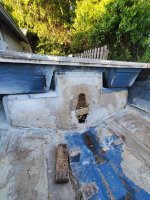
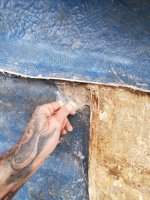
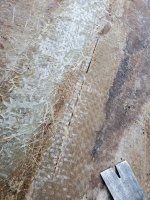
Here's a few shots of my progress as well as where I found poor adhesion to the hull and was able to use a pry bar to get it to basically peel right off which lucky for me will take away some of my sanding.

I noticed that the guy that did the repair before added an extension to edge of the hull with the bulkheads even though it originally did not have that. I myself will not be doing this. He also used pl glue to adhere the stringers to the hull, I myself will be making pb.

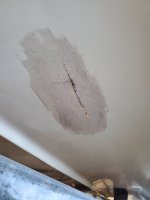
I also found out where all the moisture has gotten in. I read in a journal he had saved on the CD of documentation the boat came with that he had cut a good bit into the hull.... There was no real attempt to patch the inside. WHY NOT?!?! So that will be a priority once I get my materials. I knew there was something going on there when i was looking at the hull initially but until I started stripping the boat it had opened up due to the flexing from me walking around in there. It's not a big deal I will be spraying the inside with gel coat in the end so I will have to figure out how to blend that on the outside when I get to that point for a cleaner repair.
 

Attachments

  • 20220327_185238.jpg
    20220327_185238.jpg
    3.7 MB · Views: 16
  • 20220323_183250.jpg
    20220323_183250.jpg
    2.5 MB · Views: 15
  • 20220322_185723.jpg
    20220322_185723.jpg
    3.1 MB · Views: 16
  • 20220330_193200.jpg
    20220330_193200.jpg
    4 MB · Views: 15
  • 20220330_192927.jpg
    20220330_192927.jpg
    2.9 MB · Views: 14
  • 20220330_182607.jpg
    20220330_182607.jpg
    2.8 MB · Views: 13
  • 20220330_175026.jpg
    20220330_175026.jpg
    2 MB · Views: 12
  • 20220330_185358.jpg
    20220330_185358.jpg
    3.1 MB · Views: 11
  • 20220330_185527.jpg
    20220330_185527.jpg
    1.6 MB · Views: 12
  • 20220330_185323.jpg
    20220330_185323.jpg
    1.3 MB · Views: 15

Dysfunctional_Vet12

Seaman Apprentice
Joined
Mar 9, 2022
Messages
31
I think from the photos it looks like there was inadequate prep wok of the old surfaces to get a good bond, doesn't look like it was really ground down enough to make it adhere properly or had grease left on it.
I agree, I'm assuming the lighter blue color you see is the original paint so I will be as thorough as I can be on my prep work.

I am going to sand it all down to the woven roving (I think it's called, please correct me if I am wrong).

Any advice on the prep process would be greatly appreciated.
 

todhunter

Canoeist
Joined
Sep 15, 2020
Messages
1,311
Angle grinder with 40 grit flap discs. I bought cheap Amazon discs (about $1.50 each) and went through 3 or 4 10-packs on my 19ft hull. You'll want to do this grinding outdoors and cover as much of yourself in Tyvek / goggles / respirator / etc. to protect yourself. I did mine indoors and built a sealed "tent" to work in - still got fiberglass dust all over my garage. When grinding, start by grinding back the tabbing and any delaminated areas. You'll get to where you can see deeper delaminations as lighter colored than the surrounding glass and you can chase those...just be careful to not grind all the way through. If you start seeing no glass fibers where you're grinding, or you start to see the gelcoat color of the outside...stop grinding! As you get a little time under your belt, it's easy to visually tell when you're grinding CSM vs. 1708 vs. roving, etc.

Once you vaccum / rinse out all the dust, wipe the areas down with liberal amounts of acetone immediately prior to laying up new glass. If your acetone-soaked paper towel comes back dirty, continue wiping until you get a clean paper towel. Then don't touch the surface with bare hands or walk on it with dirty shoes, and start your layups.
 

Dysfunctional_Vet12

Seaman Apprentice
Joined
Mar 9, 2022
Messages
31
Angle grinder with 40 grit flap discs. I bought cheap Amazon discs (about $1.50 each) and went through 3 or 4 10-packs on my 19ft hull. You'll want to do this grinding outdoors and cover as much of yourself in Tyvek / goggles / respirator / etc. to protect yourself. I did mine indoors and built a sealed "tent" to work in - still got fiberglass dust all over my garage. When grinding, start by grinding back the tabbing and any delaminated areas. You'll get to where you can see deeper delaminations as lighter colored than the surrounding glass and you can chase those...just be careful to not grind all the way through. If you start seeing no glass fibers where you're grinding, or you start to see the gelcoat color of the outside...stop grinding! As you get a little time under your belt, it's easy to visually tell when you're grinding CSM vs. 1708 vs. roving, etc.

Once you vaccum / rinse out all the dust, wipe the areas down with liberal amounts of acetone immediately prior to laying up new glass. If your acetone-soaked paper towel comes back dirty, continue wiping until you get a clean paper towel. Then don't touch the surface with bare hands or walk on it with dirty shoes, and start your layups.
Thanks for the advice! That helps a lot.

I'm set as far as PPE (except for a new tyvek suit) and tools I will need so that's good. I plan on running to Harbor Freight and Home Depot this weekend to get some stuff so I will add acetone to the list.

I have a small 10x10 portable shed like this one that I think I am going to see if I can fit at least most of the boat in while doing the sanding to hopefully cut back on the dust. It has been super windy here in Central Florida the past week or so, id like to at least try not to cover the neighborhood (and my other vehicles). Also the heat is finally starting to come in so id like to get the tyvek suit out of my life asap.

As far as cleaning up the dust, I have rigid shop-vac with a hepa filter that claims to be for fine dust but an still seeing a lot of the dust coming from the output side of the vac. So I think I will be trying to locate a bag compatible with it.

Before I go crazy with sanding it yet, I want to make some mock up pieces for a few spots out of polystyrene since I think it will make my life easier in the future. The plan is to hopefully get this all done so I can pick up materials start building stringers by next weekend. Wish me luck!
 

todhunter

Canoeist
Joined
Sep 15, 2020
Messages
1,311
Your shop vac filter will clog in no time at all. You'll need to get a dust cyclone attachment to keep from having to stop to clean the filter every minute ot two. I bought one called a Dust Deputy. I also got a long (13 ft?) hose for my shop vac and a remote controlled outlet to plug the shop vac into. That way the vac could be out of the boat, hose in there with me, and I could turn it on and off with the remote so I didn't have to climb in and out a bunch.
 

Dysfunctional_Vet12

Seaman Apprentice
Joined
Mar 9, 2022
Messages
31
Your shop vac filter will clog in no time at all. You'll need to get a dust cyclone attachment to keep from having to stop to clean the filter every minute ot two. I bought one called a Dust Deputy. I also got a long (13 ft?) hose for my shop vac and a remote controlled outlet to plug the shop vac into. That way the vac could be out of the boat, hose in there with me, and I could turn it on and off with the remote so I didn't have to climb in and out a bunch.
That's funny I was just looking at harbor freights version of the dust deputy and was considering grabbing one. I think I do have some more hose at work I can bring home and run through the transom hole. Good idea.
 

buxmj

Petty Officer 1st Class
Joined
Jun 9, 2018
Messages
294
Where are you in Central Florida? I am in Lake Mary, hope to meet you in person with both our boats on the water someday! I did my grinding outside under an enclosed tent in July, it was brutal! A few things that helped is I used heavier 7mm Harbor Freight rubber gloves, put them on first, take them off last and put leather work gloves over those. Put a bucket hat on and fold the front lip up once you pull the tyvek hood over the hat, keeps the itchies off of your head and neck, wear ear muffs for hearing protection but also keeps the itchies out of your ears and of course a respirator. Take breaks and have plenty to drink. It sucks but like everyone says it is the worst part, you will be into the reconstruction soon after the grinding. Good luck!
 

Dysfunctional_Vet12

Seaman Apprentice
Joined
Mar 9, 2022
Messages
31
Im in Cocoa, next to the Space Center. I'm definitely trying to get the major itchy bits out of the way as quick as possible. I brought home a full face respirator from work so that will help since my goggles I was wearing had small vent holes in them. I also picked up a new tyvek today.
 
Top