help lower unit shift screw!

Boat-ryder

Petty Officer 3rd Class
Joined
May 19, 2012
Messages
87
Got water intrusion in the lower unit so I figured before ordering complete seal kit I would replace all fill plug seals and also the clutch dog screw o-ring. Well after taking the screw out the clutch dog fell down. After about an hour of playing around with the shift rod I got screw back in. But the shift rod still moves up and down freely and it won't shift in or out of gears. Right now its stuck in forward. Playing with prop and shift rod has no effect and I am positive the screw is back in. What could of happened? Thanks
 

pnwboat

Rear Admiral
Joined
Oct 8, 2007
Messages
4,251
You have to pull the prop shaft, and reverse gear out to get it back in.
 

pnwboat

Rear Admiral
Joined
Oct 8, 2007
Messages
4,251
The pin goes through the shifting fork. The shifting fork pivots and is held in place on the pin. Once you remove the pin, the shifting fork falls out of place and is no longer functional.

You can put the pin back into place, but since it no longer goes through the shifting fork, the shifting fork just kind of flops around on the end of the shifting rod and doesn't do anything.

There's also a chance that the shifting yoke may have fallen off of the clutch dog pin. The shifting fork holds it in place.

That's why you have to take it apart to get it all back together. Not the best design, but it works.
 

Boat-ryder

Petty Officer 3rd Class
Joined
May 19, 2012
Messages
87
Ah thanks for the response. Any thing have to be replaced when pulling prop shaft other than the 2 outer seals? Also will all gears stay together on shaft when pulled out? Im a mechanic but not an outboard mechanic just wondering if I'm going to need a manual in order to remove and install the shaft after I realign the clutch dog.
 

jerryjerry05

Supreme Mariner
Joined
May 7, 2008
Messages
18,049
The manual will help or a parts diagram would help too.

​Try not to remove the top plate as the re-sealing can be tough.

You said water intrusion. Where??

Do a pressure test before you take it all apart.
That way you can do the right repair as you work.
 

pnwboat

Rear Admiral
Joined
Oct 8, 2007
Messages
4,251
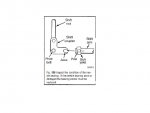
There is a large "O" ring seal around the prop shaft bearing carrier. The gears just sit on the shaft and slide right off. Attached below is a diagram of the shifting mechanism. The diagram is illustrated with the front of the lower unit pointing to the left.

The "L" shaped shift coupler (shift fork) has a hole where the pivot bolt goes through. First line up the hole in the shift coupler with the hole in the lower unit and insert the pivot bolt. Tighten up the bolt and make sure the small "O" ring that seals the bolt is in place. The illustration shows the shift coupler positioned with the shift rod pushed down for re-assembly. It must be in this position so the jaws will engage the shift yoke post or pins. The shift yoke is horse shoe shaped with an open end. The open end must be pointed down as it sits on a groove on the shift arm. I use a dab of grease to hold the shift yoke on the shift arm to keep it from turning and falling off. Push the propeller shaft assy. forwards until the shift yoke engages the slots or jaws in the shift coupler. Insert the reverse gear onto the shaft to kind of hold the propeller shaft centered. Hold the propeller shaft in and pull up on the shift shaft. It should shift into reverse and forward. You might have to insert the bearing carrier assy. too to get a better feel.
Shift pin.jpg


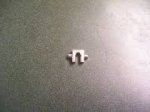
Here is a picture of the shift yoke that sits on the shift arm.
shift yoke.jpg


Good luck. Feel free to ask any questions if you run into any problems.
 
Last edited:

Boat-ryder

Petty Officer 3rd Class
Joined
May 19, 2012
Messages
87
Thanks again for the response. I bought a seal kit before all this happened and it should be in Wednesday. I understand most of what you explained and it should get the rest once its in my hands. Will definitely repost if I have any probs.
 

Boat-ryder

Petty Officer 3rd Class
Joined
May 19, 2012
Messages
87
The manual will help or a parts diagram would help too.

​Try not to remove the top plate as the re-sealing can be tough.

You said water intrusion. Where??

Do a pressure test before you take it all apart.
That way you can do the right repair as you work.

What do you mean by top plate?
 

Boat-ryder

Petty Officer 3rd Class
Joined
May 19, 2012
Messages
87
OK got a question already. Can't remove prop shaft. Prop is off and I'm looking at the bearing carrier nut which is marked to show it has reverse threads. I'm guessing there is a special tool for this? Can anyone tell me what tool this is and where to get one? Also are there any other special tools needed to complete this job? Thanks
 
Last edited:

pnwboat

Rear Admiral
Joined
Oct 8, 2007
Messages
4,251
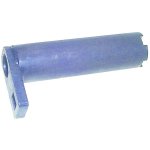
Yes there is a special tool to remove the bearing carrier nut. I don't think that it is reverse threads though.....at least I've never run across one with reverse threads. I just made a tool myself to remove the nut.
 

Boat-ryder

Petty Officer 3rd Class
Joined
May 19, 2012
Messages
87
Yes there is a special tool to remove the bearing carrier nut. I don't think that it is reverse threads though.....at least I've never run across one with reverse threads. I just made a tool myself to remove the nut.

I thought about coin that but If I can get a tool quicker ilk buy it. I even consider breaking the but into pieces and just replacing since I think it is guna be hard to remove even with tool. One I get this but off will I need any kind of puller or will the shaft assy come out easy?
 

pnwboat

Rear Admiral
Joined
Oct 8, 2007
Messages
4,251
The bearing carrier should come out with little effort. There may be some corrosion that prevents it from coming out, but you don't need a special tool or anything like that. The "O" ring around the carrier assy, is the only thing that seals the assy, so it's not that hard. Just pull it out as evenly as possible.
 

jerryjerry05

Supreme Mariner
Joined
May 7, 2008
Messages
18,049
The 'nut can be cut out but your gonna need a tool to reinstall it and torque it to specs.
It also cost about $40

FT 11275 part # for the tool.
They have some listed on e-bay but measure the nut so you get the right size.

​I've never had a carrier fall out.
You need a puller with long arms.
 

Boat-ryder

Petty Officer 3rd Class
Joined
May 19, 2012
Messages
87
The 'nut can be cut out but your gonna need a tool to reinstall it and torque it to specs.
It also cost about $40

FT 11275 part # for the tool.
They have some listed on e-bay but measure the nut so you get the right size.

​I've never had a carrier fall out.
You need a puller with long arms.

Having trouble finding the tool online. Is there a certain name brand? Or would you mind giving me a kink? Only one I found shows for a mercury and doesn't list its size
 

pnwboat

Rear Admiral
Joined
Oct 8, 2007
Messages
4,251
It's not something that is very common. I made my own tool from a piece of pipe that was the correct diameter.....can't remember the exact diameter off hand. Cut 4 notches in it with a hacksaw to form 4 tangs that stick out and it works great.
 

Boat-ryder

Petty Officer 3rd Class
Joined
May 19, 2012
Messages
87
It's not something that is very common. I made my own tool from a piece of pipe that was the correct diameter.....can't remember the exact diameter off hand. Cut 4 notches in it with a hacksaw to form 4 tangs that stick out and it works great.

How did you make the opposite end? The part a bar or wrench would hook onto
 

pnwboat

Rear Admiral
Joined
Oct 8, 2007
Messages
4,251
Got a cheap large Harbor Freight 1/2" drive impact socket that fit pretty close to the inside diameter of the pipe and brazed it. Doesn't have to be a perfect fit, I think I had to grind the socket down a bit to get it in.
 

Boat-ryder

Petty Officer 3rd Class
Joined
May 19, 2012
Messages
87
Got a cheap large Harbor Freight 1/2" drive impact socket that fit pretty close to the inside diameter of the pipe and brazed it. Doesn't have to be a perfect fit, I think I had to grind the socket down a bit to get it in.

Any chance you could get me the measurement on that pipe? Im pretty sure its 3 1/4 but it's hard to be exact with the prop shaft in the way. No hurry just whenever you get a chance.
 
Top