Glastron soft floor

ItsNick

Cadet
Joined
Sep 14, 2024
Messages
15
Hello,


first time poster, long time reader. Wealth of knowledge here!


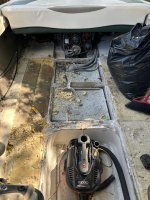
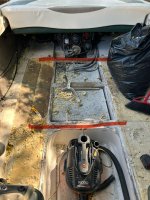
recently picked up a 2002 glastron gx205 bowrider. First boat! Got a great deal on it due to the floor feeling soft.


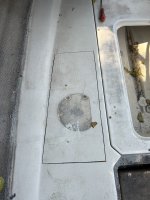
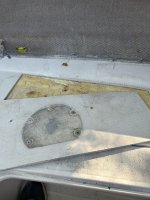
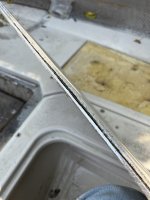
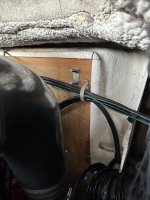
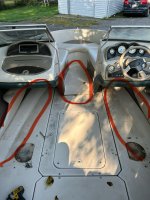
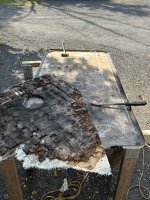
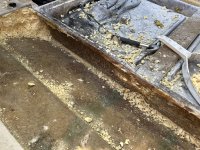
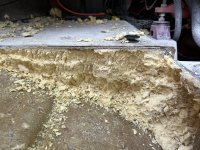
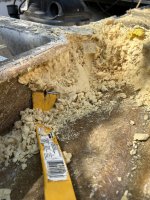
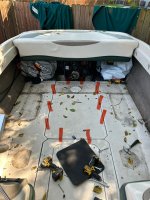
I've read much on replacing rotting plywood floors in boats and feel confident that I could tackle such a project. Pulled out the interior today and cut out a small section under the passenger pedestal seat, What I found has me stumped. Seems that there is no plywood, only a very thin (~3/16") section of layered fiberglass and an aluminum backing plate for the seat. Under that is flotation foam. No wonder you could see the floor move when you rocked the seat back and forth!


Elsewhere the floor seems to be made up of a series of hatches that are screwed down. Most of which are soft under foot. They seem to be made of plywood. I've read some about "hatch recoring". I think that's the best avenue of approach for them.


my questions are as follows:


How did I go about fixing the section I've cut up? There are no stringers visible in the area I've removed, in other words, nothing to attach the new patch to.


it some floor movement expected with boat built this way? It's an odd method to build something. And doesn't feel very reassuring.


thank you for any help!


Nick
IMG_0962.jpeg
 

Attachments

  • IMG_0964.jpeg
    IMG_0964.jpeg
    2.5 MB · Views: 16
  • IMG_0967.jpeg
    IMG_0967.jpeg
    2.3 MB · Views: 16
  • IMG_0966.jpeg
    IMG_0966.jpeg
    1.3 MB · Views: 17

alldodge

Moderator
Staff member
Joined
Mar 8, 2009
Messages
41,736
Welcome
Yes Glastron makes a pretty cheap boat. What I see is 1/4 plywood and the rest is glass and gelcoat

Best way to fix it to where it will last is rip it all out and start over.

Otherwise I would cut a bunch more out of it. Maybe more toward bow then stern but doing both will increase strength. Grind some of the foam down enough to be able to use at least 1/2 ply.

Grind and feather the edges so some tabbing can be installed and over lapped on both edges. Going down over the inside edge even better.Once in there, drill some holes and use some of the closed cell foam like stuff-it and fill voids

Once dry place layer over holes and re-gelcoat

glastron.jpg
 

Scott Danforth

Grumpy Vintage Moderator still playing with boats
Staff member
Joined
Jul 23, 2011
Messages
49,021
If the floor is rotten, the transom long ago rotted and the foam is most likely waterlogged
 

ItsNick

Cadet
Joined
Sep 14, 2024
Messages
15
Thank you for the information. It seems the transom was previously repaired and is solid from the looks of it. I would prefer to replace the entire floor if possible. Do it right once.

Unfortunately I can't get to the bow section, as it looks like the console is all one piece and covers that area. I'd rather not try to remove the entire top half of the boat, so I may need to cut out just what I can get to. It feels solid up there so im hoping I can get away with it.

Alldodge, your advice seems sound. Thank you. I will rip out what I can access and replace with glassed 1/2" or 3/4 ply. Whichever brings me to the same height as the bow section floor. There are several screw holes aft that have obviously allowed water into the foam underneath. Will investigate further as the floor comes up.
 

Attachments

  • IMG_0952.jpeg
    IMG_0952.jpeg
    783 KB · Views: 8

airshot

Rear Admiral
Joined
Jul 22, 2008
Messages
4,876
I thought you stated " Do it right once" if you mean that, you will physically check the transom and rest of the hull. If your hull is compromised, having a nice floor won't keep it afloat...
 

Scott Danforth

Grumpy Vintage Moderator still playing with boats
Staff member
Joined
Jul 23, 2011
Messages
49,021
Uncapping is how you do it right. May seal like more work, it's actually less than leaving the cap on
 

ItsNick

Cadet
Joined
Sep 14, 2024
Messages
15
Here's some pictures of the transom behind the motor. I have no idea if this is original, but it looks like a section has been cut out previously. This is what leads me to believe it was repaired at some point in the past. Maybe they let it leave the factory floor with saw overcuts in the corners? The transom sounds solid everywhere when tapped with a hammer, I'm a machinist and blacksmith by trade, I know my way around one. Pushing on the out drive causes zero deflection.

Please advise! Thanks!
 

Attachments

  • IMG_0972.jpeg
    IMG_0972.jpeg
    1.7 MB · Views: 19
  • IMG_0973.jpeg
    IMG_0973.jpeg
    1.9 MB · Views: 18
  • IMG_0974.jpeg
    IMG_0974.jpeg
    1.7 MB · Views: 17

ItsNick

Cadet
Joined
Sep 14, 2024
Messages
15
I unfortunately lack the experience, know how and space to separate the hull. First day messing with boats. Just a guy with a good understanding of most things mechanical and plenty of carpentry experience in homes.
 

alldodge

Moderator
Staff member
Joined
Mar 8, 2009
Messages
41,736
Agree with you someone did replace the transom, but ..... (yes the but) they didn't replace it correctly. They should have ground the glass off around the edges and then lay layers of glass back on top the wood

To get all into doing it mostly right.
Rip all the foam out, grid and clean the stuff off the inside and buid the entire box with thicker wood. Build deck back, and then drill 2 inch holes in a few places on the deck after deck has been re-glassed.

Pour some close cell foam into the cavity holes and watch foam come back out those and other holes. Foam dry's, now take plug 2 inch holes and place back in the holes drilled. Glass back over the holes and cover with gelcoat or what ever you want to use
 

ItsNick

Cadet
Joined
Sep 14, 2024
Messages
15
Alldodge, thank you for the information. Think I'll roll with the shotty repair of the transom. Seems to be doing what it needs to currently and this is a 5 year boat for me at best. Question: can I cut the section circled out of the bow section "cap" which will hopefully give me the ability to finagle the ski locker hatch out for repair. Repairing the section with fiberglass afterwards? It seems like they sandwiched carpet under there which just seems idiotic to me. Or how would you go about addressing the bow of the boat without uncapping?

Also, the floor has an angled section built in around the two captains chairs. Just cut that out and replace with flat plywood or try to match the angle? Sorry for the uninformed questions. Just trying to learn!
 

Attachments

  • IMG_0952.jpeg
    IMG_0952.jpeg
    780.8 KB · Views: 15

ItsNick

Cadet
Joined
Sep 14, 2024
Messages
15
This is a photo of the hatch that covers the fuel tank. I plan to replace this with a cutout section of plywood, fiberglassed on both sides and expoxied to the hatch. Hopefully that is correct.
 

Attachments

  • IMG_0969.jpeg
    IMG_0969.jpeg
    3.9 MB · Views: 16

airshot

Rear Admiral
Joined
Jul 22, 2008
Messages
4,876
Keep in n nd that fiberglass itself has very little strength that is wht the wood or other structure material. With the look of the rotten wood under that fuel tank cover, you will have more issues the deeper you dig. Boats rot from the bottom up, not down from the top !! As q boat owner for over 60 years, I don't have enough fingers and toes to count the number if times I have saw this, and none have come out good.. Good luck !
 

alldodge

Moderator
Staff member
Joined
Mar 8, 2009
Messages
41,736
When doing a project like this it can be replaced same as original, or can do it your way. Looking at the angle, I would guess it's just 2 pieces of 1/4 ply and glass. You can decide to use a single piece of ply and go clear to the edge and glass in

Your looking at a full gut the further the discussion goes. As Airshot mentioned, the further you go you will find out the bottom is probably soaked
 

ItsNick

Cadet
Joined
Sep 14, 2024
Messages
15
Made a little progress this morning. The way this boat is built is interesting. I don't see any stringers in the sense of a joist under a home floor. Seems like it's made in sections of molded fiberglass that I assume are laid into the hull and attached somehow.

I don't believe I'll be able to remove all the foam in the boat. But on the bright side, it doesn't seem totally saturated anyway. Especially the further forward I work. It does get wetter the further down I get, which makes sense. But I have reached the deepest I can reach and only the last inch or so has any water in it. It's not even dripping at that, you have to squeeze the foam to produce any water. Looks like there's more foam under the "tray" that the fuel tank sits in, but I don't think it's worth trying to remove it.

Pictures show my progress. Should I continue on removing the foam I have uncovered or leave it be and start building a new deck?
 

Attachments

  • IMG_0977.jpeg
    IMG_0977.jpeg
    2.4 MB · Views: 19
  • IMG_0978.jpeg
    IMG_0978.jpeg
    4.6 MB · Views: 51
  • IMG_0979.jpeg
    IMG_0979.jpeg
    2.5 MB · Views: 18
  • IMG_0980.jpeg
    IMG_0980.jpeg
    2.4 MB · Views: 18

alldodge

Moderator
Staff member
Joined
Mar 8, 2009
Messages
41,736
Does look dry forward, The stringers next to tank look dark, most likely their wet

Good progress
 

ItsNick

Cadet
Joined
Sep 14, 2024
Messages
15
Yes that small section of plywood is wet. I will replace. Seems like it's just a small strip glassed to the bottom of the lip of the "tub" the fuel tank sits in. There is no joist like stringer as I've seen in many how to videos. Odd way to do things. And here I was thinking glastron made a middle of the road boat. Water under the bridge now.

Any problem with leaving the dry foam and filling the voids as previously instructed? I've started to chip out the other side since the pictures were taken.
 

alldodge

Moderator
Staff member
Joined
Mar 8, 2009
Messages
41,736
Stringers run bow the stern and your saying this is not a stringer that's in the pic
img_0978-jpeg.401329
 

ItsNick

Cadet
Joined
Sep 14, 2024
Messages
15
Correct. What you see is the outside of the "tub" the fuel tank sits in. Think of an aluminum baking tin. Very similar in shape. There is what seems like a small strip of 1/2" plywood ~1" wide glued to the bottom of the lip of the tub, which I assume was put there to provide backing for the screws that once held down the hatch over the fuel tank.

No evidence that a full depth stringer was ever present. No rotted wood, just foam. Foam also travels from side to side under the front edge of the tub, Highlighted in red. Hopefully I'm doing a good job describing it. Very odd to me. I was expecting it to look like the underside of a home floor, but it does not.
 

Attachments

  • IMG_0977.jpeg
    IMG_0977.jpeg
    992.2 KB · Views: 6
  • IMG_0983.jpeg
    IMG_0983.jpeg
    253.8 KB · Views: 6
  • IMG_0962.jpeg
    IMG_0962.jpeg
    845.2 KB · Views: 6

ItsNick

Cadet
Joined
Sep 14, 2024
Messages
15
It seems to me that the foam provides much of the support for the floor in this boat. I see there are two different density foams available through total boat. 2 and 6lb. The latter being designed to provide structural support. I think it's smart to go with the 6lb variety in my case.
 

alldodge

Moderator
Staff member
Joined
Mar 8, 2009
Messages
41,736
6lb is required for fuel tank, and boats with no stringers it must use 6 lb
Below is me starting with the transom and wound up ripping up a lot more

Transom
 
Top