Garboard drain cover

pbtodd

Cadet
Joined
Oct 28, 2020
Messages
10
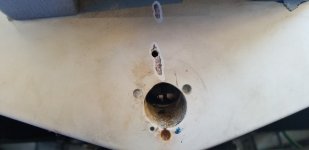
I noticed my garboard drain cover was a little loose when I installed the plug. So I decided to reseal it. I removed the screws and garboard drain cover and a little bit of water drained out of the bilge. I think some of the water got in the bottom screw hole and used a heat gun to dry it out. While doing that, I could see small drops of water coming out of the screw hole. The water drops were developing about 3/16" inside the hole, at the 10 o-clock position from the same spot every time. See attached pic for location. Had to use 5 Q-tips to dry it out. Is this anything to worry about? Should I drill a small hole besides it to see if there is any more water?

Also, I noticed a spider crack in the gelcoat above the hole for the garboard, see attached pic. Is this anything to be concerned about?


holes.png
 

Scott Danforth

Grumpy Vintage Moderator still playing with boats
Staff member
Joined
Jul 23, 2011
Messages
47,494
first, welcome aboard

second, most likely your transom is wet

the crack is from water freezing. that is also what caused your garboard plug base to come loose

there would be no drying the wood with q-tips

time to make some test drills from inside the bilge. most likely you are looking at a restoration. especially if your boat is over 15 years old.
 

JASinIL2006

Vice Admiral
Joined
Feb 10, 2012
Messages
5,539
I'd drill some test holes from the inside, one on either side of drain and one above the drain, about 2" away. If the shavings come out light and dry, you're good (and lucky!). If the shavings are dark and/or wet, go out another 6" and drill again. If those shavings are dark/wet, you have some work ahead of you.

Let us know what you find. I was amazed on my boat that the garboard fitting was installed apparently without any kind of sealant and with very little protection for the wood through which the hole was drilled. Still, that was not the source of water that caused my transom to rot. In your case, better to check and find out for sure your boat is still sound.
 

pbtodd

Cadet
Joined
Oct 28, 2020
Messages
10
Thanks for the welcome and appreciate the feedback from both of you. Unfortunately, I can't access the inside of the drain hole. It's a Monterey 262 cruiser. Thinking I should drill a hole on the outside within the drain cover, like rotating the cover 30 degrees and see if those holes are wet? I drilled a bigger hole in the bottom screw hole and it was dry, except for water bubbling out in that one area. Is a moisture meter very accurate? I recently purchased this boat and had a survey done and the hull was good. I'm hoping this is just from when I removed the drain cover and some water "ran" into the hole upon removing the cover.
 

Scott Danforth

Grumpy Vintage Moderator still playing with boats
Staff member
Joined
Jul 23, 2011
Messages
47,494
that crack above the drain hole indicates that you have a wet transom and it froze
 

Grub54891

Vice Admiral
Joined
Jun 17, 2012
Messages
5,911
I recently purchased this boat and had a survey done and the hull was good.
I've far to many that were surveyed good that are in fact not. Best check with the previous suggestions.
 

pbtodd

Cadet
Joined
Oct 28, 2020
Messages
10
I can't access the inside of the drain hole, the engine would need to be pulled out in order to drill some holes to see if it is wet. I showed it to the owner of the boat yard where I store my boat and he said it would be fine like it is for another 10 years or so. It's a 20 year old boat so it's expected to have some moisture. I keep it in dry storage so hopefully it will be ok.
 

GSPLures

Chief Petty Officer
Joined
Sep 3, 2019
Messages
564
I can't access the inside of the drain hole, the engine would need to be pulled out in order to drill some holes to see if it is wet. I showed it to the owner of the boat yard where I store my boat and he said it would be fine like it is for another 10 years or so. It's a 20 year old boat so it's expected to have some moisture. I keep it in dry storage so hopefully it will be ok.
Welcome, He may be right or he may not, it is an uneducated guess at best. I am not trying to be rude so please do not take this the wrong way. While he is probably very good with boats he should know that there is no possible way to know without a core sample.

If the frame of your car was cracked and the owner of a car lot said should be good for 10 years you would probably still have it welded. If not it would be in your mind everytime that you went over railroad tracks wondering if today is the day it gives.
 

JASinIL2006

Vice Admiral
Joined
Feb 10, 2012
Messages
5,539
I agree... no way he could know without checking.

A number of members here would advise pulling the engine to check; pulling the engine really isn't that hard, but if you've never done it before I know it sounds pretty daunting.

I am not a big fan of drilling holes from the outside, but barring any way to check from the inside, I'd probably drill a couple 1/4" holes to check the shavings.

If all is OK, you can fill them with either 3M 5200 sealant or epoxy, either Marine Tex or PC11. (As you're filling the holes, make sure you use a toothpick or piece of wire to make sure you really seal off the wood exposed by drilling, then fill the hole completely.)

If the shavings are dark/wet, then you really need to think about pulling the engine to examine the scope of the rot.
 

GSPLures

Chief Petty Officer
Joined
Sep 3, 2019
Messages
564
Which ever way you decide to go you need to repair those cracks if you do not have rot through out the transom yet you will as water will get in those cracks. If you decide against pulling the motor you will already have the stuff to fix core samples from the outside.
 

pbtodd

Cadet
Joined
Oct 28, 2020
Messages
10
I'm with you JASinIL2006, not a big fan of drilling holes from the outside. I recently pulled the outdrive - a VP DPS - wasn't that hard and I've pulled a car engine before. Looks like a boat engine would be a lot less technically difficult but still a lot of work. I think I'll start with GSPLures suggestion filling the crack and drilling a small hole within that crack and decide from there how to proceed forward. It could just be a surface crack, really hard to tell without grinding the gelcoat surface off.
 

pbtodd

Cadet
Joined
Oct 28, 2020
Messages
10
I grinded the two cracks on the gelcoat down to the fiberglass and it was just surface cracks, didn't go through the glass. Decided to drill a explorer hole in the one crack and it was dry. What a relief that was, think I dodged the bullet on this one.
 

Attachments

  • gelcoat crack.jpg
    gelcoat crack.jpg
    2 MB · Views: 6

GSPLures

Chief Petty Officer
Joined
Sep 3, 2019
Messages
564
That is good, I am glad you checked it out instead of taking somebody elses word for it. I personally would also do one lower if it were me you have the stuff already the rot usually starts low and moves up. Which is why if you have soft spots in the deck usually the stringers are already done for.

Other than that all that is left is to clean her up and patch the areas.
 

pbtodd

Cadet
Joined
Oct 28, 2020
Messages
10
Yeah, I kinda didn't want to drill more holes than necessary. I got it all patch up but went to re-install the pitot tube for the speedo and noticed the wood shavings are a little moist. Yikes! Is there any good way to measure the moisture content of the wood shavings? I ordered a moisture meter - electrophysics model CT33 - to check other areas of the boat and to monitor the moisture content as preventative maintenance so to speak.
 

GSPLures

Chief Petty Officer
Joined
Sep 3, 2019
Messages
564
Yeah, I kinda didn't want to drill more holes than necessary. I got it all patch up but went to re-install the pitot tube for the speedo and noticed the wood shavings are a little moist. Yikes! Is there any good way to measure the moisture content of the wood shavings? I ordered a moisture meter - electrophysics model CT33 - to check other areas of the boat and to monitor the moisture content as preventative maintenance so to speak.
Not sure on the moisture content or how well the meter works. I am more of a simple person it is either wet or dry. My boat there was no doubt because the wood was in a pile of splinters on the bottom. Possibly you caught the problem early but if it is wet there is no way to dry it out so the problem will get progressively worse as time goes on. If you did catch it early enough you may just be able to patch in new wood and be good. If you close it up a full gut and rebuild will be in the future. So you must weigh your options if the boat is worth it to you to fix properly or try to squeeze the last few years out and move on to another boat.
 

pbtodd

Cadet
Joined
Oct 28, 2020
Messages
10
Some moisture is good. It actually increases the strength of the wood. Trees are wet. It wouldn't be worth it to repair. I did the ping test with a hammer and it's solid so hopefully it will be good for several years. Previous owner stored it in water but I'm keeping it in dry storage. I'm waiting for the moisture meter so I can monitor the moisture content and see if it's getting worse or not.
 

todhunter

Canoeist
Joined
Sep 15, 2020
Messages
1,241
Hammer test is pretty much worthless for detecting rot.
Agreed. We tapped all over mine and thought it was good, then ripped into it anyhow and some of the places we tapped were completely rotten. This test tells you nothing useful at all.
 
Top