G.W. Invader Bravo

Bravo

Petty Officer 3rd Class
Joined
May 28, 2010
Messages
81
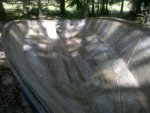
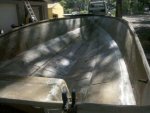
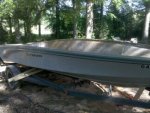
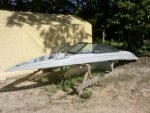
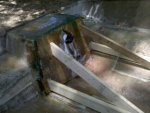
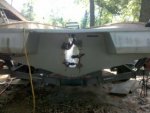
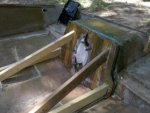
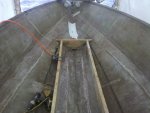
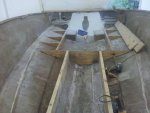
HI folks... Just another newb to this site. I'm working on my 4th boat now, but this is as far into one as I've ever been. It's a 1993 GW Invader Bravo 200 ES. I had noticed some of the usual telltale signs of the dreaded rotten floor last year, and almost made it through the entire season before the seat pedestal ripped out of the floor. So, I started on what I thought would be a simple floor replacement and the more I dug, the worse it got. The stringers had mostly disappeared from rot, and the transom was terrible on one side. Before I knew it, the boat was nothing more than a bare fiberglass shell. I removed the top half of the boat and went to work... After the season ended and the boat was bare, I stopped work until this spring. Between all that, I had to move which was no fun. I've got to work again, and forgotten just how much I hate the itchy cold shower part. The Transom is in place and the Stringers have begun to take shape. I do have one question though... Should there be some type of drain at the bottom of the stringer where it meets the hull? I'm wondering this just in case water should somehow get in there I want to make sure it gets out. Any input? I can post some pics if you guys are interested. Thanks!
 

Bondo

Moderator
Staff member
Joined
Apr 17, 2002
Messages
70,721
Re: G.W. Invader Bravo

this just in case water should somehow get in there I want to make sure it gets out. Any input? I can post some pics if you guys are interested.

Ayuh,.... Welcome Aboard,... We just Love Pictures,... ;)

To answer your question,... Yes, Absolutely include Limber Holes in the lay out,...
There's No such thing as a dry, or waterProof compartment in a boat,...
Build Everything so it can Drain to the bilge, to be pumped out....
 

Bravo

Petty Officer 3rd Class
Joined
May 28, 2010
Messages
81
Re: G.W. Invader Bravo

Thanks for the advice. I thought that was a good idea to include limber holes, just didnt know the technical name. Ill see what I can do about some pics for you guys, but some will have to be scanned as they are not all digital. Current ones are though. Just so you know, most computers dont like me, LOL.....
 

Bravo

Petty Officer 3rd Class
Joined
May 28, 2010
Messages
81
Re: G.W. Invader Bravo

Ok guys.. I'm back. I had major computer failure for awhile there. The project is into full swing too. Late nights with fiberglass isn't much fun, but its gotta be done. Its worth it in the end though. So far, I have the new transom in, the stringers are installed and the glass is being lain to cover them. I'm actually adding some reinforcements that the factory never had in a few places. I'll be replacing the old drive system with an Alpha I Gen II and the original 4.3L V-6 will be replaced with a 350cid. I wish I could afford to go fuel injection, but I'm happy enough with a V-8. The gimball housing will be going in this week or next as soon as some replacement parts get here (new ss washers and locknuts, gimball bearing and boots etc..) The gas tank will go in at the same time. My goal is to splash in by the 4th of July, but that may be pushing it a bit hard. My two large $$ items left to purchase is carpet as well as an addition of side exhaust. I'll post up some pics shortly.
 

Cadwelder

Lieutenant Commander
Joined
Aug 30, 2010
Messages
1,780
Re: G.W. Invader Bravo

Wow must have been a major computer problem...its been almost exactly one year. Good to see you back at it.
 

Bravo

Petty Officer 3rd Class
Joined
May 28, 2010
Messages
81
Re: G.W. Invader Bravo

here is a few pics of previous work. The pics of the tear down will have to be scanned somehow. It was pretty rough!
 

Attachments

  • invader bravo1.jpg
    invader bravo1.jpg
    20.2 KB · Views: 5
  • invader bravo2.jpg
    invader bravo2.jpg
    19.6 KB · Views: 2
  • invader bravo3.jpg
    invader bravo3.jpg
    24.5 KB · Views: 2
  • invader bravo4.jpg
    invader bravo4.jpg
    24.2 KB · Views: 2
  • invader bravo5.jpg
    invader bravo5.jpg
    19.7 KB · Views: 2

Bravo

Petty Officer 3rd Class
Joined
May 28, 2010
Messages
81
Re: G.W. Invader Bravo

A couple more...
 

Attachments

  • invader bravo6.jpg
    invader bravo6.jpg
    19.1 KB · Views: 2
  • invader bravo7.jpg
    invader bravo7.jpg
    19.8 KB · Views: 2

Cadwelder

Lieutenant Commander
Joined
Aug 30, 2010
Messages
1,780
Re: G.W. Invader Bravo

Waht type of wood did you use on your transom?
 

Bravo

Petty Officer 3rd Class
Joined
May 28, 2010
Messages
81
Re: G.W. Invader Bravo

Waht type of wood did you use on your transom?

I used a double layer of 3/4" standard plywood from Lowes, sealed with 3 coats of plain resin and a double layer of 1.5 oz chop strand mat in between them. Its all coated pretty thick with resin and more mat. The 2x4's are just braces in there till the fiberglass cured.
 

Cadwelder

Lieutenant Commander
Joined
Aug 30, 2010
Messages
1,780
Re: G.W. Invader Bravo

Cool on the plywood...on the resin you just need to cover the cloth or Matt well, extra resin just adds weight and doesn't help the strength any. Save your dollars, no need in wasting resin.
 

Bravo

Petty Officer 3rd Class
Joined
May 28, 2010
Messages
81
Re: G.W. Invader Bravo

Wow must have been a major computer problem...its been almost exactly one year. Good to see you back at it.

It was rather major... I turned it on one day and got a major shocker when all it would do is tell me "operating system not found". I wasn't really worried about it and recently decided to get it fixed. Mostly just used my phone for what little I needed to do.
 

Bravo

Petty Officer 3rd Class
Joined
May 28, 2010
Messages
81
Re: G.W. Invader Bravo

Since I'm off work today and its nice and warm outside, I'm gonna lay some more fiberglass to finish up the stringers and the section for the ski locker. I may even get the gimbal housing installed... here are a few pics as she looks now.
 

Attachments

  • IMG_20110517_164001.jpg
    IMG_20110517_164001.jpg
    143.2 KB · Views: 2
  • IMG_20110517_163723.jpg
    IMG_20110517_163723.jpg
    139 KB · Views: 2
  • IMG_20110517_163756.jpg
    IMG_20110517_163756.jpg
    141.5 KB · Views: 1

Cadwelder

Lieutenant Commander
Joined
Aug 30, 2010
Messages
1,780
Re: G.W. Invader Bravo

That is a heavy duty stringer system for sure. Looking good.
 

Woodonglass

Supreme Mariner
Joined
Dec 29, 2009
Messages
25,924
Re: G.W. Invader Bravo

What did you use to bed your stringers? What will you be using to tab and cover your stringers?
 

Bravo

Petty Officer 3rd Class
Joined
May 28, 2010
Messages
81
Re: G.W. Invader Bravo

The rear section of the stringers are made from double 5/8" plywood, sealed with resin and a double layer of mat in between them. The front section is actually made from rough cut 2x10's. The front were the hardest to make as they required a slope to match the contour of the hull as it rises toward the bow. Every few inches along them I had to remeasure and in the end it was pretty close. The outer side of the stringer also had to have a bevel cut up to 45 degrees at the end. Of course on the first cut it came out completely wrong and the whole piece had to be scrapped. But I finally got it figured out. Believe me when I tell you that making a curve with a skill saw isn't much fun. There were a few ridges that had to be sanded out with a belt sander for a better fit. As for bedding them to the hull, I cut a section of mat up and hand shredded it. (That took awhile)The shredded mat was lain down in the hull as puffy as I could make it then I installed the stringer on top and screwed it in place at the forward bulkhead with 2.5" screws. I then put down a section of mat on the inside of the two stringers and let it cure. After it cured, I mixed up a larger batch of resin and from the outer side of the stringer I poured it in at the little gap between hull and stringer. This let it run under the stringer and soak into the shredded mat and conform itself for an exact match to the hull as well as the stringer. By jacking up the front of the trailer as much as I could made the resin run down as well as towards the rear of the boat eliminating air pockets. Does all that make much sense?

Woodonglass, I'm not exactly sure what you mean by "tab". Its all covered by 1.5 oz chopped strand mat.
 

Bravo

Petty Officer 3rd Class
Joined
May 28, 2010
Messages
81
Re: G.W. Invader Bravo

I can't wait till I get this put in... :cool:
 

Attachments

  • IMG_20110520_174521.jpg
    IMG_20110520_174521.jpg
    138 KB · Views: 1

Bravo

Petty Officer 3rd Class
Joined
May 28, 2010
Messages
81
Re: G.W. Invader Bravo

Today brought a bunch of resin and mat... I added a brace between the stringers that will also give me a solid place to screw the floor down if needed. I drug the gas tank, gimbal housing and transom plate outta the shop attic and gave everything a good scrubbing. I'm really debating if I should replace the fuel fill and vent hose. I already know the original fuel line to the water separator will be replaced. I ordered new washers and nuts for the transom assembly and will see about getting that in. I need to order a exhaust block off plate as well as my side exhaust tips. The bummer is the average price for side tips is about $350.... :eek: Does anyone know if there are any ones a bit cheaper out there? Ebay doesn't seem to have any. I'm probably gonna need riser blocks to keep the water out of the engine as well. Guess I'll wait to order them when I install the motor.
 

lennielmf1

Recruit
Joined
Jun 13, 2011
Messages
1
Re: G.W. Invader Bravo

]you look like u really know what your doing. i got a bravo and i have searched the net for pics close to my boat and yours is the closest . i glad to see that im not the only one with a little floor rot . mine has a red and yellow stripe and it came with 350 mag that i am re doing now . but what my problem is my back half of interor is missing and im trying to see what it looked like so i cant wait till u get pics of the inside of the boat.
 

Bravo

Petty Officer 3rd Class
Joined
May 28, 2010
Messages
81
Re: G.W. Invader Bravo

]you look like u really know what your doing. i got a bravo and i have searched the net for pics close to my boat and yours is the closest . i glad to see that im not the only one with a little floor rot . mine has a red and yellow stripe and it came with 350 mag that i am re doing now . but what my problem is my back half of interor is missing and im trying to see what it looked like so i cant wait till u get pics of the inside of the boat.

Does yours have the wrap around seat in the rear? I am sad to say that it seems to me that these boats weren't put together so well from the factory. Maybe its just mine, but the way the stringers and the bracing were just slapped together, its no wonder it was all rotten. The fiberglass didn't cover the wood properly, and there were no limber holes to drain any water from the stringers to the bilge. The hull itself seems beefy enough though. I've already had my interior recovered, but its all stuffed in the back of a big storage closet inside the house... The original engine was a 4.3L V6. It had long ago died and I scored the 350 Alpha I Gen II set up for a reasonable price. It should do well in this boat as long as I haven't made everything too heavy. I tend to do the overkill thing sometimes...
 
Top