First Tohatsu motor 9.9HP

Sea Rider

Supreme Mariner
Joined
Sep 20, 2008
Messages
12,345
Post a pic of current CD to have a look. Cold Ohm testing doesn't say much, better is testing all the electrical elements while cranking the motor, but if any of them it's already altered when the motor runs especially at wot will not run healthy...

Happy Boating
 

andreipou

Petty Officer 1st Class
Joined
Nov 26, 2008
Messages
317
here it is
 

Attachments

  • 20210831_122510.jpg
    20210831_122510.jpg
    2.2 MB · Views: 5
  • 20210831_122455.jpg
    20210831_122455.jpg
    2.2 MB · Views: 6
  • 20210831_122447.jpg
    20210831_122447.jpg
    1.8 MB · Views: 7

Sea Rider

Supreme Mariner
Joined
Sep 20, 2008
Messages
12,345
Sorry, the CDI of the M9.9B2 model differs much from the M9.9D2 model in current production including spare parts availability. How many cables does the second posted pic have ?

Happy Boating
 

andreipou

Petty Officer 1st Class
Joined
Nov 26, 2008
Messages
317
Sorry, the CDI of the M9.9B2 model differs much from the M9.9D2 model in current production including spare parts availability. How many cables does the second posted pic have ?

Happy Boating
One single that goes to coils primary wiring (right).
One single that grounds to the holding bolt (second from right).
One triple that goes under flywheel (third from right).
One double that goes to shut-off switch. (left one).
 

andreipou

Petty Officer 1st Class
Joined
Nov 26, 2008
Messages
317
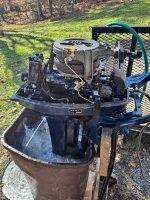
I am back to this slow running project.
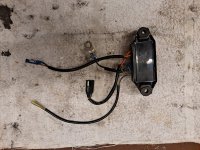
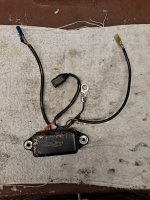
Neither new ignition coil, nor new CD unit brought sparks back.
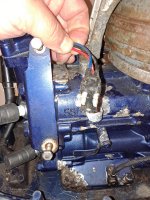
It took me some effort and "redneack ingenuity" to get fly wheel off.
Man, it was stuck really hard and having left-hand thread ( as it turned out) did not help either.
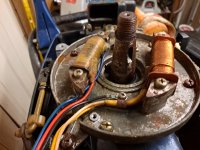
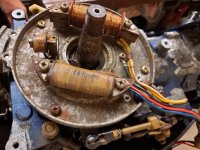
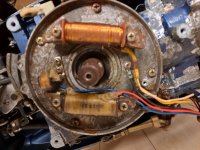
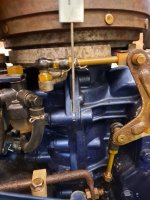
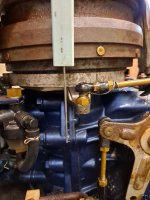
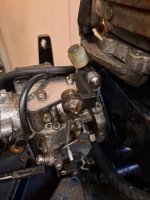
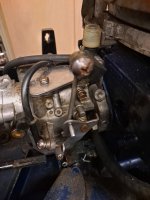
Not too many things under the wheel:
1.Alternator coil that was cut off by previous owner. I do not care about it.
2. big exciter coil
3. small pulser\trigger coil.

The way I understand it will be either #2 or number #3 or both.
#2 is on Ebay , but looks different (no long wire)


do not see #3, but there is this one. will it work?


what do you think?
should I try?
 

Attachments

  • 20211015_205333.jpg
    20211015_205333.jpg
    3.3 MB · Views: 7
  • 20211015_205346.jpg
    20211015_205346.jpg
    1.8 MB · Views: 5
  • 20211015_205329 (1).jpg
    20211015_205329 (1).jpg
    1.8 MB · Views: 5

andreipou

Petty Officer 1st Class
Joined
Nov 26, 2008
Messages
317
I went thru test sequence again for exciter and trigger and exciter passes test again, but trigger shows infinity instead of 30-60 Ohm and no DVA output.
I wonder if I can find original one to replace or use the one above...
 

pvanv

Admiral
Joined
Apr 20, 2008
Messages
6,509
362060220MTRIGGER COIL-NO LONGER AVAILABLE
Contact CDI electronics to see if they can rewind yours.
 

km1125

Chief Petty Officer
Joined
Aug 10, 2016
Messages
496
I'd be surprised if you couldn't use just about any trigger coil. You'd just have to make sure that it mounts similarly so that the timing and gap is about the same as the old one.
 

andreipou

Petty Officer 1st Class
Joined
Nov 26, 2008
Messages
317
I was told by the vendor that this trigger coil will not work.
CDI did not respond to my request.
But, I just got on Ebay the whole ignition (plate , exciter, trigger, charging coils, CD unit and ignition coil with all the wires) for less than I paid just for new CD.
And CD unit and the rest looks exactly like mine.
I hope it will work.
So , the saga continues...
 

andreipou

Petty Officer 1st Class
Joined
Nov 26, 2008
Messages
317
Funny, just got reply from CDI that they can repair trigger coil for $113 + shipping...
 

Sea Rider

Supreme Mariner
Joined
Sep 20, 2008
Messages
12,345
Funny, just got reply from CDI that they can repair trigger coil for $113 + shipping...
Let's hope there isn't any other electrical component associated with issues too to be in the water soon.....

Happy Boating
 

andreipou

Petty Officer 1st Class
Joined
Nov 26, 2008
Messages
317
The old boy is smoking again!
But, now the issue is to adjust it to run smoothly.
I really need help with following:
I adjusted linkage as per manual (+3 degrees fully closed to +22 degrees fully open), but I rebuild the carb and can not find details on how to adjust it properly.
Manual says that I have to open pilot adjusting screw to standard settings.
What is "standard settings"?

I need help to figure how to properly adjust 3 things (see second pic):
1. Pilot adjustment screw
2. Linkage from throttle to cam follower
3. Idle stop screw

Also, what is operating range of temperature?
It has strong "pisss" , but I always check...

Can you share this info please?
Thanks.
 

Attachments

  • 20211106_125312.jpg
    20211106_125312.jpg
    4.6 MB · Views: 12
  • 20211106_131949.jpg
    20211106_131949.jpg
    3.5 MB · Views: 14
  • 20211106_130556.jpg
    20211106_130556.jpg
    2.7 MB · Views: 15
Last edited:

MattFL

Master Chief Petty Officer
Joined
Oct 20, 2010
Messages
839
I can give you generalities. The pilot screw you're going to adjust until it runs nicely at idle and at small throttle openings (about 1/3 throttle and below). Generally speaking, turn it in all the way until it seats GENTLY, then turn it out about 1.5 turns as a starting point. For the idle stop screw, adjust it until the idle is the right speed. For the linkage my guess (and just a guess) is the linkage should start moving the timing advice as soon as you start opening the throttle from idle.
 

Sea Rider

Supreme Mariner
Joined
Sep 20, 2008
Messages
12,345
Did you managed to solve all the electrical issues the motor had ? For the carb adjustment : With warmed motor open the pilot screw from lightly seated to 2 ± 3/4, once idles nicely adjust the idle stop screw to a point in which the motor will not die when geared forward while the boat floats, adjust as required.

Can set the timing advance to 0 when the throttle is fully closed and leave the other to 22 deg. Will need to back down a bit the idle screw adjustment in case the motor revs bit higher than when set at -3.

Happy Boating
 

andreipou

Petty Officer 1st Class
Joined
Nov 26, 2008
Messages
317
Did you managed to solve all the electrical issues the motor had ? For the carb adjustment : With warmed motor open the pilot screw from lightly seated to 2 ± 3/4, once idles nicely adjust the idle stop screw to a point in which the motor will not die when geared forward while the boat floats, adjust as required.

Can set the timing advance to 0 when the throttle is fully closed and leave the other to 22 deg. Will need to back down a bit the idle screw adjustment in case the motor revs bit higher than when set at -3.

Happy Boating
yes, trigger coil was the problem. All other parts are working.
I will try what you said tomorrow, but I am not sure how to correctly adjust the linkage from cam follower to throttle.
Is it what MattFL said?
Can you confirm?
On all OMC motors there is a mark on a cam for that. I can not find anything on this motor.
 

Sea Rider

Supreme Mariner
Joined
Sep 20, 2008
Messages
12,345
Yes, trigger coil was the problem. All other parts are working.
I will try what you said tomorrow, but I am not sure how to correctly adjust the linkage from cam follower to throttle.
BTW it's 2 ± 3/4 out turns from lightly seated in. I'm not familiar with your 9.9 B2 model but if the 9.9D2 timing procedure matches same will go from there. Question : When the throttle grip is set to max throttle position, does the timing plate imaginary 22º mark stops right in middle of both mating surfaces as shown ?
9.9B2 Timing Marks.JPG

If need to adjust the plate to match the 22º setting play with the advancer arm rod (AAR)
AAR.JPG

While the throttle remains at max, pull up the ball joint a from the ball joint b until it disengages, rotate the ball joint a CW or CCW till the timing 22 mark matches the line formed as explained before, once there push down the ball joint a into the ball joint b till rests secure in place.

When at full throttle check that the timing cam mounted on the timing plate pushes the carbs roller down for the carb's butterfly to remain opened at 180º.

Carb's Rod.JPG

If doesn't match, release the screw that holds the rod, with one hand push and hold down the butterfly 's metal plate for it to remain at 180º, with the other hand raise the arm till the roller makes full contact with the high side of the cam, once there adjust the rod's screw tight. Now will have a correct time advance well synched to carb.

Happy Boating
 

andreipou

Petty Officer 1st Class
Joined
Nov 26, 2008
Messages
317
Sea Rider, thank you for such good explanation.
Can I clarify 1 things , please:

I might seem too slow, but please can you elaborate about 180º. I am not sure I got it. Against what I measure 180º?
Sorry for not getting it ....
 

Sea Rider

Supreme Mariner
Joined
Sep 20, 2008
Messages
12,345
Sorry been out of town, don't worry nobody was born knowing anything about outboard motors. 180º was referred to having the butterfly wide open at its max when the white roller remains resting at the upper side of the cam provided that the carb's rod is well height adjusted.

To know : when the tiller grip was throttled to its max rabbit side, did the time advance plate stopped at 22º ? yes, no, did you played with the advance arm rod ? Would you be interested in upgrading that 9.9 motor to a 15 HP for peanuts cost ? It's a very simple modification well forth it...

Happy Boating​
 

andreipou

Petty Officer 1st Class
Joined
Nov 26, 2008
Messages
317
First I set arms do recommended default length

horizontal arm to 72 mm
vertical arm to 75 mm

then I had to decrease horizontal arm length to 69 mm to achieve +22 to -3 degrees. See pics 1 and 2.

To adjust throttle link I turn tiller to FAST and open throttle to max (180) and push cam follower roller against the cam and tighten the screw. Is this correct?
This way link rod almost comes out of holder . Pic 3.
After that when I turn tiller to LOW throttle stop never reaches idle stop screw even when screw is all way in. Pic 4. Does not seem right.

It is hard to start motor with choke off. With choke on it starts right away , but it stalls if I do not put choke off immediately. When I put choke off it runs high 2000+ rpms with tiller in START position , but when I turn tiller to SLOW it stops soon.

Not sure what you mean under upgrade. This is my first Tohatsu motor and it is very different from OMCs.
 

Attachments

  • 20211108_112729.jpg
    20211108_112729.jpg
    3.9 MB · Views: 5
  • 20211108_111426.jpg
    20211108_111426.jpg
    4 MB · Views: 7
  • 20211115_230713.jpg
    20211115_230713.jpg
    3.8 MB · Views: 6
  • 20211115_230728.jpg
    20211115_230728.jpg
    4.2 MB · Views: 9
Last edited:

Sea Rider

Supreme Mariner
Joined
Sep 20, 2008
Messages
12,345
Put the horizontal arm back to 72 mm.

Arm Stoppers.JPG
Release the upper stopper A nut several tuns out.
Throttle grip to max side and gently hold it there, with a screwdriver turn screw CCW while increasing throttle till the timing mark travels and stays set at 22º right at middle of both mating surface as pic 1.
While holding the screw's head with screwdriver as not to move from where adjusted, turn CW the nut till secure tight at resting position.

Once there while holding the grip to max throttle, release the screw that holds the throttle arm in place.

Tohatsu 9.9-2.JPG

With finger move plate fully left for the pawl to rest touching the base, without releasing the plate, raise the throttle arm screw till the roller gently touches the cam's high hill, once there tighten the screw firmly. Let me know if worked OK.

When the tiller grip is set to min turtle side the roller doesn't touch any part of the cam, the carb works on its own, that's why needs to be well adjusted to achieve a good idle rpm.

Happy Boating
 
Last edited:
Top