First rebuild - '89 Campion Allante 185 - Stringers, Deck, Transom

Mechanicalmike08

Petty Officer 1st Class
Joined
Aug 29, 2018
Messages
308
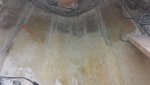
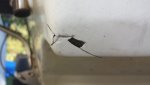
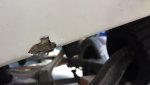
I used the circular saw to get as close as i could to get the big stuff out of the way then i switched to the multi tool. Don't force it, let the tool do the work. If your forcing it the blade cant oscillate and then your not cutting anything. I also found going straight on and making a cut then moving over and making another straight cut worked the best. If you try and use it like a regular saw it seem to have problems, meaning like a jig saw. I basically took the blade width cuts and plunged all the way through then moved over enough to continue the cut, this went very fast.

When i was done i only had about 3/16 to grind off, made my grinding much easier.
 

ACon977

Senior Chief Petty Officer
Joined
Nov 21, 2017
Messages
759
But honestly I find it painfully slow. Maybe I'm using it wrong but I really found it cutting so slowly that I've hardly used it during the demo. I've found this little blade in a Dremel rotary tool to cut much, much faster, just fwiw:

https://www.homedepot.com/p/Dremel-...berglass-Plastics-and-Laminates-543/202315728

I found the multitool pretty slow as well, but using a wood bit sped up the process. And as stated above, just find a pace that works, and stay steady. having the blade at an angle helps too.

Just FYI on the wood blades, the glass will tear them up. I went through 2-3 cutting out my floor and stringers. in addition to using my 4 1/2" grinder with a metal cutoff blade that actually worked pretty well, just couldnt do anything with wood. So i used that for the first cut, and then trimmed remaining pieces with the oscillating tool. then hit the left over tabs with my 36 grit grinder.

You got it!
 

Woodonglass

Supreme Mariner
Joined
Dec 29, 2009
Messages
25,924
You can also use a Long Flexible Blade on your Sawzall. Anything you do to cut away as much as you can before your start gringing IS a good thing.
 

steve_h7

Chief Petty Officer
Joined
Sep 16, 2018
Messages
401
A Sawzall is what christened me into the world of being a true iBoat rehab'er (i.e., cutting a hole through the hull :)) so I'll tread lightly with that one! But I have been trying to use my oscillating Dremel tool more.

I think I'm getting braver and getting better at grinding those tabs down to the hull. Here's a picture that shows some of the new grinding so feel free to critique. But the arrows show what is my new question... these look like "stringers" from the factory that are glass, but they didn't support the original deck. The deck was an inch or so over them.
So do I just leave them as is? I suspect they're hollow with foam but haven't cut into one. I would think they're there for some reason so my first inclination is to leave them alone. Are they maybe for structural support? Any harm with leaving them as they are?

Thanks for everyone's help!
 

Attachments

  • photo303951.jpg
    photo303951.jpg
    191.9 KB · Views: 3
  • photo303952.jpg
    photo303952.jpg
    232.7 KB · Views: 3

steve_h7

Chief Petty Officer
Joined
Sep 16, 2018
Messages
401
Majority of grinding is done! :very_drunk:
Still have to grind where storage spaces were tabbed in and assorted spots.

Question though, not due to grinding but I can see light through several spots on the hull, including a spot where one of the stringers rests, so I wanted to check to see if it needs correction before starting the rebuild or not. The worst spots not surprisingly are on the front part of the keel and spots that look like the light is coming through because the bottom gel coat is damaged. Do I need to add 'glass and resin on the top side of just repair the gel coat? Pictures:
 

Attachments

  • photo304221.jpg
    photo304221.jpg
    173.5 KB · Views: 3
  • photo304222.jpg
    photo304222.jpg
    233.7 KB · Views: 3
  • photo304223.jpg
    photo304223.jpg
    170.5 KB · Views: 3
  • photo304224.jpg
    photo304224.jpg
    21.1 KB · Views: 3

kcassells

Fleet Admiral
Joined
Oct 16, 2012
Messages
8,600
It's not unusual to find sun spots. Ususally associated with thin gelcoat on exterior. Any areas that are in question you can always add glass. In most cases the tabbing gets to cover over it. In my case I glassed and tabbed completely inside the boxes when I got to it.
 

ACon977

Senior Chief Petty Officer
Joined
Nov 21, 2017
Messages
759
Personally, If I have a concern, I address it so that it is out of my mind.

Throw down some PB to give some volume, then a layer of CSM or 1708 and roll it out with some resin. Even if you may not 100% need it, this is the time to strengthen, and it will certainly give you peace of mind, which is more important. You would hate to have it actually be thin, and get gel coat cracks in the future.
 

steve_h7

Chief Petty Officer
Joined
Sep 16, 2018
Messages
401
That makes sense and the last thing I want is to be second guessing what I did once the deck is on! :joyous: To be sure it was coming from gelcoat that was compromised I crawled under the boat and taped the areas where I had sunspots and I could eliminate the light coming in on each spot by covering the damaged gelcoat. I hadn't planned on redoing the whole bottom gelcoat so hopefully I can do spot repairs. Most on the bottom of the hull and keel look like scrapes from beaching but there's damaged corners and on the edges... can these be repaired individually? Examples:
 

Attachments

  • photo304350.jpg
    photo304350.jpg
    89.5 KB · Views: 2
  • photo304351.jpg
    photo304351.jpg
    77.3 KB · Views: 2
  • photo304352.jpg
    photo304352.jpg
    119.3 KB · Views: 2
  • photo304353.jpg
    photo304353.jpg
    67.9 KB · Views: 2

ACon977

Senior Chief Petty Officer
Joined
Nov 21, 2017
Messages
759
Im not a gelcoat expert, but I would sand it down until you are through the cracks and to fresh surface, then either use CSM to replace the glass you removed, or put new gelcoat if thats all that you removed.

Looking at your drain plug you may want to check to see if you have a crack running through the hull to the inside, or if that chunky look was just someone gelcoating over damaged surface. either way, I would grind it back and take a better look.
 

Mad Props

Lieutenant Commander
Joined
Jul 8, 2016
Messages
1,766
Looks like there may have been some voids under the gelcoat in that area... I would sand down the damage to fresh glass and feather it out a few inches all around the area and lay up a few new layers of CSM to stabilize the area. Then coat with gel and feather in the repair with the surroundings.
 

steve_h7

Chief Petty Officer
Joined
Sep 16, 2018
Messages
401
Thanks to you both... I've never worked on the outside of the hull so I'm going to have to find some videos of what I should be doing... not sure what grit I'm after since it looks a more delicate than grinding on the interior. Since they're all in the area of the transom I'm going to check those spots before I go any further with replacing it in case I need to do something to the interior that would be covered up once the transom gluing starts. If anyone has run across a particularly good video that might explain how to prep and repair areas like these, feel free to share too. :joyous:
Thanks again!
 

ACon977

Senior Chief Petty Officer
Joined
Nov 21, 2017
Messages
759
Boat works today has SO many good videos, I feel like i have watched 80% of his content. Great reference.
 

steve_h7

Chief Petty Officer
Joined
Sep 16, 2018
Messages
401
I've watched a lot of them too but I have to say that was one of the best ones yet! :thumb:
 

steve_h7

Chief Petty Officer
Joined
Sep 16, 2018
Messages
401
To my untrained eye the gelcoat around the drain looked like just a bad repair job... but maybe someone can look at this and tell if I have more to do on this one than just cosmetic replacement of the gelcoat on the exterior?
Most of the other spots that were letting light through just look like chips that need fixing.
 

Attachments

  • photo304454.jpg
    photo304454.jpg
    143.4 KB · Views: 1

ACon977

Senior Chief Petty Officer
Joined
Nov 21, 2017
Messages
759
To my untrained eye I agree with you. Looks like you got through the gunk and have clean glass to apply your gelcoat to.
 
Top