First rebuild - '89 Campion Allante 185 - Stringers, Deck, Transom

ACon977

Senior Chief Petty Officer
Joined
Nov 21, 2017
Messages
759
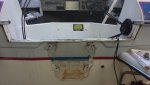
Where should I be measuring and how often? Am I measuring across the beam and up at the
cap height or just below since part is getting removed? Or lower? Do you measure just a couple
of places or every 6 in

I ended up measuring side to side from the lip of the hull where it would need to sit inside the cap, with respect to the back of the boat. Below is the little sketch I made for it. It's not perfect, and I haven't put the cap back on. But my measurements are still the same so I'm not too worried.

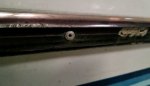
update, wrong photo.

20181007_124558-1134x2016.jpg
 
Last edited:

steve_h7

Chief Petty Officer
Joined
Sep 16, 2018
Messages
401
You want to measure at the beam, at the deck attachment and the height from deck to top cap. This MUST stay the same after all the new stuff is installed. Nylon Straps encircling the hull will help it from flexing outwards.

I ended up measuring side to side from the lip of the hull where it would need to sit inside the cap, with respect to the back of the boat. Below is the little sketch I made for it. It's not perfect, and I haven't put the cap back on. But my measurements are still the same so I'm not too worried.

Thank you to you both! :thumb:

Engine is off and on the stand I built and so far so good. lol
Here in WA state the rain has been coming down steadily for the last several days... I can tell I might
have to find a canopy of some sort so I can still work while it's wet out since it's been known to rain a
bit around these parts. :)
 

steve_h7

Chief Petty Officer
Joined
Sep 16, 2018
Messages
401
Question: This is the bow section cut out. There was a sort of "step" up from the main deck that
I removed the top of and it had nothing but foam in it. Is it structurally needed? I'd like to keep one deck
level and use the extra room for a bit more storage if it doesn't serve any needed purpose. I left the lower
part of the deck intact until I could support the hull.

bow deck.jpg
 

ACon977

Senior Chief Petty Officer
Joined
Nov 21, 2017
Messages
759
Question:
I removed the top of and it had nothing but foam in it. Is it structurally needed? I'd like to keep one deck
level and use the extra room for a bit more storage if it doesn't serve any needed purpose. I left the lower
part of the deck intact until I could support the hull.

I cant say for sure, but my boat, and many others I have looked at since starting a rebuild, have this section. I would assume its structural so that your bow can take more impact from the waves, if you drop it down lower it would have a longer distance between structure points (floor and cap) which could lead to excess flexing, which causes spiderweb cracks in your gelcoat.

Just one man's opinion, but I believe there is a reason, put it back the way it was.
 

harringtondav

Commander
Joined
May 26, 2018
Messages
2,438
I'm not trying to top this forum's experts here. Last winter I found this guy when I was researching transom repair for a friend. Several long YouTube videos with a little too much commentary. He goes step by step thru a full stringer and transom restore. His has an I/O, but the process is the same. Your clamping rig for the transom bond up will be different.

It takes time to watch his full series, so you may want to scroll past his stories and get to the good stuff.

https://www.youtube.com/watch?v=uD1rK8Ail2I
 

ACon977

Senior Chief Petty Officer
Joined
Nov 21, 2017
Messages
759
I'm not trying to top this forum's experts here. Last winter I found this guy when I was researching transom repair for a friend. Several long YouTube videos with a little too much commentary. He goes step by step thru a full stringer and transom restore. His has an I/O, but the process is the same. Your clamping rig for the transom bond up will be different.

It takes time to watch his full series, so you may want to scroll past his stories and get to the good stuff.

https://www.youtube.com/watch?v=uD1rK8Ail2I

Both Frisco Boater (who is sometimes active on IBoats) and the JMink channel (also had a thread on iBoats, but didnt keep it up to date, he preferred to do his videos) are both very helpful and informative. I've watched both through for reference when I first started trying to get motivation to actually put my boat to the grinder and start the project.
 

steve_h7

Chief Petty Officer
Joined
Sep 16, 2018
Messages
401
I cant say for sure, but my boat, and many others I have looked at since starting a rebuild, have this section. I would assume its structural so that your bow can take more impact from the waves, if you drop it down lower it would have a longer distance between structure points (floor and cap) which could lead to excess flexing, which causes spiderweb cracks in your gelcoat.

Just one man's opinion, but I believe there is a reason, put it back the way it was.

Thanks Austin!
I'm inclined to think you're right and there was a reason it was like that. I've seen the Allante 185 in a
bow rider and cuddy cabin version so I'm not sure what the structural differences are in the different
models but I'll stick with how they designed it.

And regarding FriscoBoater and JMink, I'm subscribed to both their YT channels and have learned a lot
from each of them. I watched Frisco's build of the Sea Ray from start to finish. He does a great job on
his videos and I enjoy watching them a lot. Thanks for the heads up!
 

ACon977

Senior Chief Petty Officer
Joined
Nov 21, 2017
Messages
759
Thanks Austin!
I'm inclined to think you're right and there was a reason it was like that. I've seen the Allante 185 in a
bow rider and cuddy cabin version so I'm not sure what the structural differences are in the different
models but I'll stick with how they designed it.

i think this is the best way to move forward, glad I was able to convince ya.

And regarding FriscoBoater and JMink, I'm subscribed to both their YT channels and have learned a lot
from each of them. I watched Frisco's build of the Sea Ray from start to finish. He does a great job on
his videos and I enjoy watching them a lot. Thanks for the heads up!

I think that FriscoBoater has more understanding of whats going on and the reason behind why. But JMink does a better job video taping the whole process and explaining from a first time rebuilder's perspective, how to get it done and what was difficult for him not having any experience before. Its a good combination of resources between the two.
 

steve_h7

Chief Petty Officer
Joined
Sep 16, 2018
Messages
401
You want to measure at the beam, at the deck attachment and the height from deck to top cap. This MUST stay the same after all the new stuff is installed. Nylon Straps encircling the hull will help it from flexing outwards.

Does anyone know of thread where this method of support was used so I could sort of see how it was done and if it'd be feasible for my situation?
I'm thinking I may opt for BillP's suggestion and remove less of the cap and more specifically just the splash well portion to access the transom but I still wanted to get the support so it's there when needed and the nylon straps sounded to be a pretty simple method.
 

steve_h7

Chief Petty Officer
Joined
Sep 16, 2018
Messages
401
Exploring options of supporting the hull during renovation and I wanted to get your opinion on this idea...
I don't have enough space between the hull bottom and the trailer to fit 2 in. lumber but I can run a board parallel to the boats center line and then I can fit boards horizontally which will have vertical 2x6's to support another 2x6 cut in the shape of the hull and then vertical supports that fit tight against the hull at several locations... like ACon977's example in post #24.
Do you think this have support in the right places to keep the hull in shape?

Thanks in advance for your thoughts!

bunk supports.jpg
 

steve_h7

Chief Petty Officer
Joined
Sep 16, 2018
Messages
401
I guess no opinions so time to move on...
Supports are very solid so hopefully it's ready to continue to remove the floor and stringers.

bunk support.jpg
 

chevymaher

Commander
Joined
Mar 29, 2017
Messages
2,915
I am watching. I am new here I know my type boat and trailer only. So my opinion would be meaningless. I got moral support out the wazoo for you tho.
 

steve_h7

Chief Petty Officer
Joined
Sep 16, 2018
Messages
401
With the supports done I was able to carefully remove the last of the bow pieces intact. The bulkhead here was solid with no drainage to the bilge area. When I got the floor above it removed I found 2" of standing water. :facepalm: Is there any reason I shouldn't add drainage to this area to drain towards the bilge like the other bulkhead has?
And a picture of another "fix" that a previous owner must have tried. It looks to have been patched together for a long time.

hull1.jpg
hull fix.jpg
 

ACon977

Senior Chief Petty Officer
Joined
Nov 21, 2017
Messages
759
I guess no opinions so time to move on...
Supports are very solid so hopefully it's ready to continue to remove the floor and stringers.


I think this looks really sturdy! Better than what I did for sure!
 

ACon977

Senior Chief Petty Officer
Joined
Nov 21, 2017
Messages
759
With the supports done I was able to carefully remove the last of the bow pieces intact. The bulkhead here was solid with no drainage to the bilge area. When I got the floor above it removed I found 2" of standing water. :facepalm: Is there any reason I shouldn't add drainage to this area to drain towards the bilge like the other bulkhead has?

From what Ive seen elsewhere people will add drainiage to any area thats not sealed off and filled with foam. Aka the middle of the boat between the stringers. So, yes, I would add drainage through the bulkhead. typically people will do this with PVC, or SS tube. and then glass them into the bulkhead.
 

steve_h7

Chief Petty Officer
Joined
Sep 16, 2018
Messages
401
Thanks Austin...
It was sealed but not foamed and it's covered as the bow is solid so I'm not sure how water got in there in the first place, but the deck there was mush and standing water. The interesting part was the false deck built on top of the first one that had the water was full of foam and as dry as can be. But who knows... and I'll definitely add a piece of pvc pipe through that bulkhead so it doesn't happen in the future. Thanks again!
 

steve_h7

Chief Petty Officer
Joined
Sep 16, 2018
Messages
401
I spent most of the day just looking at pics taken during the demolition and wishing I had taken more. :joyous:
Questions are piling up but one at a time...
I took the trim off between the splash well and the outside of the hull and I was surprised to see it wasn't one piece and clearly was two pieces. Is this normal or is this gap a sign the cap, or at least part of it, have been removed before? I thought I was going to have to cut this part so either way it seems a little simpler that I thought. I plan on taking a somewhat 45* angle towards the back corner of the splash well from the edge where the transom starts. I'll post a drawing to see if there are any objections before I start cutting.

First picture is just a shot of the area the close ups were take at:
 

Attachments

  • photo303141.jpg
    photo303141.jpg
    148.7 KB · Views: 3
  • photo303142.jpg
    photo303142.jpg
    100.1 KB · Views: 4
  • photo303143.jpg
    photo303143.jpg
    127.6 KB · Views: 4

ACon977

Senior Chief Petty Officer
Joined
Nov 21, 2017
Messages
759
The cap of the boat is just sitting on the hull. Typically they are screwed together and then the rub rail goes overtop for aesthetics, as well as to protect the boat. I would assume this trim was also an aesthetic, there to cover up the gap. Are there any screws or attachments in this area?

Below are images from my deconstruction. showing Rivets through the rub rail, and then the holes when the cap is separated are from screws and rivets.

Drill Rivets.JPG

Drill Through Hole.JPG

Hull Holes.JPG ​​​​​​​
 

Attachments

  • Rivets.JPG
    Rivets.JPG
    28.1 KB · Views: 3
Top