First rebuild - '89 Campion Allante 185 - Stringers, Deck, Transom

steve_h7

Chief Petty Officer
Joined
Sep 16, 2018
Messages
401
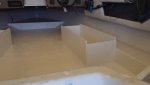
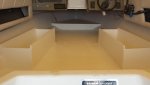
Great to finally have this part of the build underway...
Got a couple coats of gelcoat down and the first coat on the deck had sand added. One more complete coat to go. Obviously not even close to perfect but the deck will be covered with carpet so I didn't really work on fairing that too much. I was a little sad at how badly I did finishing the the parts I did add fairing to. But just decided that it is what it is. I'm under no illusion that this boat is worth restoring to "like new" condition, so I'm just trying to make it safe and last a while, and not making it look like total crap. :) No wax used so far but will be adding it to the 3rd coat so hopefully it'll all harden up. :thumb:
 

Attachments

  • photo319581.jpg
    photo319581.jpg
    386.6 KB · Views: 3
  • photo319582.jpg
    photo319582.jpg
    372.9 KB · Views: 3

Chris51280

Ensign
Joined
Jan 24, 2018
Messages
911
I would say that is nice looking. Mine came out the same way. It is impossible to get a nice smooth shine to it. Maybe I will put a carpet in it again but not glued. Or I paint it again with gelcoat or some other form. The sand does hide alot of imperfections though
 

steve_h7

Chief Petty Officer
Joined
Sep 16, 2018
Messages
401
I would say that is nice looking. Mine came out the same way. It is impossible to get a nice smooth shine to it. Maybe I will put a carpet in it again but not glued. Or I paint it again with gelcoat or some other form. The sand does hide alot of imperfections though

Thanks Chris.
Exactly what I thought... I really liked how MechanicalMike08 did his Larson.
 

steve_h7

Chief Petty Officer
Joined
Sep 16, 2018
Messages
401
Question:
I'm a slob and didn't realize how much damage I was doing until it was too late...
I have to repaint the area of the splash well that was repaired from its removal because of the transom replacement but I'd rather not repaint more than needed...
How can I remove the resin on the gelcoat of the cap without more effort than needed? If sanding, what grit to start? I also neglected to plug holes when installing the new transom so have runs down the far back too.

Thanks!
 

Attachments

  • photo319753.jpg
    photo319753.jpg
    356.6 KB · Views: 3

Chris51280

Ensign
Joined
Jan 24, 2018
Messages
911
The first question i did not understand but I had little blobs too. If they are just little, you can get them off with a razor blade and small screw driver since the resin does not stick too well on gelcoat that had a wax surface. Maybe with a dremel and a stone in it and gently get the most of it off. Then use the razor blade
 

steve_h7

Chief Petty Officer
Joined
Sep 16, 2018
Messages
401
Sorry that was hard to follow. :) They're just smudges of resin that came from my gloves when I was climbing in and out of the boat. The others on the back are drips made from resin being squeezed out existing holes in the stern like the U bolt holes in the hull to secure the boat to the trailer with straps and holes used to mount the outboard to the transom.

I've got some chisels too I might try but there's not much to "grab" on to to try and chip it off. It's really thin smudges... just enough to make a mess.
 

Chris51280

Ensign
Joined
Jan 24, 2018
Messages
911
I had a lot of those. I hand sanded with 200 grit paper and then went higher. I have a lot of gelcoat from the factory on the hull so I wasn't worried sanding through too much. Just sand with small strokes back and forth until they are gone. I had to pay the price too for my sloppiness. :facepalm:
 

52FordF2

Petty Officer 1st Class
Joined
May 31, 2013
Messages
372
Question:
I'm a slob and didn't realize how much damage I was doing until it was too late...
I have to repaint the area of the splash well that was repaired from its removal because of the transom replacement but I'd rather not repaint more than needed...
How can I remove the resin on the gelcoat of the cap without more effort than needed? If sanding, what grit to start? I also neglected to plug holes when installing the new transom so have runs down the far back too.

Thanks!

If its just resin I have always just wiped it off with Acetone.
 

steve_h7

Chief Petty Officer
Joined
Sep 16, 2018
Messages
401
If its just resin I have always just wiped it off with Acetone.

I did try that and it did remove a lot of it... but some are a bit thicker that it didn't seem to effect. If the Acetone won't damage the gelcoat I might give it another try too before resorting to scraping or sanding.
Thanks for the suggestion!
 

steve_h7

Chief Petty Officer
Joined
Sep 16, 2018
Messages
401
Third coat down and I'm pretty happy with the way it turned out. Not perfect but hey, looks good from 5 feet away. :) The instructions on my wax said to mix 4 oz of wax to 1 gallon of gelcoat, which, if I did the math right, works out to a little more than 3%... so I upped it to 3.5%. Washington doesn't have really warm temps so I'll give it a while and hopefully will harden up. I think I'll go out and cover the deck with plastic too just to hedge my bets. :)
 

Attachments

  • photo319826.jpg
    photo319826.jpg
    302.3 KB · Views: 1

kcassells

Fleet Admiral
Joined
Oct 16, 2012
Messages
8,600
Looks Great from here too! Spent some of my time today doing the same thing, pulling off the slop I got everywhere on my boat.
 

52FordF2

Petty Officer 1st Class
Joined
May 31, 2013
Messages
372
It looks great. :rockon:

But what I don't like, is that after you start to walk around on it and installing things it gets dull and dirty. :spider:
Then you have to clean it :lalala:

Keep up the good work.:popcorn::third:
 

Mad Props

Lieutenant Commander
Joined
Jul 8, 2016
Messages
1,766
Looks good Steve. If you are afraid of it getting super dirty and being hard to clean, the first thing you want to do is sand off any nibs/drips/etc with like 320 grit sand paper and if you don't plan on sanding out any waviness or orange peel, just go right to buffing with compound and then wax it... The styrene/parrafin wax surfacing agent, makes the gelcoat finish kinda dull and the paraffin traps dirt on the surface. By buffing and applying a boat or carnauba wax it will make getting rid of dirt 1000x easier in the future. Also, I invested in a big pack of plastic shoe covers to wear while finishing up my boat lol... They look goofy but I'm gonna be happy when I'm done.
 

steve_h7

Chief Petty Officer
Joined
Sep 16, 2018
Messages
401
Thanks everyone and good suggestion Jarrod... I never though about buffing and waxing the interior but makes sense. I have everything covered with plastic now so any dirt should be pretty easy to clean up until it's got some time to cure. I was happy to find that much of the deck I had a hard time getting the plastic to "stick" so it seems like it's hardening up well. I did make the mistake of grabbing a plastic Home Depot bag that was laying in the garage so my foot wouldn't make a mark where I step into the boat... only to find that the logo writing on the bag transfers nicely to sticky gelcoat. :facepalm:

I removed much of the hull supports today but need to pull the boat out from under the cover to get the cross supports out. I used a razor blade and acetone on the smudges and it worked great so thanks for those suggestions!
 

steve_h7

Chief Petty Officer
Joined
Sep 16, 2018
Messages
401
i did the same with wal mart bags. lol

:) Luckily the place I normally step to get into the boat is on the sacrificial board on the floor I put in for one of the batteries under the jump seats in the back... so after added another coat of gelcoat it's hard to see... and it'll be under the battery. :thumb:
 

steve_h7

Chief Petty Officer
Joined
Sep 16, 2018
Messages
401
Question: I used gelcoat with wax on my last coat... but once dried I need some more on the sides of the hull to cover the leftover glue that's colored red/pink. I know I need to sand it before the next coat but what grit? Is 100 okay? Just enough to scuff it up to give the next coat something to bite into?
 
Top