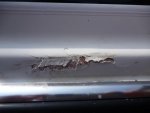
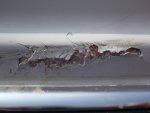
Re: First mishap on the new boat - gel coat in need of repair
This one caught my eye, so thought I would offer my $.02.. First step as was mentioned is check the inside of the hull to see if any of the damage has gone all the way through (I doubt that it has, but better safe than sorry). To do the repair you'll need to remove the section of rub rail beneath the damage (easier working and you'll need to feather and taper the glass into that area). Easiest way to grind the damage away on this small of an area is with a sander and 40 or 60 grit paper; u80 will work as well, but take a little longer. Careful grinding on the profiled lip just above the scrape as this glass will be a little thinner than above and below. Dish the area until all remnants of white (broken glass) has been removed. VIP: DO NOT SAND ALL THE WAY THROUGH THE HULL! THIS WILL OPEN UP A WHOLE NEW CAN OF WORMS! This is the only critical part; take your time.
Use 1.5oz CSM and poly resin with a number of 2" disposable brushes. Tear the glass roughly to the shape of the area that was ground out (starting small and working up in size so each layer is a little larger than the previous one. The top couple of layers should overlap the area that was ground out and lay onto an untouched section of the hull (just by a 1/2" or so). Let this cure and go at it with a sander and 80 grit to do the major knock-down and fairing (be careful of the profiled lip; get it close, but final shaping will need to be done by hand and a block).
After all the shaping and fairing has been done (spots that are a little low are OK, but high spots need to be taken care of), go over with a poly based fairing compound (my preference is a product by Ad-Tech, but there are others that work just fine). Go over top of the repair with this to fill pin holes, low spots, and get the final fairing done. By hand and a block go back over this to get it perfectly smooth (even a little low is best as the top layer of gelcoat will add additional thickness to bring everything perfectly fare).
Try contacting Spectrum Color (online search) to see if they have your gel avail; if they do, then the match should be pretty darn close based on the way the hull has been cared for (stored indoors, etc). For this small of an area, the gel can either be sprayed or brushed on (apply in layers to avoid runs/sags, and make sure that it is laid up fairly thick (20 mills or so). Better too thick than too thin; this will ensure a proper cure and excess will be sanded off.
Wetsand starting with 320 and work your way up to 800 and buff out with a compound. Remount the rubrail using a bedding compound over the screws (3M 4200), clean up and enjoy the fruits of your labor! This is a simplified explanation, but covers all the steps. All cleaning and prep is done with acetone, make sure to wear a respirator when grinding and don't worry about making mistakes! There nothing you can do that can't be fixed!! Good luck!~ It sounds more difficult than it really is..