Finally began my summer project and I am already confused...

jonesg

Admiral
Joined
Feb 22, 2008
Messages
7,174
Re: Finally began my summer project and I am already confused...

Its very do-able in that time frame but the snag always seems to be side projects and getting off track with silly stuff, save all the cosmetics until after the major elements are back together, the last thing you want is having the internals exposed to bad weather.
Stringers and transom are the big two.
Then the cap and or deck.
You need a bunk trailer if you're removing the stringers...or replace one, then the other, that will retain the hull shape.
Another big time saver is polyester resin, 20 minutes vs 24 hrs for epoxy.
If you're doing a ply transom and stringers get some PT ply now and let it dry out if its still green. If its damp the resin will not take.
Kiln dried external PT is good.

But first you have to gut it, get some big trash bags.
If the stringers are dry you win.
How is the transom?
I know you jumped on it but that can be misleading , if its wet its shot.
 

fishKILLER1987

Petty Officer 3rd Class
Joined
Mar 22, 2010
Messages
86
Re: Finally began my summer project and I am already confused...

Ok, good. The way I figure it, if my goal is to have her back in the water by August 1st, then that gives me pretty much a solid 3 months to make it happen. Seems like a reasonable amount of time to me. I dont anticipate getting side-tracked with other mindless things considering that this boat is my number one priority at the moment. But im sure there are a few surprises instore for me along the way that might slow things down a bit.

The trailer that she sits on now has keel rollers down the middle and two horizontal bunks that support it at the stern(one on each side). Im hoping this will be enough to retain the shape of the hull. What do you think?

The situation with the transom was very misleading at first. As i have mentioned in previous posts, it is solid as a rock. However, when you look down the transom, perpindicular to the side of the boat, you can see that the transom has a severe outward bow to it. I am guessing this has been caused by years of supporting an 800lb outboard motor. Also, one of the eye hooks on the transom that you would use to maybe strap the back of the boat down to the trailer has pulled through the transom completeley and is only held in by the outer fiberglass of the hull. If I pull the eye hook out as far as it will go without damaging the outer fiberglass, I can see dark, wet fragments of wood stuck in the threads of the eye hook. This is what leads me to believe that the transom is done.

It is my undertsanding that wooden stringers should run the full legnth of the boat, from the transom to the tip of the bow. My only question is where do you find lumber long enough to satisfy the required legnth of the stringer? Do you splice two boards together? I feel like i may be missing a big piece of the puzzle here...
 

jonesg

Admiral
Joined
Feb 22, 2008
Messages
7,174
Re: Finally began my summer project and I am already confused...

Yeh a bunk trailer should be fine for stringer work.
You can scarf joint stringers, examine what you remove and follow their lead.
I spent a lot of time head scratching myself.
The actual build isn't so bad.
 

fishKILLER1987

Petty Officer 3rd Class
Joined
Mar 22, 2010
Messages
86
Re: Finally began my summer project and I am already confused...

Ok, good to know.

Can you elaborate on what it means to scarf??

Is that some kind of method to somehow attach two seperate boards together to make the full legnth of the stringers??
 

ftl900

Petty Officer 2nd Class
Joined
Aug 6, 2009
Messages
157
Re: Finally began my summer project and I am already confused...

FishKILLER-

Quite a project, best of luck with it. Please keep taking pics and posting notes and ideas as you go. There are several really good restore threads, and I'm looking at starting mine at the end of this season, so I'm soaking up info from where ever I can find it.
I'm sure there are more than a few others in the same boat, if you'll pardon the pun.
 

fishKILLER1987

Petty Officer 3rd Class
Joined
Mar 22, 2010
Messages
86
Re: Finally began my summer project and I am already confused...

ftl900,

Absoluteley. Great info here, has deff helped me so far. I plan on keeping all whose interested updated on my progress with the boat. I've got alot of work ahead of me, but with some steady elbow grease and help from knowledgeable people here, it shouldnt take too terribly long.

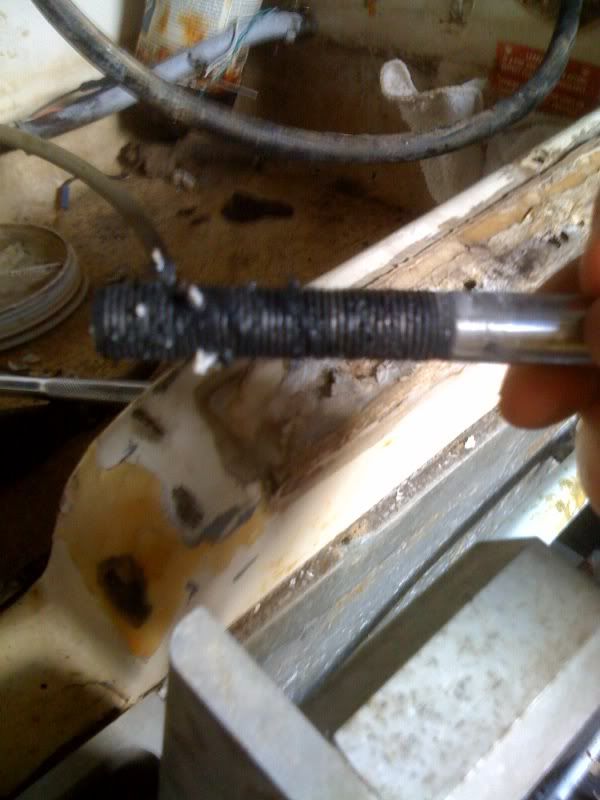
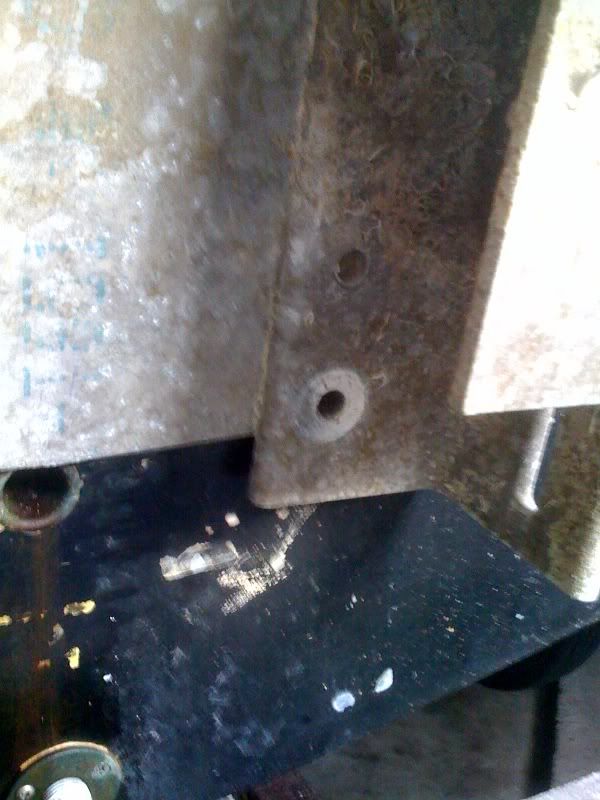
Was able to get a little more done to the boat after work today. I removed the jack-plate assembly for the motor and both of the steel plates that were mounted on each side of the transom. After removing the lower bolts to the jack-plate, I know without a doubt that the transom is gone. As soon as I removed the bolts, I noticed water dripping from the holes where the bolts ran through the transom. Also, on the removed bolts the threads were compacted with a dark, oily substance that I suspect is just extremely rotted wood.

Here are some pics of what I found:

boattransom3.jpg

This is what was compacted into the threads of one of the bolts I removed from the transom.

boattransom1.jpg

This is where I removed the lower bolt from the transom. I think the transom is in worse condition towards the bottom of the boat because the upper bolts did not have the same compacted residue that I found on the lower ones.

Can't wait to see what condition the stringers are in...

Keep the good info comming guys. Thanks.
 

jonesg

Admiral
Joined
Feb 22, 2008
Messages
7,174
Re: Finally began my summer project and I am already confused...

Ok, good to know.

Can you elaborate on what it means to scarf??

Is that some kind of method to somehow attach two seperate boards together to make the full legnth of the stringers??

A scarf joint, see the photo, is as strong as solid wood , the longer it is the better, for 1 inch thick wood make the joint 12 inches long.
They use these joints for wingspars in homebuilt aircraft so its good.
18 inches is the longest you need to go, epoxy glue it and double glass over it after its installed in the hull with 10oz cloth.
If cost is an issue glue/clamp the joint with epoxy and use polyester for the glass work. If you do the whole project with epoxy it will be rather expensive.

Yeh its a bit of a project but that boat is worth it, if it was an older typical bowrider you'd be nuts. Robalo is a fishin machine, even if you used it for 5 yrs you'd still get a decent price for it.

The transom is shot for sure.! Mine was like potting soil.:)
 

Attachments

  • normal_scarf_joint.jpg
    normal_scarf_joint.jpg
    15.5 KB · Views: 0

jonesg

Admiral
Joined
Feb 22, 2008
Messages
7,174
Re: Finally began my summer project and I am already confused...

Check out the condition of the stringers in this scandia center console, 30 yrs old and they are still perfect, the difference is there no Bleepin foam under the deck. Amazing the damage foam does.
http://forums.iboats.com/showthread.php?t=389659
 

fishKILLER1987

Petty Officer 3rd Class
Joined
Mar 22, 2010
Messages
86
Re: Finally began my summer project and I am already confused...

Ahh...i see. A scarf join is probably what ill end up using depending on how long my stringers are.

I agree with you about Robalo boats. Ive heard nothing but great stuff about em on the water and as far as looks and functionality goes, I love em. Im very thankful to have the opportunity to restore a boat like this one.

Thanks for sending me the link on the scandi CC, every time I come accross a thread about stringer or transom replacement I become even more eager to dig into mine. Cant wait! It just seems to take an eternity to get the boat ready to remove the cap. I spent the majority of the day working on it and all I managed to get done was drain about 60gallons of old gas out of that monstorous tank and then just clean up where i had been chipping away at that foam. And by the way, this boat is loaded with foam. I dont know if it was made this way or if the previous owner shot more foam under the deck after repair work. In any case, there is foam everywhere on this boat. Any hole I unplug or piece of trim i remove reveals more of this foam, and its all soaked with water. I know whenever I finally pop the cap there is going to be at least half a foot of standing water in the belly of this thing.

My goal was to have the cap off by this weekend but I dont think thats going to happen. Even though the gas tank is pretty much empty, it wont budge an inch. I think all that foam that is sandwiched in between the tank and the hull is keeping it from moving. So until I can remove the tank, the cap will remain on the hull. Also, after close examination of my tank today while syphoning gas, I realized that it is eat up with crevace corrosion. The whole thing is pitted all over the place. Now Im mwondering if it is even worth trying to salavge this thing. I'll try and get some pics of it up by tomorrow evening. That foam is terrible on a gas tank.

Well, tomorrow is another day...and I cant wait to see curve ball that boat may throw next.

Thanks for the info and please keep it comming.
 

jonesg

Admiral
Joined
Feb 22, 2008
Messages
7,174
Re: Finally began my summer project and I am already confused...

When the tank comes out take the measurements and hit craigslist, you'll find them for under $150.

I find an elec chainsaw ends the argument with foam and quick.:p
And no, the chainsaw does not cut fiberglass as fast as anyone thinks it does. Circular saws do though.

If its all wet its got to come out, whether you replace it is your choice.
Originally they had to install it for coast guard regs, we don't.
If its structural you can add stringers and build a box for the tank.
 

fishKILLER1987

Petty Officer 3rd Class
Joined
Mar 22, 2010
Messages
86
Re: Finally began my summer project and I am already confused...

Alright guys,

Today I came home from work and went straight to the garage to tackle the gas tank. I took some advice from jonesg and cut out big chunks of foam with a recipricating saw. Worked great! After about 3 hours of cutting and chipping, the tank was finally ready to come out.

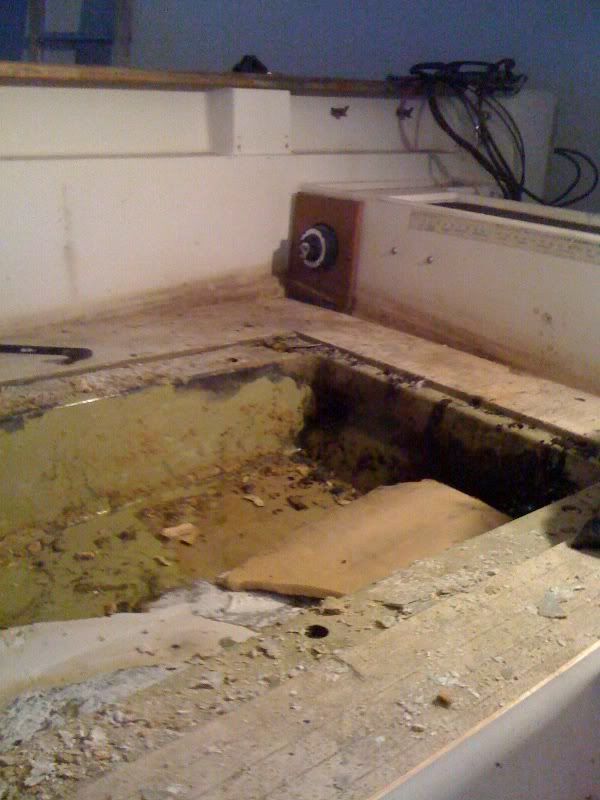
The way my gas tank is housed below deck seems a bit strange to me. It is my understanding that most below deck tanks rest deep within the belly of the boat, usually between a set of stringers in its own compartment. Well, my tank it inclosed within the deck itself. The actual deck was made to completely enclose the tank so that it is never actually below the deck in the lowest part of the boat. I also noticed after I removed the tank, that this compartement that the tank was in has no drain holes. And the tank was completely enclosed in foam all the way around. Every square inch of the aluminum tank was sandwiched in with soaking wet foam.

Here are some pics that will hopefully describe what I mean about this gas tank compartment:

gastank1.jpg


gastank2.jpg


Can anyone make heads or tails of this tank compartment??

Thanks.
 

jonesg

Admiral
Joined
Feb 22, 2008
Messages
7,174
Re: Finally began my summer project and I am already confused...

Coast guard specs for below deck tanks are that they must be vented, I don't see any vent tubes, just a fill hose at the bow end of the compartment.
Either way just gut the wet foam out and discard it.

Does the tank compartment extend deeper ?

Some boat mfgers weren't too clever installing their tanks, Grady coated their alum tanks with coal tar, theres no need for that at all. But thats all they knew at the time I guess.
 

system-f

Senior Chief Petty Officer
Joined
Dec 3, 2008
Messages
667
Re: Finally began my summer project and I am already confused...

I don't see any vent tubes, just a fill hose at the bow end of the compartment.

What about the little hose hanging below the fill hose? I think that is the vent hose.
 

fishKILLER1987

Petty Officer 3rd Class
Joined
Mar 22, 2010
Messages
86
Re: Finally began my summer project and I am already confused...

I believe the smaller hose below the fill hose is the vent tube. The actual gas tank compartment doesnt go much deeper than what is seen in the pic. There is maybe 1 1/2 inches of foam covering the bottom of the tank compartment.

The only think that seems strange to me is that there is no drain hole in the compartment. But, theoretically, i guess with the deck sealed tightly to the top of the compartment, there shouldnt be any water getting into the tank to begin with. It all just seems a little wierd to me.

Im going to chip away the rest of the foam inside the compartment today so I can get a closer look. I have a feeling the entire hull of the boat below the deck is full of water. While I was cutting away the foam inside the gas tank compartment with my recipricating saw, I accidentally cut a little too deep and went through the bottom of the compartment to where the stringers would be below deck. I didnt realize this until after the tank was removed and water was seeping in from where I had made the cut. I then stepped down into the compartment and my body weight spread the cut apart and water began gushing in. I think Im going to end up spending alot of time with the wet vac as soon as the cap is off trying to get all that water out of the boat. Sounds like fun.

Ill try to have some more pics up later on this evening of what I get accomplished today.

Any ideas on the gas tank compartment??

Thanks again.
 

jonesg

Admiral
Joined
Feb 22, 2008
Messages
7,174
Re: Finally began my summer project and I am already confused...

Gut it out and build a tank box if nessesary.
If you just poke around and explore it'll drag on for days, its all got to come out anyway.

There should be 2 air vent tubes, 4 inch diameter each.
And it should be able to drain to the bilge , mine is open from the console all the way back to the transom.
Tank rests on 4 hardwood planks that are glassed and glassed to the hull or stringers. I think my tank supports are teak, they were in decent condition so I left them with just a new coat of bilge paint.
 

jonesg

Admiral
Joined
Feb 22, 2008
Messages
7,174
Re: Finally began my summer project and I am already confused...

This is what the tank compartment should look like.
Pre-glass the cross supports then tab them to the stringers or hull and paint, you might be able to fit a bigger tank this way.

DSCN6237.JPG


Its open all the way to the bilge and drain.

DSCN6238.JPG
 

fishKILLER1987

Petty Officer 3rd Class
Joined
Mar 22, 2010
Messages
86
Re: Finally began my summer project and I am already confused...

That may be what I end up doing. I may just end up biting the bullet and building a new gas tank compartment. Especially looking at the pictures of what Jonesg posted, it just seems like the right things to do.

Now, moving on from the gas tank, I have reached a dilema and I cant progress any further until i figure this one out. Bare with me, this will probably end up being a pretty long post, but I would like as many opinions as possible to steer me in the right direction.

My original thoughts on continuing this restoration project was to begin by removing the cap to be able to get to the stringers and transom very easily. However, after looking at many other restorations like mine, it seems like the more popular option is to cut the deck, remove it sections at a time, and get to the stringers that way leaving the cap and gunnel still attached to the hull.

This is where my debate begins. I am working in a very limited space, so having the hull and the cap seperated and at my house at the same time is next to impossible to accomplish because of a lack of space. This is why I am considering leaving the cap on and removing only the deck. It seems like a great idea to cut the deck and remove it to replace the stringers because ultimately, it eliminates the problems associated with removing the cap in one piece and helps keep the shape of the hull intact. But, in my situation, I was hoping to remove the cap so I could begin fiberglass work on the hull more easily and be able to access everything all at the same time. So I am trying to put together a list of pros and cons to each approach so I can decide which route to take.

Naturally, I have a ton of questions:

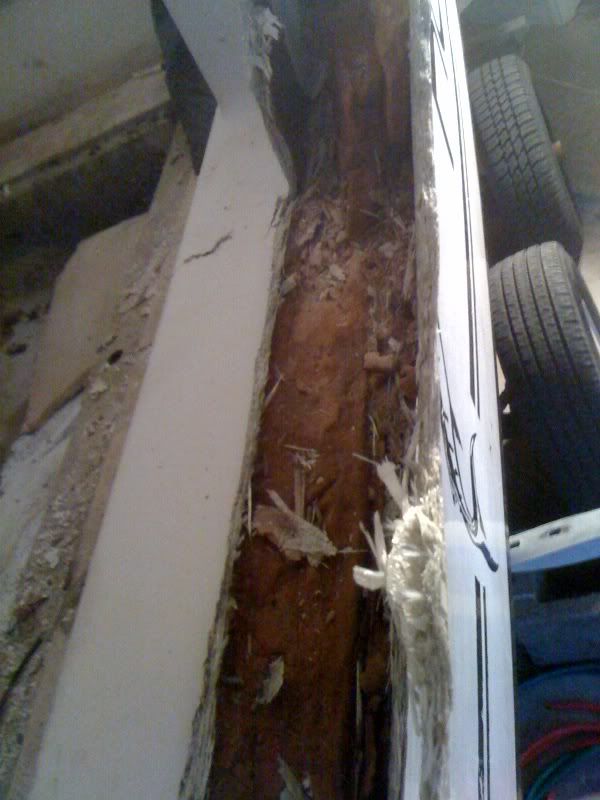
1) There is old, dry foam sandwiched in the gunnel of the boat. If I cut the deck, and leave the gunnel and cap on the boat, I will be unable to get to this foam and replace it like I had originally planned. So would the foam still be good if it has been dry and any water that did encouter it was aloud to drain down to the bottom of the boat??

Here is a pic of the foam that I am talking about:
fiberglass3.jpg


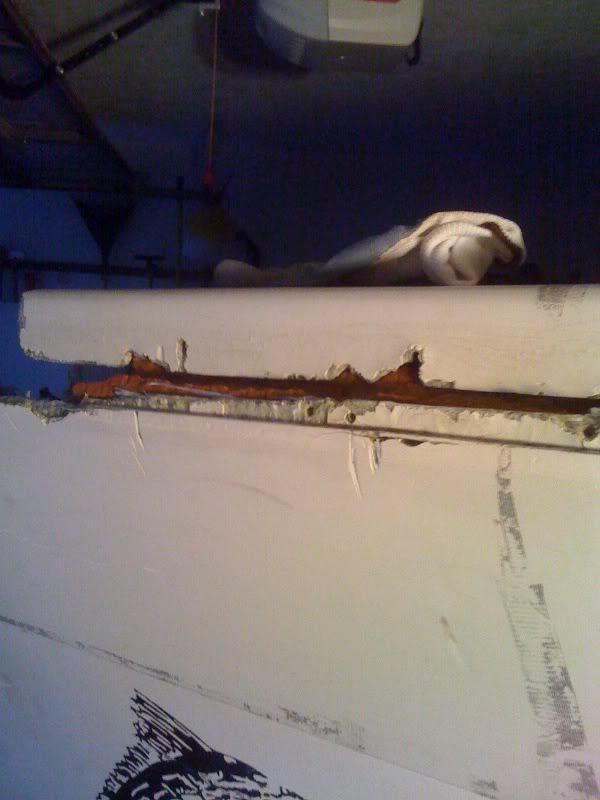
2) The joint where the cap of the boat meets the hull is busted up pretty bad in certain sections and needs to be fixed. However, I dont see how I can fix it without removing the cap completeley.

Here is a pic of the joint. Any ideas on how to fix this?? I know it wil eventually be covered by trim but I would sleep easier knowing that it was fixed properly.
fiberglass1.jpg


3) I also need to replace my transom. But, how would I go about doing this with the cap still on the hull? I would like to make the least amount of cuts as possible to avoid an overabundance of fiberglass work further down the road.

Any answers or suggestions to these three questions would be awesome...

Thank you.
 

jonesg

Admiral
Joined
Feb 22, 2008
Messages
7,174
Re: Finally began my summer project and I am already confused...

Cut the deck off, cut the splashwell off, do the transom with nidacore pourable composite, access the inside of the hull side repair by cutting part of the gunnel away on either side of the damage, maybe 2 feet either side.

When cutting the deck leave the main hatches in one peice, don't make any cuts across hatch openings or they'll be difficult to get lined up when the deck goes back.

When cutting the splashwell make the cuts so they are easily concealed along seams etc. You need access to the back of the transom, I'd expect the rear wall to be weakened, but its simple to install a dam for the nida.
 

fishKILLER1987

Petty Officer 3rd Class
Joined
Mar 22, 2010
Messages
86
Re: Finally began my summer project and I am already confused...

Ok. So ur saying to just cut the deck and leave everything else intact. What about the foam in the gunnel? Do u think it is still good??

Can u explain this nidacore pourable composite in a little more detail?
I did some research on it and it sounds like a miracle product. So would I use the nidacore instead of plywood for the transom?
 

jonesg

Admiral
Joined
Feb 22, 2008
Messages
7,174
Re: Finally began my summer project and I am already confused...

I used seacast because I didn't know about Nida at the time, coulda saved $300, its just as good at 50% cost.
It allows you to do the transom from the top and leave the cap on, if you do pop the cap then you might as well use plywood to save money.

Test the foam under the gunnels, it might be ok. I would tend to leave it be and just cut it away from the hull repair for interior access.

Follow the directions for seacast by watching their video but substitute nida for the pour in. They will send you a 1 gal free sample pail to play with.

A spade drill bit, an extention and elec chainsaw works real well, the chainsaw throws the wood out, takes a couple of days but it comes out ok.
You can hear when the chainsaw touches the glass at the bottom, it sounds dangerous but it didn't cut the glass at all. Works real good.
http://www.transomrepair.com/zk/how-to-pour-seacast-video.shtml
 
Top