Engin Basement Gasket leaking

Plandeck

Petty Officer 2nd Class
Joined
Jul 8, 2012
Messages
115
No Title

Attached is image of my 8hp Nissn outboard lower unit converted to saildrive....you can see the corrosion and the zinc anode, and the small amount of remaining copper bottom paint. I need to unbolt the LU to replace the bearing (there was a significant amount of water that came out before the gear oil when I drained the gear case...interestingly the gear oil came out dark not white and did not seem to mix with the water)...I'll use a wire brush to remove the bottom paint and then, as you recommend, 2 coats of epoxy paint over the lower unit. I wasn't sure what you meant about the epoxy insulating the LU from the copper...is that copper paint used after the 2 coats of epoxy paint on the LU? or is it copper suspended in the epoxy paint? There is a problem with zebra mussels in the Great Lakes. Problem is their spawn gets inside of the plastic grates and then matures into mussels which block the passage. I used the copper bottom paint inside the grating and this prevented the spawn from growing into mussels. How would you deal with this since the LU is not able to be inspected as a saildirve below the hull...?
 

Attachments

  • photo254171.jpg
    photo254171.jpg
    120.5 KB · Views: 0

pvanv

Admiral
Joined
Apr 20, 2008
Messages
6,559
From your pic, it appears that you hacked off the antiventilation plate (and more) doing the conversion, thereby eliminating the factory anode. What a mess you have created. As I previously noted, you use mag anodes in the Great Lakes (I am on Lake Ontario with my 9.8A3 -- same motor, just not de-tuned with a crippled carb.). You should also be running a high thrust prop. No, you do not ever put copper in contact with aluminum -- not even suspended in epoxy. You use the epoxy as an insulator -- a barrier coat -- before any copper. Also, you must sandblast (not just wire brush) the casting to remove 100% of the corrosion (and factory paint), then etch the aluminum so that the epoxy will stick properly. If you then apply coppercoat http://coppercoat.com or similar antifouling, you will be mussel free. Aside from that, you will need to periodically clean that LU... either haul, or dive, but it will need to be cleaned periodically. What bearing do you feel is causing water to get into your LU? Odds are that you have a bad seal somewhere. Bearings are not seals.

Based on your demonstrated knowledge and skill set, backed up by your blunders and questions, if you want a modicum of success with this project, you should seek the assistance of a marine professional. Really. No offense intended, but you just don't have the skills and experience to not continue making a mess out of what was once a great motor.
 

Plandeck

Petty Officer 2nd Class
Joined
Jul 8, 2012
Messages
115
I appreciate your constructive criticism, and the information contained, don't get me wrong...but what you say...after 3 flawless seasons with the saildrive conversion the advantage of a fully submerged prop in heavy Great Lakes seas over a stern hung installation is huge, not to mention the other benefits such as ease of access getting into the sailboat out of the water (now there is a swim deck where the motor was), reduced noise, lower center of gravity, etc (not to mention the huge cost advantage over installing a traditional inboard engine with prop shaft and stuffing box)...as for the antiventilation plate...I removed it to reduce drag...I didn't notice one on factory installed saildrives of expensive larger sailboats and considered its function mostly for props with only shallow submersion...not the saildrive's problem. Maybe my installation is a bit rough, but its a first and a prototype and has operated remarkably well. Ironing out the glitches has been an ongoing affair, but each one seems to have fallen into place. (By the way the solenoid choke you recommended seems to have burned out...I remember this problem with other solenoids I used for other applications in the past...is it typical for an outboard?)...I'll have the LU sandblasted, etch it and epoxy paint it this winter after unbolting it from the underbelly of the sailboat...and inspect the bearing/seal at that time...but it still doesn't solve the zebra mussel spawn that finds its way through the plastic grate and hatches in the water pump passage way....I haul out each year so inspection and cleaning is an annual thing. As far as seeking the assistance of a marine professional...isn't that what I'm doing here Paul?
 

Sea Rider

Supreme Mariner
Joined
Sep 20, 2008
Messages
12,345
Interesting convertion but a PITA if wanting doing anything to lower leg, say gear oil, prop change. For that will necessarily must take out the sailboat. If sailboat on its way rides parallel to water level, anticav plate will ride same assuming that OB sits internally at 90?. Did you retorqued base gasket, if so, were lower bolts bit loose ?

Happy Boating
 

pvanv

Admiral
Joined
Apr 20, 2008
Messages
6,559
I have never seen an electric choke solenoid fail on the 8/9.8, but it is possible. It's usually only live for a few seconds while starting, so it doesn't get hot, etc. Check it with an ohm meter if in doubt.

When you strip off the prop, prop shaft housing, etc., to do the blasting, you can also remove the water inlet strainers, and treat that inner cavity the same as the rest of the LU casting. Then you won't get mussels in there.

I would recommend the carb for the 9.8, and I would also recommend a high thrust prop -- which you will also want to blast, etch, epoxy coat and antifoul, since it is also continuously submerged. Don't do the drive shaft, or the impeller will not fit over it.

The typical installation of an outboard in an application such as yours is what my boat has -- the outboard is housed, complete, in a lazarette well, rather than hung off the stern. Much less effort to construct the inner transom mount than to convert the motor leg, plus the motor can just be unclamped and pulled out for service. You can see the technique by reviewing the Hinterhoeller HR28 on the web.
 

Plandeck

Petty Officer 2nd Class
Joined
Jul 8, 2012
Messages
115
No Title

...familiar with the lazarette install on boats from 60's and it never impressed me...you still get the motor popping out of the water in rough seas no? plus the noise, plus the blocked access to the transom from the water, plus no lowered center of gravity closer the keel and middle of the boat...only more dead weight hanging off the stern when sailing...just where you don't want it.

You are recommending replacing my carb with one for a 9.8hp Nissan? Really? this a performance thing? and a high thrust prop? Would the expense be worth it? Its a sailboat! And why sandblast, etch and repaint prop? no corrosion there...

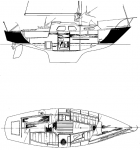
I sail a Grampian 26' built in 1973...not so dissimilar from your 28...also built in CAN with a bolted on cast iron fin keel and spade rudder designed by Alex somebody or other...although built as a 26' with the sugar scoop/swim deck added by me to the stern as you can see on attached (to increase hull speed by increasing length theoretically) she is now a 27.5...

What's a good epoxy paint for the aluminum LU?
 

Attachments

  • photo254277.jpg
    photo254277.jpg
    370.3 KB · Views: 0

pvanv

Admiral
Joined
Apr 20, 2008
Messages
6,559
With a long shaft motor, the prop stays submerged.
The motor is in its own compartment, so it is very quiet, especially since it's a 2-cylinder 4-stroke.
No gasoline inside the cabin, either, so safer.
No hole in the bottom of the boat to leak.
This ends up being a fully Remote motor, with single-lever control and key start. Many think it's an inboard.
Yes, the motor is aft of the rudder, but it leaves the transom completely solid.
The 8 and 9.8 are identical except that the 8 has a detuned (smaller) carb.
The HT prop was made specifically for sail boats. It develops superb thrust, especially in reverse, and allows the motor to come up to the correct WOT RPM of 6000. More efficient, and safer in a storm.
In fact, if you order The 9.8 Tohatsu (Nissan no longer sells outboards) in XL shaft, it will automatically come with the HT sailboat prop.
Your motor location develops a lot more exhaust back pressure because it is mounted too deep in the water.
Lead is a much better choice for keel ballast, since it does not rust. Iron was used to save a few dollars. It's lighter, so you need more of it. However, the rest of the Grampian build is pretty sturdy.
I have the most experience with West system epoxy (and their 2-part aluminum etch), but other brands are OK too. Remember that most epoxies will blush, so they will need to be scrubbed with water between coats, or the second coat will not adhere to the prior coat properly, unless you "hot coat" by applying the second coat before the first one fully cures.

hr28.png
 

Sea Rider

Supreme Mariner
Joined
Sep 20, 2008
Messages
12,345
Plandeck,

To take the max out of your 8 HP while pushing your sailboat OB will need to run at its max stated wot rpm range, your current prop should be a medium pitched delivered prop which is not appropriate to push heavy weights as could lug the engine when full power its needed. To check current prop wot rpm will need to install a tach, if OB runs at min wot rpm range a prop repitch or maximization for a less pitch is the way to go.

If solenoid is ok, check solenoid plunger, sometimes sticks/jams inside solenoid body. Push and release with fingers to check if works smoothly. Seen some solenoids misalingnments and plunger jamming when electrically actuated.

Paul great OB/sailboat configuration, OB running at 6 K at full throttle is the way to go with underpowered OB's.

Happy Boating
 

Plandeck

Petty Officer 2nd Class
Joined
Jul 8, 2012
Messages
115
well the engine oil leak isn't under torqued bolts at the basement power head gasket...all are tight and torqued as supposed to be. Paul, are you saying paint the aluminum with raw West system epoxy? Got the LU off and on my work bench...looks like there is a groove on the propeller thrust holder that should take an o ring but it is missing...but I don't see one on a parts list...this would explain water in the gear case right? especially water that didn't mix white with the gear lube that came out after...and a lead keel is an ecological hazard...if she sank in deep Great Lakes water the wreck would still need to be brought to the surface for salvage...could be very expensive...she's an old boat.

Which prop would you recommend? 4 blade or 3? 7 pitch or 5?

Nissan Props.jpg
 
Last edited:

Sea Rider

Supreme Mariner
Joined
Sep 20, 2008
Messages
12,345
You need to tach current factory delivered prop with an induction tach as usually loaded and check max achieved wot rpm. To take the most out of that 8, go for a 9.8 carb swap and pass it to a 9.8. HP Both 8 & 9.8 CC are same CC,same time advanced and revs at same wot rpm range. Later can go for a prop maximization to take the max out of each one.

Happy Boating
 

pvanv

Admiral
Joined
Apr 20, 2008
Messages
6,559
well the engine oil leak isn't under torqued bolts at the basement power head gasket...all are tight and torqued as supposed to be. Paul, are you saying paint the aluminum with raw West system epoxy? Got the LU off and on my work bench...looks like there is a groove on the propeller thrust holder that should take an o ring but it is missing...but I don't see one on a parts list...this would explain water in the gear case right? especially water that didn't mix white with the gear lube that came out after...and a lead keel is an ecological hazard...if she sank in deep Great Lakes water the wreck would still need to be brought to the surface for salvage...could be very expensive...she's an old boat.

Which prop would you recommend? 4 blade or 3? 7 pitch or 5?

No no o-ring.
No, metallic lead in the bottom of the lake (how often is a well maintained boat going to lose a keel?) does not need to be salvaged.
Check with Coppercoat about outdrive prep.
 

pvanv

Admiral
Joined
Apr 20, 2008
Messages
6,559
You probably need a seal kit for your LU, available from any dealer. Good time to do the wp kit too, since you will have everything apart. Be sure to replace the cam rod bushing o-rings (both inner and outer) as they are often overlooked. There are also conventional seals for the drive shaft and prop shaft, as well as o-ring for the prop shaft housing. The kit should also come with lower water pump gasketing, but you will of course get that when you get the wp kit.

On a 7000-pound or heavier boat, I would get the HT prop in 5 pitch. Considering you have the 8 and not the 9.8, maybe even on a slightly lighter boat. On a 4000-pounder, the 7 pitch HT prop would be OK. Both of the Tohatsu HT props for your motor are manufactured by Solas as 4-blade HT props.
 

Plandeck

Petty Officer 2nd Class
Joined
Jul 8, 2012
Messages
115
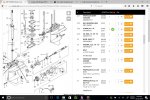
How about the shift rod bushing and (2)? O rings? Parts dwg shows 2 O rings, I am missing one on top of the bushing if there ever was one...any chance of water penetration here into the base of the shift rod and then down into the LU?...as for your 4 blade prop...really?...wouldn't this only add to drag when sailing? Probably a very small thing...and the medium duty prop I am using now is a bit worn and could be replaced, although not bent or dinged really...Great Lakes boating rarely strikes bottom or anything else with the prop...keel in the way...I only find one inner O ring on the cam parts diagram 22-3...
LU parts diag.jpgI wasn't going to do the WP because I rebuilt it 2 or 3 years ago and working fine.
 
Last edited:

Plandeck

Petty Officer 2nd Class
Joined
Jul 8, 2012
Messages
115
...lastly seems there is a slight warp in the prop shaft...hmmm...don''t know where this might have come from...I've never hit anything...I guess it must be replaced huh? Its only a slight warp visible when twirling...warp appears to occur after the bearing between the prop spline tip of the shaft and the bearing...I guess somebody before me set the motor down on its prop on a hard surface and slightly bent the shaft...worked fine the last few years why fix it right?
 
Last edited:

pvanv

Admiral
Joined
Apr 20, 2008
Messages
6,559
There is an o-ring inside the cam rod bushing, and one at the bottom. Those are the only two for the cam rod bushing. The lower (outer) one is compressed by the retainer "stopper" pushing down on the bushing. The inner one is compressed by the cam rod. Changing the inner one will test your patience and skill. Don't mangle the groove in the nylon bushing, or it is sure to leak.

If the run-out of the prop shaft is visible to the naked eye, the shaft is bent, possibly by dropping the motor onto the prop, and should be either straightened (difficult for ordinary folks to do) or replaced. That can cause a prop shaft seal leak.

All OB manufacturers recommend annual wp maintenance. In the short season, and cold clear waters of the Great Lakes, we do them about every 3 years, unless in a very silty area.

The HT prop will have a little more drag, but that's negligible at boat speeds below 10 knots, especially on a cruiser or cruiser-racer. Thing is that the power boat props are intended for much faster boats, and either your motor will lug at WOT RPMs that are way to slow, or the prop will cavitate. Not ventilate -- cavitate. Neither lugging nor cavitation are good. The HT prop was designed specifically for sailing conditions, and to provide good thrust in reverse.
 

Plandeck

Petty Officer 2nd Class
Joined
Jul 8, 2012
Messages
115
I would replace the prop shaft but dread removing and reinstalling tiny clutch...any problem here? just drive out the pin? reset spring with screwdriver when reinstalling?...the o ring seal at the shaft seems to be moving with the slight warp to keep from leaking...but I did have water in the gear case when I drained it...didn't mix with the gear lube though as this came out dark not white...the water came out before the lube...
 

Plandeck

Petty Officer 2nd Class
Joined
Jul 8, 2012
Messages
115
No Title

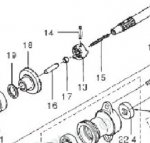
Ok clutch removed and shaft ordered...but for reassembly does the Clutch Spring Retainer (17) go between the spring and the pin or as shown in diagram on the other side of the pin...that was how it dissembled but makes more sense to me the other way with Retainer between spring and pin.
 

Attachments

  • photo254524.jpg
    photo254524.jpg
    17.6 KB · Views: 0

pvanv

Admiral
Joined
Apr 20, 2008
Messages
6,559
I would replace the prop shaft but dread removing and reinstalling tiny clutch...any problem here? just drive out the pin? reset spring with screwdriver when reinstalling?...the o ring seal at the shaft seems to be moving with the slight warp to keep from leaking...but I did have water in the gear case when I drained it...didn't mix with the gear lube though as this came out dark not white...the water came out before the lube...

There isn't any o-ring on the prop shaft; it's an ordinary oil seal, which you should replace as part of installing the new seal kit.

GET A FACTORY SERVICE MANUAL INSTEAD OF GUESSING.
 

pvanv

Admiral
Joined
Apr 20, 2008
Messages
6,559
Ok clutch removed and shaft ordered...but for reassembly does the Clutch Spring Retainer (17) go between the spring and the pin or as shown in diagram on the other side of the pin...that was how it dissembled but makes more sense to me the other way with Retainer between spring and pin.


The diagram is correct. Do it differently, and you will either be unable to reassemble the LU, or it will be stuck in one gear only.

GET A FACTORY SERVICE MANUAL INSTEAD OF GUESSING.
 

pvanv

Admiral
Joined
Apr 20, 2008
Messages
6,559
I would replace the prop shaft but dread removing and reinstalling tiny clutch...any problem here? just drive out the pin? reset spring with screwdriver when reinstalling?...the o ring seal at the shaft seems to be moving with the slight warp to keep from leaking...but I did have water in the gear case when I drained it...didn't mix with the gear lube though as this came out dark not white...the water came out before the lube...


Under some circumstances, the fluids don't emulsify (such as if it leaks while the motor is not running). Also, the emulsion will eventually separate back into the oil and water layers. That's why it's critical to drain the LU in the fall. If water is present, it can freeze and break the housing.

Clutch service is covered in the Factory (not aftermarket) service manual. You need to get one and read it. Then read it again. Then have it handy as you work. Otherwise, as has been noted many times, both when you proposed the Frankenstain mutilation of the MFS8 and in this lengthy thread (where you want to fix an oil leak that you have yet to even identify), get ye to a competent technician/dealer.
 
Top