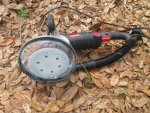
I have to sand the entire fiberglass deck on my 1968 Boston Whaler 17' blue hull in preparation for laying down some additional glass and wanted to avoid the dust. I looked at the many dust shields, but they are all designed for angle grinders. Angle grinders run too fast to sand flat. I use a $30 Harbor Freight variable speed polisher/sander. The dust shield I decided to go with was the most adaptable, I knew from the beginning that all the dust shields would have to be adapted and the 7" Dustbuddie seemed to be the most adaptable because of its mounting system. Here's how I adapted it to make it work:
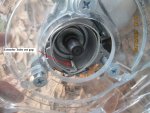
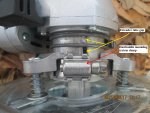
The first problem is that the HF polisher/sander "collar" where the Dustbuddie (DB)is mounted, is 1.85" in diameter and the 7" Dustbuddie is designed to mount on a minimum 2.25" grinder mounting area ("collar"), according to Dustbuddie. I however, found that it can go down to about 2". I had to place some kind of a sleeve to increase the HF collar diameter to about 2".
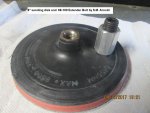
Secondly and more important, the sanding pad I have was too short to reach the floor. Therefore I bought a bolt extender specifically made for polishers, the best deal is at Amazon $5.05 delivered Model 69-100 Extender Bolt by S.M. Arnold. https://www.amazon.com/gp/product/B005IU1IOO/ref=oh_aui_detailpage_o00_s00?ie=UTF8&psc=1"
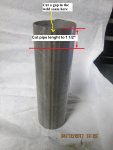
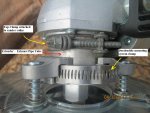
With that Extender Bolt installed, I ran into a third problem, now the sanding disk was too long, the DB sat in the air, with a gap for the dust to escape. I tried many different ideas and came up with my best solution, I used a piece of tailpipe that I had, it was a little over the 1.85" of the HF Polisher/Sander (HF P/S) collar, so I cut a slit down the weld seem so I'd have a gap that I could later tighten down with a hose clamp, creating a type of extende rso I could adjust the DB to the perfect position for sanding. I first made the piece out of 1 1/2" PVC pipe till I got the perfect length and fit, then I cut the steel tailpipe to size. I attached the tailpipe to the HF collar with a hose clamp. Then I attached the DB to the extender pipe with the DB mounting system, which is another hose clamp.
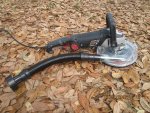
I hooked up the HF sander/dustbuddie with a 6" disk & 40 grit paper to my ShopVac with a bag filter (very important!!! You MUST use a bag filter or it'll clog your regular filter very fast and you do not want to be cleaning this stuff off the filter.) and it sanded fast and without dust.
Some Notes:
This DB system only works on flat surfaces, as long as you keep the sander flat, all the dust will be extracted.
I used steel pipe because I thought the PVC might insulate the bearing in the HF Polisher/sander and cause it to overheat. The steel pipe will dissipate heat and the vacuum cleaner will draw cooling air through the DB arbor opening. I also used steel because it does not bend at the end like the PVC.
You'll have to move the pipe gap and the two clamps around till they all sit flush, there is not much collar height on the HF P/S so you want to get the clamp down just right.
I paid $30 for the HF P/S, $71 for the 7" Dustbuddie Kit which includes the adapter hose to hook up to the ShopVac, and $5.05 for the Extender Bolt. That's a total of $106 for tools that I can use for other purposes too (dustless angle grinding of concrete floors, polishing cars & boats, sanding without the shield....)
The first problem is that the HF polisher/sander "collar" where the Dustbuddie (DB)is mounted, is 1.85" in diameter and the 7" Dustbuddie is designed to mount on a minimum 2.25" grinder mounting area ("collar"), according to Dustbuddie. I however, found that it can go down to about 2". I had to place some kind of a sleeve to increase the HF collar diameter to about 2".
Secondly and more important, the sanding pad I have was too short to reach the floor. Therefore I bought a bolt extender specifically made for polishers, the best deal is at Amazon $5.05 delivered Model 69-100 Extender Bolt by S.M. Arnold. https://www.amazon.com/gp/product/B005IU1IOO/ref=oh_aui_detailpage_o00_s00?ie=UTF8&psc=1"
With that Extender Bolt installed, I ran into a third problem, now the sanding disk was too long, the DB sat in the air, with a gap for the dust to escape. I tried many different ideas and came up with my best solution, I used a piece of tailpipe that I had, it was a little over the 1.85" of the HF Polisher/Sander (HF P/S) collar, so I cut a slit down the weld seem so I'd have a gap that I could later tighten down with a hose clamp, creating a type of extende rso I could adjust the DB to the perfect position for sanding. I first made the piece out of 1 1/2" PVC pipe till I got the perfect length and fit, then I cut the steel tailpipe to size. I attached the tailpipe to the HF collar with a hose clamp. Then I attached the DB to the extender pipe with the DB mounting system, which is another hose clamp.
I hooked up the HF sander/dustbuddie with a 6" disk & 40 grit paper to my ShopVac with a bag filter (very important!!! You MUST use a bag filter or it'll clog your regular filter very fast and you do not want to be cleaning this stuff off the filter.) and it sanded fast and without dust.
Some Notes:
This DB system only works on flat surfaces, as long as you keep the sander flat, all the dust will be extracted.
I used steel pipe because I thought the PVC might insulate the bearing in the HF Polisher/sander and cause it to overheat. The steel pipe will dissipate heat and the vacuum cleaner will draw cooling air through the DB arbor opening. I also used steel because it does not bend at the end like the PVC.
You'll have to move the pipe gap and the two clamps around till they all sit flush, there is not much collar height on the HF P/S so you want to get the clamp down just right.
I paid $30 for the HF P/S, $71 for the 7" Dustbuddie Kit which includes the adapter hose to hook up to the ShopVac, and $5.05 for the Extender Bolt. That's a total of $106 for tools that I can use for other purposes too (dustless angle grinding of concrete floors, polishing cars & boats, sanding without the shield....)