Damaged Hull -- Pictures

Peter9Do

Petty Officer 2nd Class
Joined
Nov 11, 2012
Messages
120
Re: Damaged Hull -- Pictures

Thanks JB! The image you provided makes sense, but i have what looks to be a paper towel core that goes down the middle and it goes to a port hole that is corked to the blige pit. Now, as for your first question there is foam in the hull, but this tube is under the foam and it makes no passage to the foam. This tube goes right to the bow and that's it. Also, the blige pit on this boat has 4 hole, one on each side, one on the front for this tube to drain and then the normal drain.

So, what i think I'm going to do is cut this tube out completly and run some glass down the entire keel to repair the cracks and to fortify the entire keel. One everything is repaired and has that added, I'll put the tube back in. What do you think???
 

jbcurt00

Moderator
Staff member
Joined
Oct 25, 2011
Messages
24,871
Re: Damaged Hull -- Pictures

I understood the tube down the center, that's what the carpet tube was for... It'd be @ 3-4" around & stiff as heck... Might hold up really well to being cut in half & having glass & resin run over it....

When you remove that tube, I suspect you may find a glassed in piece of wood taking up most if not all of the space inside the keel.......

My pix was in reference to the hull & and possible condensation and allowing a small amount of air to 'circulate/ventilate' thru that small tube & my lower bilge plug's hole below deck...........

On mine, there are bilge plugs for both below decks & 1 for above decks....... Of course they're both at least 1.5" above the surface their supposed to drain :facepalm:

By 1978 MFG should have gotten a handle on foam filling a hull, so rather then an un-needed design hold-over for some unknown reason, I'd for sure put that support back. Either w/ a similar 1/2tube or possibly a different shaped stringer of some type. Other's may have a better grasp of the design purpose of the tube & it's shape, but likely it should be redone w/ a similar tube....:)
 

Peter9Do

Petty Officer 2nd Class
Joined
Nov 11, 2012
Messages
120
Re: Damaged Hull -- Pictures

I thought the one on your boat makes sense just a small tube to release any moisture that builds up in the hull. I like it! Well, i can promise you this: Once I get this boat on this cradle and the rest of this deck out, i will be pulling out a section of this 1/2 tube to inspect closer. I will take a bunch of pictures to make sure i get all the details and take some measurments of everything it uncovers. So far the only thing for certain is a nice sized section of that NEEDS to come out so i can properly repair the fiberglass. I should get to this within the next couple of weeks or so (depending on how quickly i get this cradle together.
 

chriscraft254

Commander
Joined
Jun 4, 2011
Messages
2,445
Re: Damaged Hull -- Pictures

The "drainage pipe" pipe your referring to is simply for water that gets in the forward compartment to be able to drain to the stern so the water can be pumped out. I was just talking about this on another thread. Pvc pipe is sometimes used for this or a channel is made using cardboard or whatever to shape it and provide a channel with fiberglass. The reason a pipe is used in alot of smaller boats is because you don't have the height on smaller vessels to expel water out of the front anchor locker or starage compartment via a thru hull drain.

The nice thing about pvc is it won't rott and you can glass it in just like you would anything else. Fiberglass after all is nothing more than a plastic like pvc. This especially usefull for running under a fuel tank as the tank can sit right on it and not hurt it. The pvc can be run all the way back to the bilge through your bulkheads and just glassed into the bulkheads so water or air doesn't intrude into the hole around it.

I know jbcurt mentioned condensation and that might be the reason for the tube, that is very unlikely as it wouldn't provide airflow without an intake somewhere with forced air. Just thought I would throw that in there. ;) All your bulkheads and stringers need to drain properly to the stern in the case that water does make its way in there via a rub rail, condensation etc.

As far as the exterior of your hull, take a look through my refurb thread sometime. I completely restored the bottom gelcoat on my boat that most said couldn't be done. The product I used was "Rhino film discs". You can use them dry on gelcoat, no need to wet sand. You use them on a da sander and they come in multiple grades. I would probably start with 800 grit on your hull and then go over with 1000 grit. Then just light compound and your done. Wax if you like afterwards.

Another option is to just try and compound the hull or wet sand. Don't get to aggressive, stick with nothing less than 600 grit if you go this route and prepare yourself for sore shoulders.

The gelcoat on the inside can be rolled. It should have no less than three coats and you do them all at one time with the last coat of gelcoat having a wax additive so it will cure all three coats hard. Keep in mind that gelcoat is nothing more than white resin. You will be covering up everything and making it pop because it will be white. Gelcoats are tintable, but the white white will not match your hull out of the can. It is very hard to get a perfect match. Also, it all in the prep, if you have a rough surface before you gelcoat (rough Fiberglass), it will show every defect and rough areas. The rolling has to be done carefully as to not get raised edges from the roller. Its good to go in a couple different directions. Overlapping into what you just gelcoated. Its not hard at all, experience just makes it a smoother process.

For beginners I suggest you take a piece of plywood first and practice rolling it out until you feel comfortable. But thats a long way away, Get to work! :)
 

Peter9Do

Petty Officer 2nd Class
Joined
Nov 11, 2012
Messages
120
Re: Damaged Hull -- Pictures

Thanks Chriscraft for all the info! I don't know what I would do without you guys other than save money! Okay, so there is no structural purposes of this tube correct? Also, do you think once I cut it off, should I replace it by fiberglassing it back in or should I just buy some PVC and make a new one?

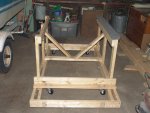
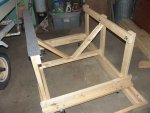
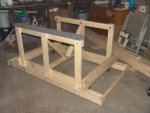
Today, I finished up the structure of the rear cradle! All I have to do is mount the carpeted 2x4s. I still have one more 2x4 to carpet but the battery on my saw didn't want to get me through the last cut today. On top of all the problems I encountered I was able to get it done (again, for the most part). I swear someone goes into my garage at night and hides stuff on me, then when I go out to purchase the item again, they put it back! I wish they would stop doing that to me!!!!!
So, I put the casters on today along with a couple of supports for the 2x4s that are housing the casters and some 45 degree supports for the cradle walls. Also, I think I'm going to trim down the bolts at the top now that I'm looking at the pictures just to be on the safe side. Now, that I'm just about done with this I need to start coming up with some measurements for the front cradle. Which seems it will be a little more difficult due to the shape of the hull. Soon enough, this boat will be minus the trailer!!!!!
DSC06565.jpg DSC06568.jpg DSC06567.jpg
 

tallcanadian

Captain
Joined
Sep 7, 2006
Messages
3,245
Re: Damaged Hull -- Pictures

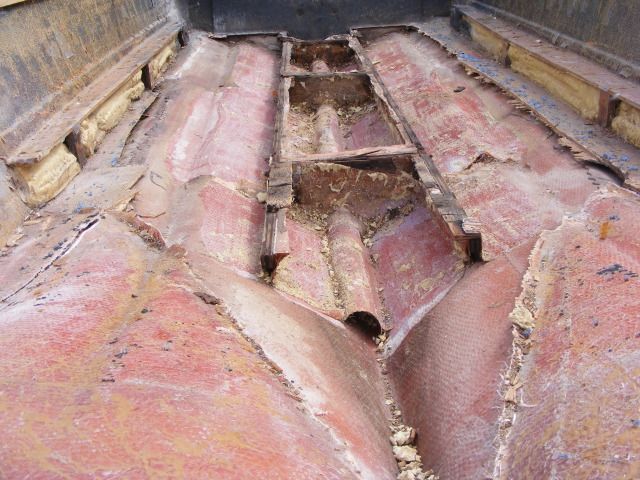
This tube is for drainage and I too was going to cut it out. Then I decided against it. I think I'll leave it there 'just in case'. I have to repair it as I damaged it getting out the rest of the crap. I've included a pic. There is no wood under this, at least in my boat. It is all glass.

DSCF1364.jpg
 

Peter9Do

Petty Officer 2nd Class
Joined
Nov 11, 2012
Messages
120
Re: Damaged Hull -- Pictures

Thanks TC! I think I'm just going to cut it out and then replace it by just glassing it in. Or i might replace it with some PVC and then glass over that. Either way i have to pull it out for the sake of the repair.

This tube has me thinking... I think i might make some sensors to detect water in the hull, maybe like 4 or 5 of them at different heights so I know how much water is building up in the hull. This is why i carry my notebook with me... lol!
 

chriscraft254

Commander
Joined
Jun 4, 2011
Messages
2,445
Re: Damaged Hull -- Pictures

Yup, thats the same idea as the pvc. You can also cut a 3 inch pvc on a table saw in half and lay it in the bottom and then tab it in and glass over it. Some use cardboard to form it, but I would worry about the cardboard degrading over time.

And your lucky, atleast your "garage gremlins" bring back the stuff they barrow when there done with it. :lol:

Can you post a pic of your hull with the drain showing like above?
 

Peter9Do

Petty Officer 2nd Class
Joined
Nov 11, 2012
Messages
120
Re: Damaged Hull -- Pictures

Yea, i like the PVC route. Once I cut the tube off I'll see if it's going to be a pain in the arse to put back on. If it is I'm going to do the PVC route.

As for my garage gremlins you have to hear this. So i bought a new pair of work gloves from harbor freight they are like the Mechanic's gloves. I buy them because they are stong and keep my hands from freezing while I'm working in 20 degree weather (and i refuse to turn my heater on). So, as i said i just bought a pair, I'm looking all over my house and garage for them. I work for 6 hours outside in the garage wearing my old gloves that have holes in just about every finger. So, i decide that i need a new pair AGAIN, so I go to HF, buy a new pair. As soon as i open my garage door boom their eye level hanging on my work bench! No way they were there!!!!!! Same thing with some nuts and washers, found them whan I got back from Home Depot!
 

Peter9Do

Petty Officer 2nd Class
Joined
Nov 11, 2012
Messages
120
Re: Damaged Hull -- Pictures

As for a picture of the tube, I have not uncovered it 100% yet, but i will post one once i get there. TC has the same boat as me, so that picture above that TC posted is going to look like mine! TC is the whole reason why I even came to iBoats forum. I saw his boat in a google search for the make modle and year.
 

chriscraft254

Commander
Joined
Jun 4, 2011
Messages
2,445
Re: Damaged Hull -- Pictures

So not only do the Garage gremlins put them back, they organize and hang them up to. Now your just bragging,lol :) Good move on blaming TallCanadian Peter, I like it. lol
 

Peter9Do

Petty Officer 2nd Class
Joined
Nov 11, 2012
Messages
120
Re: Damaged Hull -- Pictures

I blame TC 110%!!!!! LOL! He basicly told me; "Listen here guy, your boat it's a peice of shiznat go spend some money and clean out your garage because its going to be a long cold winter for you!" Now, the wallet is open, I spend hours in my cold garage all by myself, and gremlins keep moveing and organizing all my stuff so I have to buy doubles of everything! TC, my life would be different if you didn't respond to that email! Hahahaha!
 

tallcanadian

Captain
Joined
Sep 7, 2006
Messages
3,245
Re: Damaged Hull -- Pictures

Come on now. Don't be hatin'. lol. It only gets better as you go along. I know with me it's become and obsession. I eat breathe, sleep boats. I plan, I scheme, i plan some more. I have rebuilt my boat 1000 times already in my head. I need help. You will too. :eek::faint2:
 

chriscraft254

Commander
Joined
Jun 4, 2011
Messages
2,445
Re: Damaged Hull -- Pictures

Wait until the boat gremlins get onto the finished boat. They move crap around all the time. I set traps for them. :boom:
 

jbcurt00

Moderator
Staff member
Joined
Oct 25, 2011
Messages
24,871
Re: Damaged Hull -- Pictures

Yep, what TC said ^^^

Hi


My name is John

And I have both MBS & MMS...

In fact, I'm not just a member, I'm president of the local boat_nerd_ r_us chapter of MBS........


Multiple
Boat
Syndrom
\
Multiple
Motor
Syndrom

Now that Peter's got this one in tear down, what say we find his next project:
3Ec3G43Jc5Na5I85G1d1l16e88f943b7a155a.jpg

17 ft boat must go


3ka3G73If5Nf5T05F1d189cdbbe75f5451e45.jpg

1968 MFG Westfield fibreglass

3Fc3Ia3H25Ie5Fb5J9d1j7d93f31ceb02142b.jpg

1970 Renken 15FT Fiberglass


Those all seem budget friendly MBS candidates..........:faint2:

PS: tell your Admiral, that my Admiral sends her condolences & welcomes her to the iboats widow's club :facepalm:
 

Peter9Do

Petty Officer 2nd Class
Joined
Nov 11, 2012
Messages
120
Re: Damaged Hull -- Pictures

LMAO!!!! You guys crack me up! So, I guess we should start a thread on iBoats called BRA (Boat Restoration Anonymous), because by the sound of it we all have some deep seeded issues. We should have a raffle to pick sponsorship over one another. We need help damn it! HAHAHA!

TC for real, I have thanked you 1000 times! I enjoy doing this. I'll admit, at first I was a little hesitant about doing all of this, mainly because I was hoping just to make cosmetic repairs. Now, that you guys point out how unsafe my boat really is in the condition it's in, and the reliability doing these repairs will make it. I'm all about it! Now I'm just a little frightened that I'm enjoying the restoration process more than I will enjoy the actual boating! Now you tell me I have NOT lost my mind! Hahaha! Again TC, I can't thank you enough for all you have done. Really all of you guys are great and helped so much! I actually think I know what I'm doing, or I at least convinced myself that I know what I'm doing and you guys have deffinatly helped in that process!
 

Woodonglass

Supreme Mariner
Joined
Dec 29, 2009
Messages
25,924
Re: Damaged Hull -- Pictures

Uhmmm, I too suffer from Restoration Addiction. The restoration was VERY enjoyable but... I will admit the day I spent on the water with Son and Grandson, WAYYYYYYYYYYYYYYYYYY overshadowed the Fun of Restoration.
 

jbcurt00

Moderator
Staff member
Joined
Oct 25, 2011
Messages
24,871
Re: Damaged Hull -- Pictures

BTW: That 1968 MFG is calling my name......... Man does the exterior ever look Great! Nice wheel at the helm too............. :watermelon: W/ a torn down motor, I bet the selling price is 1/2 or less asking.......... I'm just sayin' :cold: :rolleyes:

I have stretched the patience twine around these parts way to tight already to even consider any purchases over the cost of a soda & a pack of gum.... :blue:

So it won't be headed my way....
 

Peter9Do

Petty Officer 2nd Class
Joined
Nov 11, 2012
Messages
120
Re: Damaged Hull -- Pictures

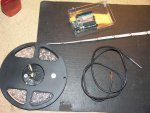
See at the end of the day I still have an addiction with electronics and I have started piling up on items for the boat, here are just a couple
-Arduino board
-16' (300) LED White led strip (might I add WATERPROOF!)
-Temperature sensor (Waterproof)

I have already built the circuit and still currently tweeking the coding for how I want the temperature sensor to work... And these LEDs, I have to say that this was probably the best deal I got yet and the wow that this will put into that boat, when all the trim under the cap lights up for some night fishing is going to be CRAZY! You don't even have to defuse the LEDs, the lighting is so even, I couldn't believe I paid $16.00 for 16' of it! Now, I have that idea of making some water sensors to put in the hull to alert of water build up and how much! This boat is going to wired to the gills! I hope my 6 ampere alternator can handle what I'm going to give it! LOL! I will definitely be needing an extra battery! I can't wait to start getting all this stuff in there. Also, I can't wait to start playing with the fiberglass and custom building panels and all that good stuff. They won't be able to hold me down!
I TOLD YOU I HAVE PROBLEMS!!!! I'M SICK!!!!
DSC06571.jpg DSC06574.jpg
 
Top