Dad's old boat 1968 Starcraft Jupiter/ Merc 650

Status
Not open for further replies.

Watermann

Starmada Splash of the Year 2014
Joined
Jan 12, 2013
Messages
13,753
Ok guys, educate me, what is OTF?
The wood boat guys swear by CPES (Clear Penetrating Epoxy Sealer) and I've seen/heard of other competing brands to CPES,
but what's OTF???

OTF - Woodonglass gave this to us. OTF = Old Timers Formula. The reason he asked about using the Helmsman rather than varnish as this graphic shows. Most have substituted the Helmsman for the varnish.

Old%20Timers%20Wood%20Sealer_1.jpg
 

Crossfire75 Ohio

Petty Officer 3rd Class
Joined
Jun 25, 2009
Messages
75
Excellent idea Watermann! Thank you.
DLNorth
OTF is a mixture of one part boiled linseed oil two parts mineral spirits and one part marine varnish. It is used to soak multiple coats into the wood to give it water resistant protection . After that Spar coatings.

I will follow Watermann's lead and cover all that with paint and paint the inner transom also as I have a little bit of corrosion but not much.

I have read many Starcraft restoration threads and I have trouble relocating and remembering what products were good and what was bad. Thanks for the help guys
 

DLNorth

Chief Petty Officer
Joined
May 26, 2016
Messages
432
Thanks guys,

That's close to what restorers of wood/canvas canoe use to put spring back in old wood.

Many use the boiled linseed oil and thinner, (some mineral sprits, some use turp) and then heat it to help it soak in.
Being that it will be top coated with traditional varnish I've never heard of the restorer adding varnish to the oil/thinner mix.

One thing about linseed oil is that the bugs like it and it turns dark with time. For this use, it probably doesn't matter. Because of this, many restorers, myself included, have switched to tung oil. It doesn't turn dark, but it's a bit more expensive.

Just be sure the oil is plenty dry before coating with the finish coats. I had a canoe once that it took several weeks in the sun before the oil dried enough to so I could varnish.

BTW, I like the paint after the finish, paint protects better and in the right color, looks better too.

So, back to the rebuilt, sorry for the distraction. :)


Dan
 

Decker83

Commander
Joined
Apr 5, 2011
Messages
2,592
That's what I used on the transom and the floor (OTF).. I used the
Helmsman and not the varnish.
After that I used the Helmsman straight out of the can and put 3 coats. Then I gave it
a light sanding and 2 coats of Rustoleum gloss white for the transom.. On the deck I did the same but used some Rustoleum gray porch paint on the bottom side of the deck and left the top Helmsman. The transom has been sitting outside in the elements for a year now and still looks new..
 

Crossfire75 Ohio

Petty Officer 3rd Class
Joined
Jun 25, 2009
Messages
75
No distractions or hijacks will be tolerated, oooh look shiny stuff 👀. Seriously though, I don't mind at all, this is how we all learn from each other and our experiences we have and that is what makes this site so great. Any information or thoughts and ideas are welcome here, and joking around is all in good spirits, have fun today because we may not be together tomorrow.
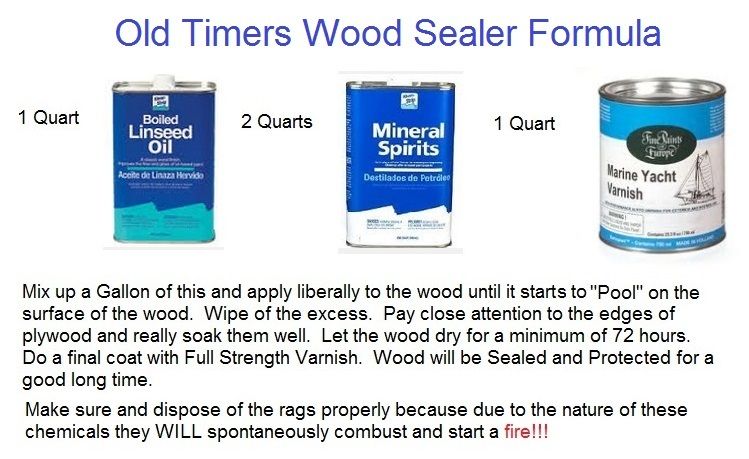
Thanks for bringing up the deck Decker83, I also was planning to do the deck sort of the same. My idea is OTF both top and bottom and the edges, Spar Urethane the same and then carpet on top. I am uncertain of what is the best way to get the carpet to stick. Paint the deck first, just carpet glue, snap in? What are your thoughts? I know Watermann is a huge fan of the carpet (just kidding Watermann, I did read the V5 thread, absolutely beautiful job by the way) and I already have the carpet, chosen by the Admiral of course.
I have read many tin restoration threads and have trouble finding information or pictures when I am looking back to remind myself what someone else did. I am thankful for all the reading material you all have provided, Watermann, BWR, RickAirmedic, cheapboatKev, ratherbboating, jasoutside(still reading) just to name the ones I can remember. Thanks to all and then some.
Time to get back to work on the tinny, I will post pictures if I can make some progress.
 

Crossfire75 Ohio

Petty Officer 3rd Class
Joined
Jun 25, 2009
Messages
75
I only made a small amount of headway, primed a couple coats on the winch mount modification and then it went from 60% humidity to 100%. Bummer, I can't get inside the hull to move on until the winch is bolted up. Rain imminent today also another delay as it needs a bit more primer to protect it from rusting. I will keep hammering away, I think I need a bigger hammer sometimes.
 

Crossfire75 Ohio

Petty Officer 3rd Class
Joined
Jun 25, 2009
Messages
75
Ok I’m back from hiatus of everything else that demanded my attention along with winter. I’ve got a question, in the pictures attached I would like to add 4 rivets 2 in the front of the rib at the shiny dots and 2 behind the rib in the same location. Already have the correct length solid rivets. Any thoughts? Good or bad idea. I’m trying to pull the rib tight to the skin like it should be and with the temporary bolts it’s not quite there yet
 

Crossfire75 Ohio

Petty Officer 3rd Class
Joined
Jun 25, 2009
Messages
75
[No message]
 

Attachments

  • photo315297.jpg
    photo315297.jpg
    581.3 KB · Views: 4
  • photo315298.jpg
    photo315298.jpg
    477.5 KB · Views: 4
  • photo315299.jpg
    photo315299.jpg
    585.8 KB · Views: 4
  • photo315300.jpg
    photo315300.jpg
    792.9 KB · Views: 19
  • photo315301.jpg
    photo315301.jpg
    531.4 KB · Views: 4

classiccat

"Captain" + Starmada Splash Of The Year 2020
Joined
Dec 20, 2010
Messages
3,405
There's supposed to be a little bit of a gap for the limber hole.

fetch


I wouldn't go banging/pulling around there too much. if you can't close the gap, shim it with some scrap aluminum and drive your rivets home.
 

Watermann

Starmada Splash of the Year 2014
Joined
Jan 12, 2013
Messages
13,753
Not something I would do, you're not going to take up that distance no matter what without deforming the hull skin. All those new holes are going to cause a failure point in the rib down the road too as the center of the rib is the flex point. I doubt that rib ever was set down tight to the hull in the center.

Call it good, plug up the holes with some solids and move on.
 

ShoestringMariner

Lieutenant Commander
Joined
Apr 18, 2015
Messages
1,563
OTF - Woodonglass gave this to us. OTF = Old Timers Formula. The reason he asked about using the Helmsman rather than varnish as this graphic shows. Most have substituted the Helmsman for the varnish.

[IMG2=JSON]{"data-align":"none","data-size":"full","height":"459","width":"749","src":"http:\/\/i1018.photobucket.com\/albums\/af303\/WoodOnGlass\/Old%20Timers%20Wood%20Sealer_1.jpg"**[/IMG2]

Would this product work for the varnish component of the OTF?
 

Attachments

  • photo315313.jpg
    photo315313.jpg
    894.2 KB · Views: 2

Crossfire75 Ohio

Petty Officer 3rd Class
Joined
Jun 25, 2009
Messages
75
Watermann, the keel underneath was gapped a little bit along with the rib situation. I think Starcraft used rivets that were either too short or pulled through some. I only wound up adding two center, front of the rib, all larger size solid rivets and it all sandwiched back together well. With a helping of 5200 on the rivets of course. I also started to Gluvit the bow. I will post pictures when I get them.
 
Status
Not open for further replies.
Top