Bringing a 1984 Enterprise Center Console back to life

cbnoodles

Chief Petty Officer
Joined
Sep 9, 2004
Messages
564
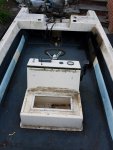
I'm going to resurrect the boat my dad gave me in 2004. Having never been a boat owner I made mistakes and ultimately let it go to seed. There's nothing special or sexy about the boat; this is more of a sentimental project since it was my dad's. Enterprise is a now defunct boat building company that was located in California.

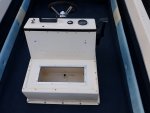
The boat is a 16' fiberglass center console fitted with a 35 hp Mercury and a 6 hp Nissan kicker. I ran it a few times after I got it but life got in the way so there she sat for more than a decade. I've just begun cleaning her and assessing what I want to do. I've been unable to find any pics on the web to show what she looked like new so any help is welcome from anyone who's ever heard of these.

I will soon post some pics of the cleanup so far. Some of my inspiration comes from reading ssdale's StarCraft restore from a couple years ago but make no mistake, this is not that type of boat or project. Cheers!
 

Sea18Horse

Chief Petty Officer
Joined
Jun 1, 2008
Messages
626
Greetings, your post made me curious. I'd never heard of that manufacturer before. A Google search is kind of frustrating isn't It. Lots of stuff with enterprise in it. I did find a post on FiberGlassics with a few pics of some brochure pages. A few are of a center console model. Have you seen that post? I'll try to link to it here but this forum software does funky stuff on this tablet. No guarrenties. Good luck with the resto.

Cheers...................Todd
 

cbnoodles

Chief Petty Officer
Joined
Sep 9, 2004
Messages
564
Since I'm new to posting pics I haven't had success yet but I hope to add some today or tomorrow. The problem seems to be my pics have too much resolution because I get a message that they exceed the 2 MB limit.

I'm also new to working on a boat and have a question about my deck. It's marine plywood under carpet. There is a small (less than 1 sq ft) section that is soft from rot just forward of the bilge. I suspect it got rot due to the edge being exposed. The boat is now cleaned out and under a canopy so no more rot should occur. Can/should I
1. let it go because the deck is otherwise structurally solid?
2. cut out the soft section only and patch it in (access appears to be not a problem)?
3. start cutting/replace the entire deck?

Thanks for any advice or tips.
 

Woodonglass

Supreme Mariner
Joined
Dec 29, 2009
Messages
25,924
Boats ROT from the bottom up. Just because you've only found the ONE soft spot doesn't mean that there's not a LOT more going on under the entire deck. Most 34 year old boats need a full rebuild. You should be drilling core samples in multiple places on the deck, stringers and transom to ascertain their condition. It sucks to have to go back and repair things that could have been dealt with in the beginning.
 

cbnoodles

Chief Petty Officer
Joined
Sep 9, 2004
Messages
564
Thanks for the good advice Woodonglass. I got very lucky. The transom, stringers and remainder of the deck are rock solid. It may have been that when I parked her it was with the trailer tongue raised about 20 degrees so no water collected. The damage was done from leaves that were in direct contact with the exposed edge of the deck.

I've stripped everything else that was bolted down from the boat except the motors and control. There is a second set of holes in the console from the original windshield. I have no fiberglass skill or experience so I plan to fill them and some bolt-hole stress cracks (superficial) with bondo or epoxy. Any thoughts?

The electric wiring was crap from the start so it's gone and I will replace with a proper distribution network and bus. Still plan to get pics posted, just haven't found time to mess with it.
 

Woodonglass

Supreme Mariner
Joined
Dec 29, 2009
Messages
25,924
Ok, just curious how you KNOW that they are good.? Have you core sampled them? There's NO other way to know for sure. There have been several who Thought theirs was good to go only to have to return and rip out all their work.
Just trying to help avoid this. If you're sure then get on with the repairs.
 

Fcdave

Petty Officer 2nd Class
Joined
Jun 10, 2011
Messages
180
WOG is correct....i thought my transom on a boat was good too....then WOG said better take a core sample....and low and behold .....wet, dark wood in many areas ..... couldn't believe how much rotting wood it was as i demo'd it all !!!! Sooo glad i checked. ...no other way to tell otherwise. If floor is perfect....then probably ok....if soft anywhere....you need to check stringers and transom !!!
 

cbnoodles

Chief Petty Officer
Joined
Sep 9, 2004
Messages
564
The stringers are visible and, as far as I can tell, intact. They are encapsulated in FG the length of the bilge to the bow. I can see them from the bilge well in the stern. How would I core sample them without compromising the FG? The transom is exposed below the splash well and I can see and reach the entire surface. While not actually drilling holes in it I jabbed hard with a screwdriver in 30 or 40 places and barely made a mark in the surface. I'm reluctant to drill into what appears and feels like a perfectly good piece of wood. Rapping anywhere I can reach also results in a sharp knock, not the dull thud one would expect from banging on waterlogged wood.

I'm not discounting your questions and I certainly appreciate the feedback. The soft spot I mentioned is virtually isolated from either of these areas. I'll work on the pics so I can show you what I mean. If, after that you're not convinced I will try drilling.
 

Woodonglass

Supreme Mariner
Joined
Dec 29, 2009
Messages
25,924
drilling into the glass surface is MINOR. IF you in fact find light colored dry shavings all you do is get some 3M 5200 sealant and fill the holes. Good as new. Not saying you're wrong, just saying that the Majority of boats of this age have significant issues unless they've been meticulously cared for.
 

cbnoodles

Chief Petty Officer
Joined
Sep 9, 2004
Messages
564
Finally able to get at least a pic of the original boat from SeaHorse's post. Mine is the 154VRDOB 2nd from the top on the starboard side. Thanks SeaHorse!

Click image for larger version  Name:	Enterprise Corwin Brochure.jpg Views:	1 Size:	112.7 KB ID:	10600524
 

cbnoodles

Chief Petty Officer
Joined
Sep 9, 2004
Messages
564
I finally learned how to post pics I think! Here's before and after the first cleaning....
 

Attachments

  • photo294392.jpg
    photo294392.jpg
    289.3 KB · Views: 1
  • photo294393.jpg
    photo294393.jpg
    155.2 KB · Views: 1

cbnoodles

Chief Petty Officer
Joined
Sep 9, 2004
Messages
564
So, now when I try to upload more pics I get this: "Upload failed due to your usergroup's upload quota. This file will require 170.0 KB but you only have 18.7 KB of 976.6 KB remaining." What am I doing wrong?
 

cbnoodles

Chief Petty Officer
Joined
Sep 9, 2004
Messages
564
WOG, I took samples from the stringers on both sides of the bilge well, the side walls just above the deck, and the transom (low and high) and came up with nice fluffy shavings. Looks like I'm OK I think.

Ordered new seats, pedestals & bases, a bunch of ss hardware and components last night so I can get started redoing the electric system. I decided to add a couple of small LED companionway lights fore and aft so I can take her out for hybrid stripers on a nearby reservoir.

I did a test section of compounding the bow cap and proved to myself that I will need to wet sand to bring the finish back properly. It's very clean and comes up with a nice luster but there is still residue in the finish and it just doesn't look good. This is, first and foremost, a fishing boat but there's no reason she can't look good enough for a Saturday evening date, right?
 

cbnoodles

Chief Petty Officer
Joined
Sep 9, 2004
Messages
564
It's been hard to get time to work on the boat with my schedule but I started sanding the gelcoat yesterday. The oxidation and imbedded grime is so heavy I wasn't making a lot of progress with 600 wet so I went to 220 dry paper and it showed a bit of improvement. The grime is worst around the cleat, rail, and rod holder mounts and it's time consuming but I think it will come up pretty nice. Do I dare use a machine to make this work go faster or should I just stay patient and do it by hand?

The electric system parts have started arriving also so I can get started on that once the gelcoat is cleaned and polished. After that I will add the new seats and pedestals. The live well seat and back cushion are shot so I will make new bases for both and have a local shop upholster them in a pattern to match the new seats. There are storage channels along the sides that have a plywood rail upholstered in vinyl. Those are shot as they were done with 1/2" cdx plywood. They will be replaced with new made from exterior grade and also upholstered to match the seats. I'm guessing there is such a thing as ss staples or upholstery tacks? Or brass? The carpet is stained but cleaned up OK and will stay. It just needs regluing where I pulled it up in the stern to inspect the deck and stringers.

I don't know what to expect with the motors. They appear very clean under the cowling with absolutely no sign of corrosion and I can turn them over with the props. Keeping my fingers crossed. The Mercury has one of those fins on it. I've read a few comments on these but can't tell whether the consensus is they are a good thing or not. The steering feels smooth so I don't expect any issues with the controls.

This project is more of a facelift for the old girl than most of the rebuilds in these threads but it's good experience for me as I'm just getting my feet wet. Maybe that's not a good choice of words? Thanks for any suggestions.
 
Last edited:

Sea18Horse

Chief Petty Officer
Joined
Jun 1, 2008
Messages
626
Exciting stuff. Yes there are SS staples available. And Monel as well. I could be wrong but I think Monel is the go to.

Did you get your pic upload troubles sorted? Seems strange, did you belong to a particular user group back in the day that has since filled up?

Cheers.........................Todd
 

cbnoodles

Chief Petty Officer
Joined
Sep 9, 2004
Messages
564
So, I've been trying to figure out the pic issue and may just be an oldhead who doesn't understand modern technology. At any rate, here goes another try: 20180628_152354.jpg
 

cbnoodles

Chief Petty Officer
Joined
Sep 9, 2004
Messages
564
Go figure! OK, let's see if I've got it now. No go! There is something limiting my pics to 1 MB total and it seems it may reset perodically. Maybe a daily or weekly limitation?
 

cbnoodles

Chief Petty Officer
Joined
Sep 9, 2004
Messages
564
I have the pic issue resolved finally. Here's an example of the holes I need to fill.The upper holes are from the original windshield where, it appears, it was knocked or torn loose, hence the ugly gouges. Is bondo or epoxy suitable for repairing this damage? Boat Console Closeup.jpg This is the condition of the motor under the cowling. It needs close inspection and testing but the lack of corrosion is encouraging. The rubber is all solid and still pliable. Boat Motor.jpg
 

cbnoodles

Chief Petty Officer
Joined
Sep 9, 2004
Messages
564
Here's an update pic. The finish is about 90% restored. I still have some final sanding on the bottom. I went with 180, 220, 600, 1200 grit wet sanding the entire hull except the aft half of the bottom which is still in like-new condition. Followed up the sanding with McGuire's 57 Compound and a low-budget B&D polisher that worked like a charm and have the first of 2 coats of wax done.

The two shots below are before and after of a section of the starboard side that must have been left to bang against a dock. It took about 3 or 4 hours to sand that out but it came up OK. The fittings cleaned up nicely with a polishing wheel and a bit of elbow grease and all the fasteners have been replaced with stainless.

Next up is patching the holes in the console and a half dozen dime to quarter size spots on the bottom where it got banged up on the shore I guess. Fortunately the damage is limited to the gelcoat so I plan to fill the voids with marine-tex and polish again. I also started laying out templates for replacing the trim panels and the live well seat bottom and back. My daughter is pretty handy with a sewing machine so I'm going to see if she wants to chip in with the vinyl covers for the seat. If not I'm not afraid to give it a go myself.Boat 7242018.jpgBoat side before.jpgBoat side after.jpg
 
Top