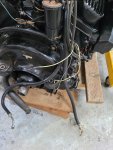
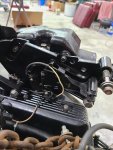
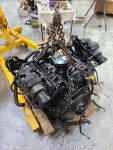
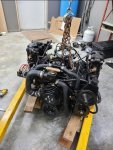
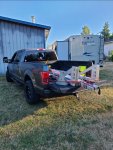
Basket case 4.3, gonna have some questions

Bumperlt12

Petty Officer 2nd Class
Joined
Mar 17, 2012
Messages
170
Its plastic, so im just going to heat it up and pry it out.

Hopefully the snapped bolt comes out easily.
 

Scott Danforth

Grumpy Vintage Moderator still playing with boats
Staff member
Joined
Jul 23, 2011
Messages
49,403
if you have a mechanical pump boss that is machined, I would go mechanical fuel pump.

first, its half the price of an electric pump, relay, switch, wiring, etc.
second, it will last 30+ years without a problem
 

Bumperlt12

Petty Officer 2nd Class
Joined
Mar 17, 2012
Messages
170
I bought a block off plate last night but, thats how I feel about it a mech pump I like the simplicity of it. Looking like that's going to be one of the last things bought because godamn I done bought everything else. Ill take recommendations on reliable mechanic fuel pump.. going to research them now. Maybe I will just hold on to block off?

EDIT. After researching I am seeing a lot of parts needed that I do not have. Pushrod, fuel lines, brackets... now I'm even more torn about using the electric thats installed, but needs attention.
 
Last edited:

Bumperlt12

Petty Officer 2nd Class
Joined
Mar 17, 2012
Messages
170
Made more progress today.

Snapped bolt came out real easy.

Installed oil drain hose.

Tried to get the distributor to seat but it wouldn't go down all the way.

Starter bolts seem to long, even though they're what we're holding it on before..

I spent a good 20 minutes trying to figure out how to use the power steering pully puller.. to no avail. Seems so simple im not sure what I'm doing wrong.

So.. off to research starter bolts, distributor installation, and PS pulley puller operation.
 

Attachments

  • photo337363.jpg
    photo337363.jpg
    943.7 KB · Views: 3
  • photo337364.jpg
    photo337364.jpg
    936.8 KB · Views: 3
  • photo337365.jpg
    photo337365.jpg
    1.1 MB · Views: 3

Bumperlt12

Petty Officer 2nd Class
Joined
Mar 17, 2012
Messages
170
UPDATE

Alrighty getting pretty close here!

Just a few more parts im waiting in.. hopefully into the boat on Sunday!

I posted (and deleted) a couple questions but thought they'd be better suited here.

Where do I ground the choke?

Theres a few mystery wires at the back of the engine. I believe the wiring harness is from a 94.

White/green and an extra ground go... where?
 

Attachments

  • Screenshot_20200814-061713_Gallery.jpg
    Screenshot_20200814-061713_Gallery.jpg
    985.2 KB · Views: 4
  • Screenshot_20200814-061657_Gallery.jpg
    Screenshot_20200814-061657_Gallery.jpg
    1 MB · Views: 3
  • Screenshot_20200814-064957_Gallery.jpg
    Screenshot_20200814-064957_Gallery.jpg
    1.1 MB · Views: 3
  • Screenshot_20200814-065025_Gallery.jpg
    Screenshot_20200814-065025_Gallery.jpg
    1.2 MB · Views: 4
  • Screenshot_20200814-065007_Gallery.jpg
    Screenshot_20200814-065007_Gallery.jpg
    1.2 MB · Views: 4

nola mike

Vice Admiral
Joined
Apr 22, 2009
Messages
5,350
The choke can ground anywhere, but I believe that the black wire in your last pic is the ground from the harness. Might need to replace the ring terminal with a spade. Can't tell for certain, but the green/white and black in the first pic are for your shift interrupt switch unless you already have that hooked up.
 

Rick Stephens

Admiral
Joined
Aug 13, 2013
Messages
6,118
When I remade my harness for an electric fuel pump I routed a purple wire and a black ground wire together to choke and continued purple to oil pressure switch. Bundles neatly and makes a clean setup. I just screwed the ground down on the plate that holds my circuit breaker, starter solenoid and the fuel pump relay I installed.
 

achris

More fish than mountain goat
Joined
May 19, 2004
Messages
27,468
Not a good idea to replace rings with spades. I can see the attraction, but if a nut comes loose (and they do) a spade will come off, possibly with unfortunate consequences. A ring will stay on.

Chris........
 

nola mike

Vice Admiral
Joined
Apr 22, 2009
Messages
5,350
Not sure what nut you're talking about that would come loose, but the choke on the 1409 has spade connections on it, where the mercarb/rochesters/others (?) Had the choke ground as a ring terminal screwed right onto the choke frame. Though a spade was used for what I would consider an important connection powering the coil (+) from the choke. Also oil pressure switch, relays use spades. My issue with them is that they seem more prone to corrosion than a ring or bullet.
 

achris

More fish than mountain goat
Joined
May 19, 2004
Messages
27,468
Not sure what nut you're talking about that would come loose, but the choke on the 1409 has spade connections on it, where the mercarb/rochesters/others (?) Had the choke ground as a ring terminal screwed right onto the choke frame. Though a spade was used for what I would consider an important connection powering the coil (+) from the choke. Also oil pressure switch, relays use spades. My issue with them is that they seem more prone to corrosion than a ring or bullet.

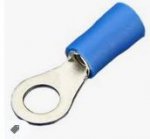
I was referring to things like oil pressure and engine temp sensors, and ignition coil posts. I've seen people swap these
ring.JPG
for these
spade.JPG
simply because it will save them from having to remove a nut :facepalm:

Not a good idea...
 

nola mike

Vice Admiral
Joined
Apr 22, 2009
Messages
5,350
Oh, yeah. Those get distorted when you try to tighten them down and don't make a good connection. I was talking about these guys:
 

Attachments

  • photo337760.jpg
    photo337760.jpg
    4.2 KB · Views: 0

Bumperlt12

Petty Officer 2nd Class
Joined
Mar 17, 2012
Messages
170
UPDATE. Haaaaalp.

Getting really really close now. Engine goes in tomorrow, I rented a gantry craine for the job.

1. Plastic fitting that broke off inside manifold is proving to be a bear. Im probably going to have to get a small wire wheel abrasive enough to get the plastic but not destroy the manifold threads. My idea of burning it out did not work well.

2. Hose from thermostat to PS cooler isn't the right hose. I made it fit but I need to get the right one.

3. I still don't know where the white/green tracer wires on the back of engine go. I snapped a pic of shift linkage but im pretty sure the interupt switch is wired up already...??

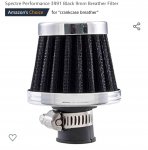
4. Spark arrestor tabs that hold the crankcase vent are broken. Any reason I can't use 2 little breather filters, one on each valve cover?

5. What are the factory locations for the ground wire near water temp sensor, and the one near the coil?
 

Attachments

  • Screenshot_20200815-055032_Gallery.jpg
    Screenshot_20200815-055032_Gallery.jpg
    1,014.6 KB · Views: 4
  • Screenshot_20200815-054950_Gallery.jpg
    Screenshot_20200815-054950_Gallery.jpg
    978.5 KB · Views: 4
  • Screenshot_20200815-055112_Gallery.jpg
    Screenshot_20200815-055112_Gallery.jpg
    1.2 MB · Views: 4
  • Screenshot_20200815-055404_Gallery.jpg
    Screenshot_20200815-055404_Gallery.jpg
    1.1 MB · Views: 4
  • Screenshot_20200815-055546_Gallery.jpg
    Screenshot_20200815-055546_Gallery.jpg
    1.3 MB · Views: 4
  • Screenshot_20200815-055958_Amazon Shopping.jpg
    Screenshot_20200815-055958_Amazon Shopping.jpg
    265 KB · Views: 4

Rick Stephens

Admiral
Joined
Aug 13, 2013
Messages
6,118
Just drill and tap the hole to clean out the threads. Same as I did for the broken off brass plug on my mani.

I think the green and white pairs are for the trim sensors.

The idea on routing the vent hoses to the intake is to keep fumes out of the bilge. They can be a problem contained in there. Safer to push it back through the carb and out the exhaust.
 

Bumperlt12

Petty Officer 2nd Class
Joined
Mar 17, 2012
Messages
170
Good info on vents, I think you're right.

I was just able to get the plastic out, new one is in.

Attached is a picture of remaining wires.

I believe the 2 gray are trim.

Are there more hookups regarding the trim??
 

Attachments

  • Screenshot_20200815-104251_Gallery.jpg
    Screenshot_20200815-104251_Gallery.jpg
    1 MB · Views: 1

nola mike

Vice Admiral
Joined
Apr 22, 2009
Messages
5,350
Still pretty sure those are your shift interrupt. You should have a pair of wires from the switch to the terminal block, and then also a pair from the harness to that block as well. Green/white should also connect from the TB module back to the distributor, and then back to the harness again. I don't see those in your pics (dizzy should have green/white and red/white wires on the back).
 

Rick Stephens

Admiral
Joined
Aug 13, 2013
Messages
6,118
Here's the diagram for later model with ThunderboltV. White/Grn goes from distributor to shift interrupt. I'd have to believe earlier version is same same.

Screen Shot 2020-08-15 at 12.34.02 PM.png
 

Bumperlt12

Petty Officer 2nd Class
Joined
Mar 17, 2012
Messages
170
I'm sorry man im trying to understand, but im just not getting it. I must have something hooked up wrong. I wish I was the one that took it apart!

Here's more pics.

I really need a pic of a interupt switch all hooked up!
 

Attachments

  • Screenshot_20200815-145819_Gallery.jpg
    Screenshot_20200815-145819_Gallery.jpg
    1.1 MB · Views: 5
  • Screenshot_20200815-150037_Gallery.jpg
    Screenshot_20200815-150037_Gallery.jpg
    909.8 KB · Views: 4
  • Screenshot_20200815-145855_Gallery.jpg
    Screenshot_20200815-145855_Gallery.jpg
    1.1 MB · Views: 5
  • Screenshot_20200815-145758_Gallery.jpg
    Screenshot_20200815-145758_Gallery.jpg
    1.2 MB · Views: 5

Rick Stephens

Admiral
Joined
Aug 13, 2013
Messages
6,118
The white/green coming out of the harness at the back of the motor goes to one side of the interrupt switch, the other side of the interrupt switch is a black wire to ground. When the switch is activated it ultimately grounds the distributor killing the ignition.

In your picture the wire leading to the interrupt switch looks like white/blu
 
Top