Bad trigger? Can’t adjust timing

Jiggz

Captain
Joined
Oct 23, 2009
Messages
3,909
The biggest challenge of replacing the trigger is the flywheel removal. If you get lucky it could just be an easy pull out using a bearing puller. But many have cracked or even destroyed the flywheel without success using a three prong bearing puller that is mounted on the rim of the flywheel. Others had more success using the bolt type wheel puller. But the most important part is the prep by soaking the center of the flywheel with some kind of penetrating oil, e.g. PB Blaster days before actually pulling it.
Note, trigger wires are very tiny and have some connectors that tend to deteriorate overtime. You might want to check each individual wires before attempting to replace the trigger. Don't just do a visual instead disconnect and do a visual check. If you have to replace the trigger make correct preparations:
1. mark the timing screw
2. double check the wiring colors that they match with the existing ones or write in what corresponds to what wires between the old and new trigger
3. although the stator and trigger can only get in one orientation mark their original orientation anyways just to make sure.
4. After removal of the flywheel check the magnets on the inside. Make sure you are not missing any. If you are missing any, it could be that the problem is not the trigger but the missing magnet.
 

Oillywater

Petty Officer 3rd Class
Joined
Jun 10, 2023
Messages
96
The biggest challenge of replacing the trigger is the flywheel removal. If you get lucky it could just be an easy pull out using a bearing puller. But many have cracked or even destroyed the flywheel without success using a three prong bearing puller that is mounted on the rim of the flywheel. Others had more success using the bolt type wheel puller. But the most important part is the prep by soaking the center of the flywheel with some kind of penetrating oil, e.g. PB Blaster days before actually pulling it.
Note, trigger wires are very tiny and have some connectors that tend to deteriorate overtime. You might want to check each individual wires before attempting to replace the trigger. Don't just do a visual instead disconnect and do a visual check. If you have to replace the trigger make correct preparations:
1. mark the timing screw
2. double check the wiring colors that they match with the existing ones or write in what corresponds to what wires between the old and new trigger
3. although the stator and trigger can only get in one orientation mark their original orientation anyways just to make sure.
4. After removal of the flywheel check the magnets on the inside. Make sure you are not missing any. If you are missing any, it could be that the problem is not the trigger but the missing magnet.
Thanks I’ll find some time to change it. I will mark everything and thanks for the heads up. One question what is the timing screw. You mean the little one I’ve been messing with to change the timing.
 

Jiggz

Captain
Joined
Oct 23, 2009
Messages
3,909
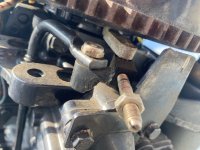
Just to make sure we are on the same page. Here's a pic of the timing screw just below the flywheel. Note however, this unit has a broken part so it'll look different from what you have orientation wise.
Timing Screw 125 HP.jpg
 

Oillywater

Petty Officer 3rd Class
Joined
Jun 10, 2023
Messages
96
Just to make sure we are on the same page. Here's a pic of the timing screw just below the flywheel. Note however, this unit has a broken part so it'll look different from what you have orientation wise.
View attachment 389121
Yup that’s what I was thinking. but if it’s not timed would it matter to mark it?
 

Oillywater

Petty Officer 3rd Class
Joined
Jun 10, 2023
Messages
96
The biggest challenge of replacing the trigger is the flywheel removal. If you get lucky it could just be an easy pull out using a bearing puller. But many have cracked or even destroyed the flywheel without success using a three prong bearing puller that is mounted on the rim of the flywheel. Others had more success using the bolt type wheel puller. But the most important part is the prep by soaking the center of the flywheel with some kind of penetrating oil, e.g. PB Blaster days before actually pulling it.
Note, trigger wires are very tiny and have some connectors that tend to deteriorate overtime. You might want to check each individual wires before attempting to replace the trigger. Don't just do a visual instead disconnect and do a visual check. If you have to replace the trigger make correct preparations:
1. mark the timing screw
2. double check the wiring colors that they match with the existing ones or write in what corresponds to what wires between the old and new trigger
3. although the stator and trigger can only get in one orientation mark their original orientation anyways just to make sure.
4. After removal of the flywheel check the magnets on the inside. Make sure you are not missing any. If you are missing any, it could be that the problem is not the trigger but the missing magnet.
Question does it just pop out I don’t see any like bolt holes on the trigger or something to hold it down. Also do I have to remove stator
 

The Force power

Commander
Joined
Feb 3, 2019
Messages
2,335
check the magnets on the inside. Make sure you are not missing any. If you are missing any, it could be that the problem is not the trigger but the missing magnet.
Hopefully It(s) still (may be) a solid band magnet
 

Oillywater

Petty Officer 3rd Class
Joined
Jun 10, 2023
Messages
96
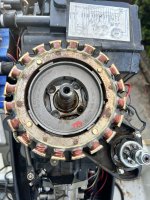
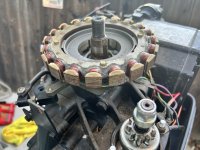
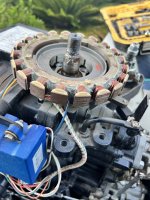
Update. I took of the flywheel off but that was a pain 2 of the three bolt holes where already stripped and i taped it alittle bigger and the other one I tapped but it pulled the threads so I ended up making another hole right to the side of it and tapped it I got it off. The flywheel key is good the trigger looks new stator looks rusty idk if that ok but or not. I wanted to see your guy’s opinion before I changed the trigger. IMG_1408.jpegIMG_1407.jpeg71652074401__8C7825C3-8A6D-417B-A312-E5DD0B3166D1.jpeg
 

Nordin

Commander
Joined
Jun 12, 2010
Messages
2,555
Looks good in my opinion, but clean up the edges of the stator poles iron cores with sandpaper.
It is to remove most of the rust and it will make the built up magnetic field to be stronger.
Take a closer look at the stator winding at each pole, look for hot spots in the insulation.
Check the magnetic strip in the flywheel, it is common that it tend to come loose when get old.
 
Top