Back to the SS

vintage2

Seaman Apprentice
Joined
Apr 4, 2012
Messages
32
Hello again,

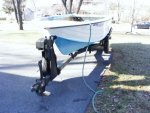
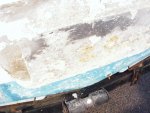
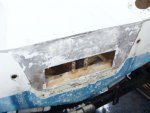
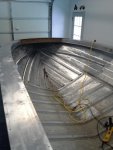
Other projects and activities got in the way of my '73 18' SS resto for over a year but now I'm back at it. I had almost demo'd the old girl when I got sidetracked. I have installed an overhead electric heater in the garage and can now work even on the coldest day (which we are having plenty of). I have stripped all inside paint and removed the glue in the side panels and am wire wheeling the inside. The disassembly revealed some surprises (don't they all?). The PO had hacked the hole where the motor controls came through the splash pan. And then, under the outer motor support board I found hole covered by a panel that had been riveted and silicone caulked into place. It had not leaked when I did the leak test but it sure isn't what I would call structurely sound. Does any one know what it may have been for?

I still have several ongoing projects, but the Starcraft is being given a high priority. Maybe I'll have it in the water by late summer. But if fishing gets in the way, surely by spring of 2015.
 

Attachments

  • Starcraft Boat 001.JPG
    Starcraft Boat 001.JPG
    82 KB · Views: 0
  • Starcraft Boat 013.JPG
    Starcraft Boat 013.JPG
    76.3 KB · Views: 0
  • Starcraft Boat 009.JPG
    Starcraft Boat 009.JPG
    53.8 KB · Views: 0
  • starcraft boat 202.jpg
    starcraft boat 202.jpg
    40.1 KB · Views: 0

1973Chieftain

Lieutenant
Joined
May 31, 2010
Messages
1,298
Re: Back to the SS

A heated garage is very nice this time of year! Congrats on getting back to the SC
 

GA_Boater

Honorary Moderator Emeritus
Joined
May 24, 2011
Messages
49,038
Re: Back to the SS

Welcome back to tin work, Vintage. I'm gonna tell you the only one who knows anything about that hole is the maker and patcher. Never seen anything like it. Isn't heated work space nice? :D
 

barato2

Commander
Joined
Dec 7, 2010
Messages
2,956
Re: Back to the SS

that has got to rank high among the weird and screwed up prev-owner "items". :facepalm: i have NO idea why they would have cut a hole that shape n size. he was gonna install plexi so he could inspect for prop cavitation? trying to use HVAC ducting as outlet for a jet drive conversion? pet guillotine project? :eek:

i assume you're already planning on doing the transom wood so no biggie there. i'd also take a VERY hard look at integrity of your knee brace.....get it to bare alum and inspect closely with light for crackage. the "correct" fix for that huge rectangular hole would be to either TIG weld or rivet/5200 a patch panel over it.

oh, and wlecome back. :cool:
 

classiccat

"Captain" + Starmada Splash Of The Year 2020
Joined
Dec 20, 2010
Messages
3,411
Re: Back to the SS

Welcome back!

I don't think i was hangin' around the mob when you were here previously :noidea:

perhaps you should be grateful that the PO at least made an effort to cover the hole :lol: :facepalm:

it looks like this transom skin & vicinity was no stranger to corrosion...but to chop a piece out completely as opposed to cleaning/patching doesn't make a heck of alot of sense.

attachment.php


and props to the PO for such a nice, straight cut :lol:
 

Watermann

Starmada Splash of the Year 2014
Joined
Jan 12, 2013
Messages
13,775
Re: Back to the SS

Back to the tin, nice looking SS which I hope is my next purchase.

Oh and AHHHHHHHH AAAAAA RRRRRRRR GGGGGG

attachment.php


Sorry had to get that out of my system. Who does bad things like that to good boats?
 

vintage2

Seaman Apprentice
Joined
Apr 4, 2012
Messages
32
Re: Back to the SS

Waterman,

Who knows what goes on in the minds of POs. At first I though the hole had been cut to install an inboard jet unit, but I know of no unit that uses that type of cutout. Then I thought maybe it was cut to work on the underlying brace, but it too wide and too short. The transom was in three pieces so I assume that it had been replaced before. I will return it to a one piece unit. Still trying to determine reason for it but I'm not too concerned. Will weld a replacement piece into place and go on with the resto.

I am going through expensive 4" stainless brushes quickly. Does anyone know how well the orange nyalox brushes work and last. I can only find them online (none locally). I understand they are only available in 2 1/2 inch cup and smaller sizes. This would limit their use to my drill and its lower RPMs.

I only work on the SS a couple of times a week for a couple of hours and cleaning the inside is a chore I can't wait to finish.:mad:

As I have said, other projects keep getting in the way. I like working on anything with a motor. So when a cousin asked me to take a look at his '76 70 HP Johnson the other day and since it goes on his 16' Starcraft that he keeps at his cabin in Canada I couldn't say no. Had to build a motor stand before I could start work on it. So no recent work on the SS.starcraft boat 186.JPG
 

GA_Boater

Honorary Moderator Emeritus
Joined
May 24, 2011
Messages
49,038
Re: Back to the SS

Vint - A three piece transom is common and SC built most of them like that. Most of us go with a one piecer because it makes more sense. I still can't think of any reason for the cutout, but you have a plan. :)
 

jbcurt00

Moderator
Staff member
Joined
Oct 25, 2011
Messages
24,996
Re: Back to the SS

Hit BlueFin w/ a PM, he used Nyalox brushes extensively on his hull. Don't know color (different colors are different 'grits'/bristle stiffness, correct?), or size but I think he did the whole hull w/ a cup brush in a drill, not an air tool or grinder........

If only marginally, I think the 1 piece transom is stronger then a 3 piece. Esp if using the transom eyes for skiing. Larger area spreads the load better & having it run up the extra bit of riveted corner has to be better, right?
 

classiccat

"Captain" + Starmada Splash Of The Year 2020
Joined
Dec 20, 2010
Messages
3,411
Re: Back to the SS

Hit BlueFin w/ a PM, he used Nyalox brushes extensively on his hull. Don't know color (different colors are different 'grits'/bristle stiffness, correct?), or size but I think he did the whole hull w/ a cup brush in a drill, not an air tool or grinder........

If only marginally, I think the 1 piece transom is stronger then a 3 piece. Esp if using the transom eyes for skiing. Larger area spreads the load better & having it run up the extra bit of riveted corner has to be better, right?

Nyalox-orange cupped brush got me through the entire inner hull on my 18' SS. I used my Milwaukee hammer drill which can hit very high RPM (5k i believe) for an electric drill. Nyalox will make short-work of shallow/surface corrosion. Deep pitting may need a dremel to remove the alumina. Wear a dust shield or a respirator.
 

jbcurt00

Moderator
Staff member
Joined
Oct 25, 2011
Messages
24,996
Re: Back to the SS

5k is still under he rpms of an air tool or grinder. But much higher then my drill, I think its 750rpms max....... It should still work w a nyalox cup though, probably not as fast or thorough.....
 

vintage2

Seaman Apprentice
Joined
Apr 4, 2012
Messages
32
Re: Back to the SS

Nyalox-orange cupped brush got me through the entire inner hull on my 18' SS. I used my Milwaukee hammer drill which can hit very high RPM (5k i believe) for an electric drill. Nyalox will make short-work of shallow/surface corrosion. Deep pitting may need a dremel to remove the alumina. Wear a dust shield or a respirator.

Thanks BlueFin16.

I have several drills, I'll have to decide which one is best. I'll order a nyalox brush today. Dust shield is always a must.
 

barato2

Commander
Joined
Dec 7, 2010
Messages
2,956
Re: Back to the SS

might be worth buying at least a cheapie angle grinder at the Fright. drills aren't designed for the sort of sustained running you'll be doing and will wear out.
 

vintage2

Seaman Apprentice
Joined
Apr 4, 2012
Messages
32
Re: Back to the SS

I dug a path to the garage the other day and got some work in on the SS. Snowed that night and I repeated yesterday. I am beginning to lose my love of winter.
Tried the Nyalox brushes in my new hammer drill. None of my other drills had near the speed and my angle grinders were wwwaaayyy too fast. The Nyalox seems to take longer but I like the results better. Still use the stainless steel brushes for a few deep pits.
I am trying to decide on having the patch (pix in previous post) TIG welded or trying to MIG it myself. If I try MIG I'll have to buy a spool gun, have all the rest including a full Argon tank. I can braze, stick, and TIG but my MIG leaves a little to be desired. Just haven't done enough of it. I would have to hire out the TIG as I don't have the equipment. Suggestions?
I was going to let them stay but yesterday I forgot to step around and impaled my shoe on one of the PO's leak fixes. Starcraft boat 171.JPG
 

Watermann

Starmada Splash of the Year 2014
Joined
Jan 12, 2013
Messages
13,775
Re: Back to the SS

Well I know how I would fill those holes in what appears to be the bottom. I would remove the screw, wheel it clean, apply some 5200 inside and out, then drive in a solid rivet.

Edit: Oh yeah and the cut out in the transom, I would cut an oversized piece of aluminum to go on the outside of the transom skin. Cut another piece that fits the inside removed piece. Back butter and rivet in the outside piece fit the inside piece in the hole and clamp down with 5200. Drop in the transom wood in and go forward.
 
Last edited:

vintage2

Seaman Apprentice
Joined
Apr 4, 2012
Messages
32
Re: Back to the SS

Back again guys. Work is progressing slowly but progressing. I continue to clean the inside of the hull and as I got near the stern I just couldn't think about how I would clean under the splash shield, so I removed it. Now I gotta get some more equipment and learn how to buck rivets. I haven't cleaned up around the transom brace yet, but what I see I don't like. Can you buy braces or must you make them yourself. I wouldn't try but I have a local fabricating shop that I''ve used before and they do great work. Cost?
Waterman, the PO made the exact repair to the transom cutout you suggested. I am thinking I want to go one better and weld in a new piece. Will keep you informed on what I do.starcraft boat 049.jpg
 

classiccat

"Captain" + Starmada Splash Of The Year 2020
Joined
Dec 20, 2010
Messages
3,411
Re: Back to the SS

Back again guys. Work is progressing slowly but progressing. I continue to clean the inside of the hull and as I got near the stern I just couldn't think about how I would clean under the splash shield, so I removed it. Now I gotta get some more equipment and learn how to buck rivets. I haven't cleaned up around the transom brace yet, but what I see I don't like. Can you buy braces or must you make them yourself. I wouldn't try but I have a local fabricating shop that I''ve used before and they do great work. Cost?
Waterman, the PO made the exact repair to the transom cutout you suggested. I am thinking I want to go one better and weld in a new piece. Will keep you informed on what I do.View attachment 224464

can you describe &/or get some close-up photos of your knee-brace? Often times they can be repaired although I don't believe that it would be terribly difficult to fabricate one using a basic bending brake...using your existing knee-brace to create a paper pattern...then transfer it to a new sheet of 0.090" aluminum.
 

Watermann

Starmada Splash of the Year 2014
Joined
Jan 12, 2013
Messages
13,775
Re: Back to the SS

Back again guys. Waterman, the PO made the exact repair to the transom cutout you suggested. I am thinking I want to go one better and weld in a new piece. Will keep you informed on what I do.View attachment 224464

Welding aluminum sounds easy enough but it can and often does cause more problems in a boat. The heat warps the transom skin and in most cases when near the seam it will ruin the seal between the 2 pieces. Then the bead has to be ground down too. Just remember all the strength comes from the wood transom and the skin is just that. I saw a thread where a guy welded up just a keyhole and it made his entire transom skin warp badly to where it looked like a licorice whip. So be sure to go slow and let the material cool down if you go that route.
 

barato2

Commander
Joined
Dec 7, 2010
Messages
2,956
Re: Back to the SS

and if you do weld it, use a TIG rather than a MIG with spool gun....latter puts a lot more heat into the surrounding area. honestly, i agree with Watermann and would skip the welding if possible. and with 5200 and rivets, it's usually possible. go look at Bluefin's thread for great tutorial on Riveting 101.

can you describe &/or get some close-up photos of your knee-brace? Often times they can be repaired although I don't believe that it would be terribly difficult to fabricate one using a basic bending brake...using your existing knee-brace to create a paper pattern...then transfer it to a new sheet of 0.090" aluminum.
you can also fab one up from square tube and angles, bolted together and tied into the stringers....best to beef stringers if you go this route tho.
 

vintage2

Seaman Apprentice
Joined
Apr 4, 2012
Messages
32
Re: Back to the SS

Thanks guys,
I really appreciate the input on welding on my SS. I guess since it was put together with rivets I should stick with rivets! Now, just where did I put that patch piece the PO had in there??? I am including the pix I have of the brace. I have not cleaned up around it yet so they aren't that clear. If need be I'll get better ones. Can't today, its the Admiral's birthday so the SS will have to wait till the morrow.starcraft boat 055.JPGstarcraft boat 054.jpg
 
Top