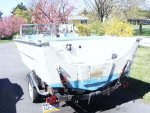
Back to the SS

gm280

Supreme Mariner
Joined
Jun 26, 2011
Messages
14,604
Re: Back to the SS

vintage2, nice work there thus far. It never seems to amaze me anymore how so many boats all seem to have the same typical problems. It doesn't matter if they are up north or down south or even out west, seems all boats deteriorate in the same areas and need the same type repairs. But that is not a really bad thing because there is so much experienced help to assist us along. I like what you've accomplish so far and I can see a very nice finished project in your future.

IF you do go the welding route, you can easily tack a spot and move to another area to keep the heat distortion at bay. I see folks TIG weld that way a lot of times and end up with a beautiful welded work. I myself like welding over any other means of repair if done properly. But rivets work too or they would never rivet things...

I'll have to drop in and see your progress...great work so far... :thumb:
 

Watermann

Starmada Splash of the Year 2014
Joined
Jan 12, 2013
Messages
13,785
Re: Back to the SS

Looks like there's a bunch of ferrous metal fasteners up stream from your bilge as evidenced by the rusty stain and pitting in the bilge.

attachment.php


I had rusty high water marks all over my Chief.
 

classiccat

"Captain" + Starmada Splash Of The Year 2020
Joined
Dec 20, 2010
Messages
3,412
Re: Back to the SS

Thanks guys,
I really appreciate the input on welding on my SS. I guess since it was put together with rivets I should stick with rivets! Now, just where did I put that patch piece the PO had in there??? I am including the pix I have of the brace. I have not cleaned up around it yet so they aren't that clear. If need be I'll get better ones. Can't today, its the Admiral's birthday so the SS will have to wait till the morrow.View attachment 224551View attachment 224552

Putting this together with Rivets has baggage as well (Waterman's kicker plate got me thinking).

The rivet bucktails @/above the Z-bracket will get in the way of installing the transom PLY & they'll prevent it from being snug against the transom skin...the MOST important section where the motor mounts...so you're going to end-up warping the transom skin anyway.

attachment.php


Here's an idea that I've been entertaining:

^^Solid rivets RULE because they expand in the hole...and fill voids/abnormalities:

I'd also consider running the patch all-the-way to the top of the transom skin so that the motor mount is flat.
 

GA_Boater

Honorary Moderator Emeritus
Joined
May 24, 2011
Messages
49,038
Re: Back to the SS

I'd also consider running the patch all-the-way to the top of the transom skin so that the motor mount is flat.

That's a good idea. It covers that huge cutout and just makes a larger motor pad instead of the ply motor pad which ends up rotten so many times. I would use a heavier chunk of AL, 1/4"-3/8" for the patch/pad. One more thing to consider is using a filler piece of tin between the patch/pad and transom wood so there isn't a gap and the pad doesn't get compressed when tightening the motor bolts.
 

InMotion

Commander
Joined
Nov 3, 2011
Messages
2,080
Re: Back to the SS

That's a good idea. It covers that huge cutout and just makes a larger motor pad instead of the ply motor pad which ends up rotten so many times. I would use a heavier chunk of AL, 1/4"-3/8" for the patch/pad. One more thing to consider is using a filler piece of tin between the patch/pad and transom wood so there isn't a gap and the pad doesn't get compressed when tightening the motor bolts.

+1 on what GA says there... it would make it a whole lot smoother and a nice tight seal!

PS - Welcome back man!

And ya... it's nice to have a heated garage... especially after a winter like we all have been having this year!

Jim
 

classiccat

"Captain" + Starmada Splash Of The Year 2020
Joined
Dec 20, 2010
Messages
3,412
Re: Back to the SS

That's a good idea. It covers that huge cutout and just makes a larger motor pad instead of the ply motor pad which ends up rotten so many times. I would use a heavier chunk of AL, 1/4"-3/8" for the patch/pad. One more thing to consider is using a filler piece of tin between the patch/pad and transom wood so there isn't a gap and the pad doesn't get compressed when tightening the motor bolts.

+1! :thumb:
 

vintage2

Seaman Apprentice
Joined
Apr 4, 2012
Messages
32
Re: Back to the SS

I like Bluefin's idea. But I have some cleaning to do before I finally decide. Will need to practice some before applying the fix. The PO had a .120" filler caulked to a .050" outer patch which was riveted with 4 tiny pop rivets and then the ply motor pad was added. Everything was caulked with probably fifty tubes of caulk but it didn't stop the corrosion.starcraft boat 025.JPGstarcraft boat 026.JPG
Yeah, evidence of ferrous metals but I found none on demo. Probably used somewhere in past.
Barato stop in when you are in the area. I live in car nut heaven (Carlisle and Hershey) and am one of them but as my first thread said "my wife made me buy it (the SS)." So, now my cars sit and the SS take up all my time. However, I can see how working on tin boats can become addictive.
One more note. That rude my cousin dropped off; he had whacked off the skeg some time back ("it hasn't affected anything so I just keep on running it.") Well, that tiny little crack that developed when he hit whatever caused all the oil to leak out. My dear departed grandpa told me when I was a kid that things don't run long without motion lotion.
 

barato2

Commander
Joined
Dec 7, 2010
Messages
2,956
Re: Back to the SS

get a coffee stir stick, or better yet an old hacksaw blade, and scrape around under the ribs down at keel level, and blow any crud out with a hose nozzle. you might be surprised what you find down there. in my case, it included a # of things that were slowly eating up hull, and you may find the source of your rust stains.

prolly not too hard to find a replacement lower unit housing for a rude. or if you can't find one, they do sell weld-on replacement skegs and you can TIG the crack while you're at it. you would need to get all the gear oil out of the crack first so it wouldn't contaminate your weld, and even with a TIG, i'd plan on replacing all seals in the housing after applying that much heat. better to just start with one that hasn't been whacked if possible.
 

crankbait cowboy

Chief Petty Officer
Joined
Mar 25, 2013
Messages
574
Re: Back to the SS

glad to see you are back at er vintage, and good on the wife to talk you into the tinner for a change of pace
 

vintage2

Seaman Apprentice
Joined
Apr 4, 2012
Messages
32
Re: Back to the SS

I gave flushed out and blew out under the ribs during demo but things get overlooked during the zeal of that phase. I'll take another closer look. During inspection and reassembly is when you notice all the things you missed during disassembly.

As for the rude lower unit, my cousin is looking for one. However, he will probably end up with a new motor if not new boat and motor.

I haven't worked on the SS lately, been practicing my aluminum welding. Not what I would call a rousing success, but I'm stubborn.

What little work I've done has been removing the rust stains around the transom brace. That has been painfully slow and I don't like the results. It is hard to get into some creavices to remove all of it and I believe the contamination from them will not allow JB to adhere properly. I am thinking of trying something called Kurd Kutter "The Must for Rust". Has anyone tried it? It says it is safe for aluminum.
 

vintage2

Seaman Apprentice
Joined
Apr 4, 2012
Messages
32
W​ell, after what looks like a 2 year hiatus I'm back at the '73 StarCraft SS '18 again. More accurately I'm finishing up on the trailer and have some questions. Attached pics show a straight roller on each side of the aft keel roller. I redid the trailer in New John Deere Yellow (No, I'm not into tractors) with yellow rollers. After an exhausted internet search I have been unable to find yellow straight rollers. My question, with all the other rollers are these really necessary or are they overkill?
 

Attachments

  • boat2.jpg
    boat2.jpg
    143.9 KB · Views: 0
  • IMG_20170329_151909873.jpg
    IMG_20170329_151909873.jpg
    60 KB · Views: 0
  • IMG_20170329_152151395.jpg
    IMG_20170329_152151395.jpg
    57.5 KB · Views: 0

Watermann

Starmada Splash of the Year 2014
Joined
Jan 12, 2013
Messages
13,785
Glad to see you get back to work on your SS. I'm not sure I know which rollers your referring to, in the pic reposted below it looks like you have all yellow rollers and plenty of them. ;)

The rollers that go on the guide ons?

fetch
 

vintage2

Seaman Apprentice
Joined
Apr 4, 2012
Messages
32
The rollers I am referring to are the ones in boat2.jpg pic. In the back of the trailer you see rollers on each side of the keel roller halfway between there and the outside edge of the trailer.
 

Watermann

Starmada Splash of the Year 2014
Joined
Jan 12, 2013
Messages
13,785
The rollers I am referring to are the ones in boat2.jpg pic. In the back of the trailer you see rollers on each side of the keel roller halfway between there and the outside edge of the trailer.

Ok, I thought those were the ends of the roller bunks. The way you have bumble bee set up now I don't see why you would need another single roller between the keel roller and the roller bunks. Maybe if you had a super heavy motor or a sterndrive Mercruiser.

fetch
 

vintage2

Seaman Apprentice
Joined
Apr 4, 2012
Messages
32
Okay, I decided on not replacing those rollers because on other trailers I have looked at they do not exist. I plan on a 90HP motor of mid '70s vintage for power. Hope to find one this fall. Meanwhile the hull is turtled and in the shop getting stripped. Hope to paint by the end of the month.
 

ezmobee

Supreme Mariner
Joined
Mar 26, 2007
Messages
23,767
I plan on a 90HP motor of mid '70s vintage for power.

If you go Johnson/Evinrude I'd recommend an '81 or newer motor. They have the more modern tilt 'n trim system which will be easier to service or replace if needed and they also have a primer instead of a choke which makes for better cold starts.
 

vintage2

Seaman Apprentice
Joined
Apr 4, 2012
Messages
32
Thanks, I'll keep that in mind. I do have a '76 Johnson 70 HP that is in good shape but needs a lower unit and has no power trim. I am not sure if it will have enough power that I should add tilt & trim and a used lower unit or just get a bigger motor. Last fall I had a charter captain in Michigan tell me runs a 18' tinny with a 70HP Johnson and it has plenty of power. Any suggestions from those of you who have this boat?
 

Watermann

Starmada Splash of the Year 2014
Joined
Jan 12, 2013
Messages
13,785
I don't have a 70 on my SS but my buddy has a 70 Rude on his 16' Smokercraft and it's a great motor. I don't believe that 2 more feet of tin is gonna break the motors performance that much.

Personally I would want a larger motor, at least a 90 to a 115 if I was looking to power an 18'r.
 
Top