Aluminum 1977 Crestliner Rebuild Finally Underway

Status
Not open for further replies.

Patfromny

Lieutenant Junior Grade
Joined
Dec 2, 2012
Messages
1,197
I used pl to glue the sheets together. I tested several glues and most just ate the foam. I wasn't pleased with the grip pl provided but it was the only stuff that left the foam alone. I also figured the floor would hold it all in place anyway and I am just wasting money on this brownish, sticky, oozing, clothes wrecking, can't get it off my hands for days, tubes of menace. Here is how I clamped the bow pieces down while the pl set up.


These weights were serving the same purpose as the leaf bags. Noone noticed they were gone, I dobut anyone knew they were there in the first place . I told my wife I just worked out and made her feel my flexed bisep. Needless to say I was pretty sore the next day after lifting weights so I took the night off. My wife made short work of pulling the weights out of the boat and mocked me for days by making me feel her flexed bicep.
 

Patfromny

Lieutenant Junior Grade
Joined
Dec 2, 2012
Messages
1,197
I laid down the foam along the sides of the hull and stood the pieces up inside each box. I mensured each boxes dimensions as well as the height from the top of the angle aluminium. The hull shape made the height change from one side to the next and it changed in a curve due to the shape of the bottom of the hull. I took the max height of each box and cut out strips of foam to that dimension off the sheet using a sheet rock T square and a utility knife. I would cut half way through and snap the strip right off. This worked flawlessly and the strip would break on a clean line everytime. I made a template that I was happy with that matched the curve or slope of the hull and cut out the rest of the pieces for that box using the template and my cut/snap method. I had to make a template for each box because the hull flattened out as you moved toward the stern. I glued the pieces together but not to the boat. I cut them so that they would just touch the bottom of the floor which was screwed down so the floor would hold them snug in place. You can see a few pieces laying on top of the rest in the above pic. There you can see the curve of the hull cut out and also the height of them relative to the floor landing.


Patfromny

Lieutenant Junior Grade
Joined
Dec 2, 2012
Messages
1,197
I left the center open for drainage. If memory serves there was a piece of angle running vertically down to the hull welded to each cross brace so I cut the foam to fit snug into that and then followed that size for the rest of the pieces. That was the lowest part of the hull anyway so it is a natural channel for water. The decking was also layed out in two pieces with the seam running down the middle of the boat so any drainage from the deck would drain into this void anyway.
 
Last edited:

Patfromny

Lieutenant Junior Grade
Joined
Dec 2, 2012
Messages
1,197
Anyone care to chime in you're more than welcome. I would love to here a different take on what i'very done. I feel like i'm talking to myself. 😊
Anyway self, here is a pic of my calculations of the hull before I cut any foam.


Don't mind my chicken scratch. It made sense at the time.😁
 

classiccat

"Captain" + Starmada Splash Of The Year 2020
Joined
Dec 20, 2010
Messages
3,411
This is like one of those condensed rebuild threads where you don't want to interrupt the OP while he/she is assembling their masterpiece :D

It's coming along great...another foam job and you're gonna need a new wardrobe :lol:


Patfromny

Lieutenant Junior Grade
Joined
Dec 2, 2012
Messages
1,197
So I was finally done with the flotation, and there was much rejoicing. My next trick was all the wood. I started with the floors and I did have very good templates. The deck had been replaced and rewrapped with the original nautilux. This was beginning to rip in spots and I know none of the wood was treated so I decided to redo them while I was this far along. In for a penny and all that.


I dry fitted it all in and was happy with the fit. I cut the boards with an angle on the edge to get more surface area touching the boat. It meant more work and a near perfect fit for the whole edge to touch the boat but it turned out well and it took some bounce out of the deck compared to the old wood. Then I realized that the last 6 inches were covered by side panels and It wouldn't have mattered anyway. Oh well. Here is a pic of the deck in and the side console supports in to check the fit. You can see a bow seating cover in the bottom of the pic and the front bulk head anchor storage piece in also


Patfromny

Lieutenant Junior Grade
Joined
Dec 2, 2012
Messages
1,197
Thanks classiccat, the pl in those huge tubes was no fun. Luckily I am a painter/finish carpenter so dirty clothes are not a problem. It was the black hands from the pl grabbing everything you touch that drove me nuts. No matter what I did I couldn't stop the stuff from running out of the tube. I pulled the plunger out and stuck a screwdriver into the tube and all i got was a sticky screwdriver and a beige dollop in the hull. I think i threw away half of each tube from waste. I would lay the tube on a foam piece and it would just run alll over it.
Please comment as often as you wish. I think your guys input will be what makes this thread interesting, my writing ability most definitely won't.

P.S. huge Seinfeld fan. Kenny Banya was a great character.
 
Last edited:

Patfromny

Lieutenant Junior Grade
Joined
Dec 2, 2012
Messages
1,197
I was riding the high of work going smoothly and it was still too cold to epoxy so I made a right turn and started on the engine. It had been sitting for 3 yrs and I wanted to give it a tune up, impeller, and rebuild the carb. It had never run right. Well, I should say, it was always hard to start. It would start, run for a few secs and then spit and stall. It would do this for 5 mins until it would warm up. I figured I would take the carb off and have it sonic cleaned, then rebuild it. For some reason I decided to take the head plate off. I think it was to replace the thermostat. That's when things got interesting.


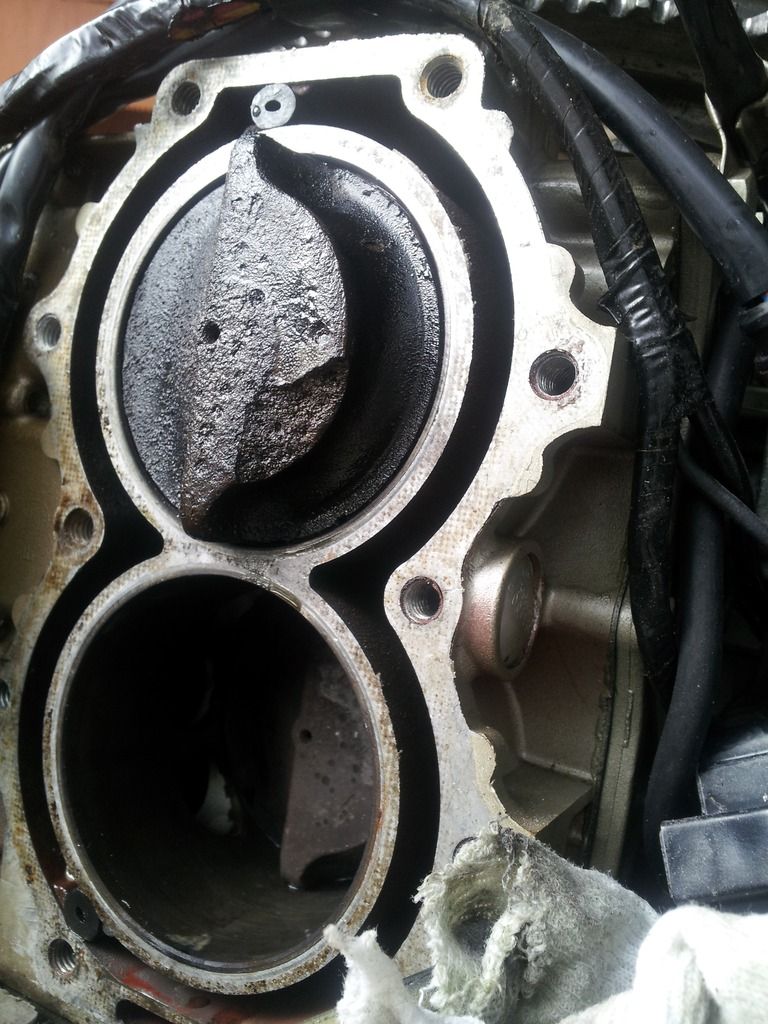
I was not happy. I took that pic, texted it to my brother, who had taken pity on me and joined me in the build, and my buddy, who was planning on coming up for the launch. I didn't have the time or money to fix this or buy another engine by June. It was over. I was standing in the garage staring at the piston cursing the evinrude gods. Then it happened, I could swear I heard a bugle playing off in the distance as my buddy came down the driveway. He is a machinist and owns a speed shop. He gets out of the car holding a port grinder (I remember him holding it high above his head and a warm glow surrounding him...he insists I had had too many bud lights and was in shock). He takes a look at it, plugs the grinder in and starts smoothing away. If you can believe it, that is what happens to a piston when an engine pings for a long time. That is the product of detenation. Luckily, the piston was solid under the scar and there was plenty of meat under it so once he smoothed it all out he deemed it less then optimal, but it will run. And it does still. I make sure to run plus in her and she doesn't ping. I'm fine with it. A bit less compression in the top cylinder if it is even detectable.
 

classiccat

"Captain" + Starmada Splash Of The Year 2020
Joined
Dec 20, 2010
Messages
3,411
Yikes! was there cylinder scoring to go along with it? It's hard to imagine a piece that size passing harmlessly through the exhaust...that's equivalent to a golf-ball sized kidney stone :eek: :lol:
 

Patfromny

Lieutenant Junior Grade
Joined
Dec 2, 2012
Messages
1,197
I was looking at the pic above and my memory came flooding back. I believe I tried to start the engine after doing all the tune up stuff and she wouldn't run or she ran rough. I guess I thought it might have been a head gasket and so I removed the head. The gasket was blown and you can see evidence of that if you look at the bottom of the top cylinder. You can see just a wisp of carbon there. I think i pulled the head saw the bad gasket and was relieved that it would be an easy repair. I cleaned the head and then moved on to cleaning the block to except the new gasket and that is when I saw the piston damage. I also changed the coils because the top cylinder wasn't getting spark as evidenced by the wet piston up there. Sorry but my memory is foggy about the progression. Probably blocked out the bad parts as a coping mechanism.
 

Patfromny

Lieutenant Junior Grade
Joined
Dec 2, 2012
Messages
1,197
Hi classiccat. No cylinder damage. My buddy explained that it was gradually eaten away over the course of it's life. Sort of like erosion. The lake we are on is a small one and the gas they sell doesn't move very fast. It might even be from the previous year early in the season. I started using plus from a local gas station and the engine sounded deeper than it ever had. It seems the higher pitch was actually pinging. I have run the lakes regular once or twice in a pinch and the high pitched noise comes back. We smoothed the piston out because the rough edges would get hotter than the large smooth areas and ping or eat away at the piston more. All that was detenation. I was shocked myself.
 
Last edited:

classiccat

"Captain" + Starmada Splash Of The Year 2020
Joined
Dec 20, 2010
Messages
3,411
Hi classiccat. No cylinder damage. My buddy explained that it was gradually eaten away over the course of it's life. Sort of like erosion. The lake we are on is a small one and the gas they sell doesn't move very fast. It might even be from the previous year early in the season. I started using plus from a local gas station and the engine sounded deeper than it ever had. It seems the higher pitch was actually pinging. I have run the lakes regular once or twice in a pinch and the high pitched noise comes back. We smoothed the piston out because the rough edges would get hotter than the large smooth areas and ping or eat away at the piston more. All that was detenation. I was shocked myself.

Ahh i see; the edges looked so defined that it appears to be a single event. I've tore into my fair share of engines...just never a cross-flow.

If it's a symptom of pre-ignition, you should look into checking your spark advance.

Try the Joe Reeves WOT timing procedure. This is an alternative to having your buddy mash the throttle while you're imitating "monkey-on-the-splashwell" holding a timing light. :lol: (although I think I have a 35Hp test prop somewhere)
 

Patfromny

Lieutenant Junior Grade
Joined
Dec 2, 2012
Messages
1,197
Thanks for the link, I will look into it. I never knew that you could even change the timing on an outboard. I looked it over real well before reassembling and saw nothing other than the piston damage, and the head gasket of course. I delved further into the engine the following year having to replace the top seal. Boy was that a lot of fun without the evinrude tool. You'll see that part soon enough. Timing seems like it would solve a few things though. It still starts tough and it doesn't like to stay running when docking it at low rpm. Thanks again for the tip, i'm going to look that over now.
 

Patfromny

Lieutenant Junior Grade
Joined
Dec 2, 2012
Messages
1,197
Ok, so next up was the transom. Oh joy.☺ one step forward...hit by a bus back. First off, I must explain that I have a problem. I tend to over do things. I don'the leave well enough alone, even if I should. Case in point, the transom. I decided, after reading endless amounts of posts here that I would glue and screw my transom using tite bond III. Easy answer there was that it seemed to be as effective as any other method and was pre mixed. Good to go. I made it a few inches taller to allow for the top angle. I put the transom in place and all looks good. I get in the boat to peek at the bottom to assure it was seated all the way in the bottom. This is the second I ruined my day. I noticed that the bottom track was on an angle and the wood was touching the back but not the front of the track. It was honestly miniscule but it would be easy to make the wood fit right, right? Right......I couldn't get in from the top to figure the angle and it was too tight a squeeze to get an accurate angle from the inside. I guesstimated and two hours later it fit perfect on the bottom. The overall width of the transom was now 4 inches though. I needed it to be 7.😯😠😣😤. I should have followed AMF's lead and Called it good with a straight cut. Next up, transom part two. Glued and screwed another one. This time however I made it longer and wider so I could cut the screw holes created from clamping off. I saved the angle for the bottom on the table saw and cut that. Slipped it in and drew a line on either side of the top. Connected them on the edge of the wood to get my angle and cut the top angle. Fit like a glove. Time to put the aluminium caps back on to see if it would all fit together......weep womp. The first piece of c channel that went on top of the wood had two different thicknesses as I stated above during tear down. This thicker piece actually pinched the transom wood. I had to make a relief cut on the top of the transom the same depth as the c channel. That sounds easy enough but the transom had an angle I had just cut into it and I had to cut the high point off this angle. Happy happy joy joy. 2 hrs later it was done. I must have measured a million times. I had to cut it face down dado blade style ( i don't own a dado blade) using the height adjustment of my table saw to cut the groove. Several tense moments followed my hrs of hemming and hawing. I think there might have been some weeping involved to be honest with you.


Several times in and out of the boat and putting the cap on until it was cut perfect.
 

Patfromny

Lieutenant Junior Grade
Joined
Dec 2, 2012
Messages
1,197
Ok guys, I have to admit, my other problem is long windedness. Here are a few shots and fewer words. Lol here is my epoxy marathon. 4 coats on each side and 8 on the edges. I hit the edges each coat. I used 1/4 inch nap 6 inch long mini rollers from Sherwin Williams. From my professional experience, SW makes the best rollers around. You will find they shed the least.


This was every piece of wood in the boat including seat backs and bottoms, console supports, and floors. Oh, and my buddy the transom which I can't seem to find in any of these pics.


This was the outer transom or engine plate. This is painted white to match the boat.

 
Last edited:

Patfromny

Lieutenant Junior Grade
Joined
Dec 2, 2012
Messages
1,197
I have to laugh at myself here, I was zooming in on the pics above looking for the transom and found the jar of peanut butter I used to lay my 20 mouse traps after finding the habitrail in my pour foam. It is in the third pic on that plastic shelf next to my coffe. What a wimp I am.
I realized that I had another table in my shop with the transom and several other small pieces on it. Guess I never got in there to take a pic. You get the idea though. Plenty of wood to epoxy there.
 
Last edited:

Patfromny

Lieutenant Junior Grade
Joined
Dec 2, 2012
Messages
1,197
I really enjoyed the epoxing portion of this build. Mostly because It is exactly like polyurethaning, which I have done a lot of. I did buy the pump system with the epoxy to make it a mindless process and I recommend anyone else does so. It was worth the money to get consistent mixes. There was a slight bit of worry about the open time and me doing so much wood at one time but it turned out that I had more then enough time to do each coat. I poured the epoxy on the board and spread it even with the roller. Came out great. It was a shame to have to cover every single piecemail with Paint or nautilux.
 

Patfromny

Lieutenant Junior Grade
Joined
Dec 2, 2012
Messages
1,197
After the epoxy was dry I cleaned off the greasy residue I believe is called blush. I then went about putting it all back together. I bought nautilux for the floor and was surprised how close it was to the original stuff. I left the original on the sides under the gunnel because I was pushing the budget and it is mostly covered. It looked ok next to the new stuff. I didn'the get a lot of pics of the put back. I guess I was in panic mode because it was probably mid to late May by now.


The deck was two pieces on each side because it was around 12 ft. Long. I cut the front longer board to land on half a stringer or cross brace and butted the back short piece up to it. I wanted to just have one continuous piece of vinyl per side like it was originally but there were two pieces of wood and they had to be wrapped in the vinyl. A friend recommended these ply joiners. They are basically just a small piece of stainless, stamped into a wave pattern. You hammer them perpendicular to the joint and they hold the two pieces together. It worked ok. I wasn't happy doing this to the freshly epoxied wood but i couldn'the join them with a piece from below because of the cross brace. It still wasn't fun lifting the two pieces into the boat. But thankfully that only had to happen once. I used contact cement on the deck wood and burnished the vinyl using a vinyl floor roller that jbcurt recommended to me on another thread. All went great, thanks jb. I stapled the vinyl to the bottom using Ronel staples.
 

Patfromny

Lieutenant Junior Grade
Joined
Dec 2, 2012
Messages
1,197
As I had said earlier, my brother had been helping during the tear down whenever he could and right around the time I finished the flotation and started on the wood he jumped in with both feet and started helping me full time. He was a life saver. So this morning I texted him and asked if he had any pics of the boat build. Once again a life saver. I think he did a better job of documenting the build than I did. Here are a few of the floor thank you Mike.


Too much blue!!!!


You can see the old and new here but it does look better in person. Just a bit darker from age

 
Status
Not open for further replies.
Top