97 SeaRay 175 project boat hull weeping question

komby

Cadet
Joined
May 30, 2023
Messages
27
Hi all, I am new here and just getting started. A family friend gifted us this project boat. The motor looks like its brand new so I figured I would give it a shot. I squeezed it in the garage this week and gutted the interior.
IMG-4959.jpg
The boat hasn't been in the water since 2011, it was in storage mostly covered for most of that time. It did have some leaks in the cover but was stored with the bow pitched up and the drain plug removed so there wasn't really any standing water in it.

Once I got the interior out I pulled the gas tank and the pumps. I rinsed out the inside with a hose making sure it was draining out of the main drain plug the whole time.

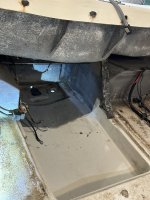
This one has a livewell setup in it so there is a drain hole to the bottom. There was a plastic connector for that part which was weeping water into the area by the bilge pump. I thought I had dried it thoroughly (i did) but when i would walk away for 20 min there would be a small puddle again.

IMG-5027.jpg
There is/has also been some water at this connection between the two under deck storage areas at times. Since I rinsed it out. I have manually dried it and it keeps coming back.
IMG-5026.jpg

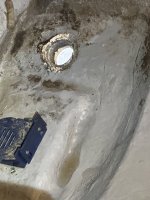
I put a cup under the drain hole after I removed the flange and after about 10 min it looked like this
IMG-5029.jpg

I knew I needed to do some work on the decking on the starboard side of the boat where you step in as this area was bubbled and loose. So I was planning on cutting / grinding out that area and re-glassing it. I tried to draw the margin of the bubble on it but it didn't do so well.
IMG-5028.jpg

So now I am wondering, how concerned should I be about the water that is in between the deck and the hull?
A case of cut the bubble out and see how far the problem goes?


Other than sun damage on just about everything the hull looked to be in pretty solid shape.
 

Attachments

  • IMG-5024.jpg
    IMG-5024.jpg
    1.4 MB · Views: 18
  • IMG-5025.jpg
    IMG-5025.jpg
    2.2 MB · Views: 19

jbcurt00

Moderator
Staff member
Joined
Oct 25, 2011
Messages
24,993
Likely full gut & rehab...

That area you marked is probably an iceberg, the real ugly part hidden..

Dig @ resto forum, you'll find plenty of small(ish) soft spots/delamination that turn into full gut topics....

Dig around the forums, lots of good info can be found here
 

Scott Danforth

Grumpy Vintage Moderator still playing with boats
Staff member
Joined
Jul 23, 2011
Messages
49,037
First, Welcome aboard

start here, looking at links 14, 15, 18, 2, 3, 4a, and 4b in their entirety. read every post, look at every picture, watch every video.


komby

Cadet
Joined
May 30, 2023
Messages
27
Thanks for the quick replies. I have some reading to do now but I had read through some of those builds already.

I dug a little further and put a hole in the soft spot on the decking. There is no plywood. its just foam under there. So that is interesting. The whole marked area is not supported by anything. I think the delam was caused by the weight of people getting in and stepping on that area?

Wondering if there is just trapped water that got in through the screw holes in the deck.

IMG-5032.jpg

After I took the pictures earlier I put the a jack under the hitch and got higher than the crank could get it. I left it to leak. Just checked the drip cup and its got about 1 drip / 5 seconds still.
IMG-5031.jpg

Ok, back to reading the entire forum.
 
Last edited:

ScottinAZ

Master Chief Petty Officer
Joined
Jun 25, 2009
Messages
820
sounds like you have/had a leak somewhere, and now have a LOT of waterlogged foam to remove/replace. From your pic above, there appears to be moisture inside the test area where you cut the floor. If there is any wood in the structure, its probably mulch by now. Unfortunately foam also retains water, which is why you are dripping even after 11 years dry. You have a project on your hands.......
 

komby

Cadet
Joined
May 30, 2023
Messages
27
Ok, well as you have guessed by now, my fast gut and summer fun plans are over. Still not 100% sure its going to be worth it to keep going on this boat. It leaked a little over a quart of water so far so something is wet.

The section that I took a picture of was damp inside where there was not foam but the foam is dry?
It doesn't really cost me much to continue investigating though I guess.

Today I am going to hole saw the deck in the general foam areas and do core samples of it. Here is what I am thinking of taking foam samples here
Copy of guttedHull.jpg

Assuming the worst and I need to cut the deck to pull the foam and replace I am curious if anyone has thoughts about the process to repair.

I am new on boats but this appears to me that they used a molded insert deck that was foam filled after glassing in place. Not like some of the threads that are marine ply decks.

Assuming I find soggy foam(likely) is the process to access in each area and trying to re-glass it from the top only then filling with foam? Or once removed, re-fill with foam, shape the foam I can use the foam as the support for the fiberglass layup?

Given the way the bilge area is shaped I don't think I am going to be able to do a full deck removal and replace/ rebuild. My thinking was that I would preserve the ski locker and gas tank/bilge area and just patch the surface? Or am I still too hopeful and its likely once I cut these holes there will be soggy wood and i'm cutting it all out and re-building like the marine ply rebuild threads? Structurally the surface is solid in all areas except #1.
 

ScottinAZ

Master Chief Petty Officer
Joined
Jun 25, 2009
Messages
820
Ok, well as you have guessed by now, my fast gut and summer fun plans are over. Still not 100% sure its going to be worth it to keep going on this boat. It leaked a little over a quart of water so far so something is wet.

The section that I took a picture of was damp inside where there was not foam but the foam is dry?
It doesn't really cost me much to continue investigating though I guess.

Today I am going to hole saw the deck in the general foam areas and do core samples of it. Here is what I am thinking of taking foam samples here
View attachment 380326

Assuming the worst and I need to cut the deck to pull the foam and replace I am curious if anyone has thoughts about the process to repair.

I am new on boats but this appears to me that they used a molded insert deck that was foam filled after glassing in place. Not like some of the threads that are marine ply decks.

Assuming I find soggy foam(likely) is the process to access in each area and trying to re-glass it from the top only then filling with foam? Or once removed, re-fill with foam, shape the foam I can use the foam as the support for the fiberglass layup?

Given the way the bilge area is shaped I don't think I am going to be able to do a full deck removal and replace/ rebuild. My thinking was that I would preserve the ski locker and gas tank/bilge area and just patch the surface? Or am I still too hopeful and its likely once I cut these holes there will be soggy wood and i'm cutting it all out and re-building like the marine ply rebuild threads? Structurally the surface is solid in all areas except #1.

as you get lower, the foam will be wet (and damn heavy) BTDT. As for structure, I cant really say. I wouldnt be opposed to putting some wood in it (properly glassed of course), but I would need to see what there is for structure under whats left of the floor and foam. Never done one with no form of wood in it for some kind of strength before.
 

Scott Danforth

Grumpy Vintage Moderator still playing with boats
Staff member
Joined
Jul 23, 2011
Messages
49,037
So as a repair I should cut out to fit in the wood rather than try and rebuild it as all fiberglass deck?
there is a core to your deck,

but your 1997 is not much different than the 1995 in link 14 in the DIY stickies.
 

komby

Cadet
Joined
May 30, 2023
Messages
27
there is a core to your deck,

but your 1997 is not much different than the 1995 in link 14 in the DIY stickies.
Yup. I found some of it today. Its not solid in all areas kinda looks like it was applied to the deck in strips while it was in a mold (upside down). Starboard side is dry so far but the port side is dripping wet in the holes I managed. the connector between the two lower areas is wood and its soaking wet and I about fried my drill trying to get in there. It's all super strong wood still and not decayed yet but as you all predicted the foam towards the motor is all soaked.
IMG-5036.jpg
So Next step I guess I'll break out the circular saw and cut the length of it on a shallow depth and see what I can find now that the deck looks like swiss cheese.
 

Scott Danforth

Grumpy Vintage Moderator still playing with boats
Staff member
Joined
Jul 23, 2011
Messages
49,037
there is a gel coat side. there is no starboard side.

what you are finding is nothing special or new. most boats older than 15 years start to have issues. your boat is 27 years old.
 

komby

Cadet
Joined
May 30, 2023
Messages
27
there is a gel coat side. there is no starboard side.

what you are finding is nothing special or new. most boats older than 15 years start to have issues. your boat is 27 years old.
LOL. I meant the driver side of it. I wish there was a Starboard (HDPE) side, we wouldn't be here talking about it.
 

Scott Danforth

Grumpy Vintage Moderator still playing with boats
Staff member
Joined
Jul 23, 2011
Messages
49,037
LOL. I meant the driver side of it. I wish there was a Starboard (HDPE) side, we wouldn't be here talking about it.
HDPE has no strength, for it to be used, there needs to be more structure underneath
 

komby

Cadet
Joined
May 30, 2023
Messages
27
Reading up on the forums and getting my head around putting it back together. I found this in one of the pinned threads.

Now that the glass and the tabbing is cut, lets deal with the gap around the edge of the deck and hull joint.
Some people use pl premium for this.....I don't like it because of the full 48 hour cure time before you can glass over it.....and I would rather have fibreglass between the hull and the deck....so I use peanut butter.
Mix up some peanut butter....and fill the gap, making sure that you don't have any sharp ridges, and that there are no dips in the gap.
If you get a dip......just wait till the peanut butter stiffens (starts to cure) and go over it again.

I am planning on using Polyester Laminating resin for most of this project and gel coat. Using the PB recipe: resin + 1/4" chopped fiberglass+ and Cabosil and Catalyst.

When using this recipe for things like filling the gaps as mentioned in the pinned thread how does it cure? Once the deck glass goes down and the gelcoat on top seals it from the top but if there is air allowed at the bottom of these joints will it cure correctly?
 

todhunter

Canoeist
Joined
Sep 15, 2020
Messages
1,299
It'll be fine. Nothing below the deck needs to be fully cured, since it will all get filled with foam.
 

komby

Cadet
Joined
May 30, 2023
Messages
27
Anyone have ideas/experience dealing with areas like these when gutting the deck?
The areas I cut out end in these raised areas in the back. The wood that was on the deck supporting the battery areas was soaked and I got that out but I am not sure about the contents of these gray raised areas up against the transom. The upper section of the deck isn't removable so anything I do near there is going to be completely miserable. I suspect its a drill, see, and start cutting until it is dry is the answer?
stern.jpg

Also The middle area that stores the gas tank with water in it in the picture, Cut it out? and rebuild it or just clear the foam and re-deck? the wood is wet but it seems rock solid.
Originally I was thinking of leaving the middle section of the gas tank area and the ski locker after the bump. Not sure if I have to take all that out for this.

I read about foaming the deck extensively and have a few questions on that also. For the foam, how do I know what density to use 2#, 4#, 8#? I think the answer is math and volume based but not knowing what foam is used in the dry areas, or what volume they are I am missing a few variables in that equation. I was looking at the 4#, any ballpark ideas of how much I am going to need to buy from people who have done similar sized repairs?

I got my head around how much resin I am going to need and started questioning doing this project yesterday. It seems like its somewhere between 5-10 gallons of resin to do 3/4 of this deck over again. Does that sound close?

Thanks everyone for your help so far! Off to get dirty now.
 

Scott Danforth

Grumpy Vintage Moderator still playing with boats
Staff member
Joined
Jul 23, 2011
Messages
49,037
Pull the drive, pull the interior, pull the cap. Cut out the current floor, taking measurements and pictures as you go

You have to pull the cap to get access
 

komby

Cadet
Joined
May 30, 2023
Messages
27
Pull the drive, pull the interior, pull the cap. Cut out the current floor, taking measurements and pictures as you go

You have to pull the cap to get access
When you say pull the cap, do you mean remove the bumper thing on the outside that goes all the way around the boat and remove the entire upper part of the boat, bow to stern? I don't think I have that in me.
Is that necessary if I drill it and its dry? The side areas I have opened so far only the very middle of the boat area trapped water the outer foam is dry and light.

I did get further this AM and noticed that both the ski locker and the back area for the gas tank are floating but glued to the bottom with some sort of adhesive. The stringer that connects the two does not go all the way to the hull. Once I got the middle bit open and the foam removed nothing surrounding it is wood other than that small stringer they used in the mold, the rest is thick fiberglass.
stringer side.jpg
 

flashback

Captain
Joined
Jun 28, 2002
Messages
3,925
Yes what @Scott Danforth suggested, remove the rub rail and then take the entire deck off. It will make your referb much easier.. your basically reversing how it was built. And while the cap is off is a good time to re-bed deck fittings..
 
Top