96 Bayliner 2050 - The Dirty Rotten Baystard

AShipShow

Lieutenant Commander
Joined
Jul 8, 2016
Messages
1,792
Sorry guys, i've been radio silence for a while... just didn't realize how long it had been! Good lord, had to go to page 4 to find myself!

Just cuz I been quiet doesn't mean I've been doing nothing.. got some good news to report and some bad news... Good news is, the interior is pretty much entirely done minus a few little hear and there things and one back rest still needs upholstered... I also got some pimpery going with some color changing LED strips under the gunnels and in the engine compartment... Trailer is pretty much good to go with the exception of some brake work.
When I bought the boat, the previous owner had disconnected the brake line from the surge coupler because he said he would apply the brakes and they wouldn't release so that was his fix... Anywho, just getting around to it now, the master cylinder was NAYSTEE... It had like some form of corrosion/solidified brake fluid stuff going on... I entirely tore apart the master cylinder to pieces. It was surprisingly in good shape inside after removing all the junk/crap from it. Theres a little orifice at the exit of the master cylinder where the brake line plugs in and it was plugged solid... Thinking thats why the brakes were locking up on him... Gunk was probably acting like a check valve.
Anywho, it seems to be working great now! I rehoned the bore and bench bled the assembly when it was back together and it seems to be fine. Next, I think I'm going to run all new hard metal lines for the brakes because if the inside of the master cylinder looked like that, I can only assume the metal brake lines look about the same and I don't want to risk gunk getting back into the fluid. Start with a clean slate...

Now the bad news... I had fired up the motor on muffs a few weeks ago to just verify it still worked basically... Everything seemed to be working great minus needing a few tweaks to the idle speed, choke, and idle mixture screw... It then sat for about a week and a half and I decided to fire it up again a few days ago to check a few other things and wouldn't start for the life of me... i went thru the basics and determined I wasn't getting spark. I then went thru the mercruiser thunderbolt ignition troubleshooting flowchart and ended up being a bad ignition module... So I figured, oh well, its old, lets go get a new one of thoooooHOOOOOOOLY CRAP, $600?!?!?! Mercruiser, are you on crack?!
After some ebaying and other googling I found some used modules, but that made me a little nervous...
Then I posted over on the merc forum and was told about some Delco EST ignition... So after a little research decided thats the way to go.. So I ordered a new EST ignition system which comes with a new distributor/module/coil/plug wires/and harness.... Its almost plug and play minus splicing a couple wires together... The other nice thing is, the replacement ignition modules are like 40 bucks instead of an arm and a leg...

So thats where I am at... she successfully floated a couple days ago with no leaks in the bilge which is awesome.. so once i get the new ignition this week hopefully I can get her running again and take it down to the launch and start her up at the dock and do some final engine tweaking... After that, its gonna be time for a maiden voyage!

Thats all lol
 

AShipShow

Lieutenant Commander
Joined
Jul 8, 2016
Messages
1,792
AAAAAAAAAAAAAAlright.... update time...

I got the surge coupler reinstalled and I ran all new metal brake lines. The old galvanized lines actually looked pretty good, but I was worried they would be as nasty as the master cylinder.. I used that fancy schmancy nicopp brake line stuff... looks like copper, but apparently super strong and really corrosion resistant... After that, filled the reservoir and got everything bled. They seem to be working awesome now.

After that, I replaced all the trailer lights with LED stuff... The old ones were mostly working, but they were a little glitchy.

Then it was on to the ignition problem..

I got my new Delco EST ignition in the mail and unpacked it and everything looked good. I threw it in and went to start it up to set the timing and it started immediately (which is good) and when I pointed the timing light at the balancer, I couldn't find the timing mark... I starting poking around and it was strobing with the line like 100° BTDC which makes absolutely zero sense... The only thing that I could think of was the harmonic balancer was busted and the outer ring slipped... After removing the belts and crank pulley I verified that the balancer seemed clocked right.. I then realized I had a full blown ID 10 T error and apparently there is an arrow on the timing light clamp which has to point towards the spark plug... I had it backwards, and apparently that matters.. Once I flipped it, I was like 2° off the 8° BTDC required... got it rotated just right and I am back up and running!

I can't recommend the Delco ignition enough if your module goes bad... Its really a no-brainer...

I plan on making a video on making the switch.


Other things on the to do list still:
-Finish the bow seating backrest for the port side
-Clean the interior/deck/etc ( its gotten pretty gross)
-Compound/buff the hull

After that, I think it will "feel" officially done
 

havoc_squad

Senior Chief Petty Officer
Joined
Mar 5, 2011
Messages
738
AAAAAAAAAAAAAAlright.... update time...

I got the surge coupler reinstalled and I ran all new metal brake lines. The old galvanized lines actually looked pretty good, but I was worried they would be as nasty as the master cylinder.. I used that fancy schmancy nicopp brake line stuff... looks like copper, but apparently super strong and really corrosion resistant... After that, filled the reservoir and got everything bled. They seem to be working awesome now.

After that, I replaced all the trailer lights with LED stuff... The old ones were mostly working, but they were a little glitchy.

Then it was on to the ignition problem..

I got my new Delco EST ignition in the mail and unpacked it and everything looked good. I threw it in and went to start it up to set the timing and it started immediately (which is good) and when I pointed the timing light at the balancer, I couldn't find the timing mark... I starting poking around and it was strobing with the line like 100° BTDC which makes absolutely zero sense... The only thing that I could think of was the harmonic balancer was busted and the outer ring slipped... After removing the belts and crank pulley I verified that the balancer seemed clocked right.. I then realized I had a full blown ID 10 T error and apparently there is an arrow on the timing light clamp which has to point towards the spark plug... I had it backwards, and apparently that matters.. Once I flipped it, I was like 2° off the 8° BTDC required... got it rotated just right and I am back up and running!

I can't recommend the Delco ignition enough if your module goes bad... Its really a no-brainer...

Hopefully you put the unit in "base timing mode" when you adjusted the distributor position correct? I didn't see you mention setting base timing mode.

If it was not put in base timing mode, the carb throttle, and carb idle fuel/air might be off and the actual timing adjustment might be wrong.

Not saying it is or is not wrong persay, but if the distributor timing was not adjusted in base timing mode, I would re-check idle speed and idle fuel/air after correcting this.
 

AShipShow

Lieutenant Commander
Joined
Jul 8, 2016
Messages
1,792
Hopefully you put the unit in "base timing mode" when you adjusted the distributor position correct? I didn't see you mention setting base timing mode.

If it was not put in base timing mode, the carb throttle, and carb idle fuel/air might be off and the actual timing adjustment might be wrong.

Not saying it is or is not wrong persay, but if the distributor timing was not adjusted in base timing mode, I would re-check idle speed and idle fuel/air after correcting this.


Yep, The Delco EST ignition kit comes with a plug with a black wire that you hook up to 12V and a white loopback wire... When you plug in that connector and hook up the black wire to 12V it locks the ignition in "base timing"...

You also then use that same plug to hookup the old shift cutout switch, except you have to wire a switched 12v wire to one side of the cutout switch, and the other side goes to the black wire, and you cut the white jumper wire... That way, when the cutout switch engages, it sends 12V to the distributor which will cut spark...

It works a treat

I'm thinking I'll make a video on installing the Delco system since I couldn't really find anything on it...
 

AShipShow

Lieutenant Commander
Joined
Jul 8, 2016
Messages
1,792
i HAD the thunderbolt 5 system which IS bulletproof... but I guess mine wasn't happy with its life anymore... I ran thru troubleshooting flow chart several times to verify and it always pointed to a bad module, which was mutually agreed upon over in the merc forum as well...

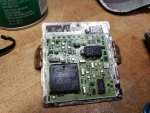
I even took apart the module (knowing it was bad) to see what was inside and if there was a big transistor or something that let the smoke out, thinking maybe I could replace it, but everything looks fine inside... Pretty old and weird technology tho lol... Its a single sided ceramic PCB with a 44 pin Toshiba microcontroller... Its also go these two weird ceramic looking things with zigzags etched on the surface... it almost looks like some kinda strain gage, but I'm thinking they must be some type of temp sensor to feedback to the microcontroller, because one is bonded right to the copper plate backing...
Plus everything is wire bonded, theres no solder joints... its basically unrepairable, atleast by an average person..

20200707_142502_copy_1024x768.jpg
 

AShipShow

Lieutenant Commander
Joined
Jul 8, 2016
Messages
1,792
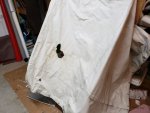
I dug out the bimini cover that came with the boat that had been in storage since it came home 3 years ago... Unfortunately, it looks like the mice decided to make it a home... I'm pissed at myself for letting that happen, cuz otherwise it probably would have been in great shape... Now I need to decide what to do with it...

Its all kinda fancy... it has snaps and zippers and gaskets on it... Thinking it might have actually been a convertible top.. I'm thinking I might just try to patch it with some weatherproof white tape for this summer, but I gotta decide how to fix it once the season is over...

Thinking I'll sew new one with sunbrella since its not a ton of material, but I gotta figure out what all these zippers are for...

20200707_213706_copy_1024x768.jpg
 

AShipShow

Lieutenant Commander
Joined
Jul 8, 2016
Messages
1,792
Got a little more done this week... I knew the trailer bunk brackets were a little rusty, but I had no idea how close they were to totally failing...
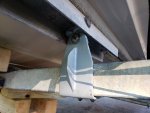
The main bracket that bolts to the trailer were in great shape, but the swivel part that bolts to bunk were absolutely toast. Some parts were close to the original thickness but a lot of it was paper thin from corrosion.

I ordered replacement hot dipped galvenized swivel brackets and decided to use carriage bolts instead of screws to hold them on to the bunk since the screw were about completely falling out on the old ones... Its actually a miracle the bunks were still attached.

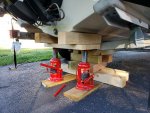
To remove the bunks, I tried lowering the trailer tongue, putting blocking under the transom, and then jacking the front back up to lift the stern of the boat, but that didn't get the boat high enough, so I had to go with the backup plan.
I used two bottle jacks with makeshift blocking (2 4x4's screwed to a 2x12) to straddle the V bottom.

Then just pumped each jack simultaneously until the boat was off the bunks... I ended up pumping the one side I was working on more to make the boat tilt slightly onto the bunk that was staying just give it a little stability and reduce any chance of it tilting towards the side without the bunk.

Anyways, after that, I removed the bunks (half unbolting, half cutting rusted bolts).

The boards and carpet are actually in pretty decent shape so I reused them.

One other thing worth mentioning is, the one bracket on the rear starboard side had bent pretty good (probably from the failing front bracket)...I tried bending it back, but it was too thick. I would have needed a hydraulic press to straigthen it out and I don't have or know anyone with one (maybe a future shop upgrade lol).

I decided to cut slits on the backside with a cutoff wheel to allow me to bend it back... After that I welded the slits to restrengthen it. The big downside is, its galvenized so that burned off where I welded and ground (don't worry, I welded it outside, with a fan blowing the fumes away)...
My best solution for now was to spray it with cold galvenizing so we'll see how it holds up.

I also added a stiffening rib (I call it the shark fin lol) to the bracket to make sureit doesn't bend again.

Thats all for now... Just waiting for a cloudy day so I can buff the hull now.

Snapped a couple pics along the way.

20200714_084332_copy_1024x768.jpg20200714_084341_copy_1024x768.jpg
 

davedog

Seaman Apprentice
Joined
Aug 4, 2010
Messages
33
I really like the way you were able to lift the boat off of the bunks. I will need to do that in not too long to repair the outside areas of the hull where I went through when grinding. Ofcourse I went through over the area over a bunk board.
 

AShipShow

Lieutenant Commander
Joined
Jul 8, 2016
Messages
1,792
Good news and bad...

I dropped her in the water to do some motor testing/tweaking and everything started up and ran fantastic, however when I was reving up the motor a bit, I was getting some squeeling and I narrowed it down to the alternator belt. After doing some investigatory research, I think the pulley was rusty and chewing thru the belt. I pulled it off today after cleaning all the belt dust off everything. I threw it in the vice and when spinning the pulley it sounded a little crunchy, so I thought I would try to break it down to see if I could get at the bearing easily so I could replace them.

I got it about halfway apart and I couldn't for the life of me get the rotor out of the rear bearing. Plus, it was pretty rusty inside, also some paint flaking off... It must have gotten pretty wet at one point in time.
After basically fubar-ing it, I decided it was time for a new alternator... yayyyyyyyyy more money...
At least I will feel good that my charging system will be 100% when done.

Ordered it on Iboats, its a protorque brand??? don't know much about it, but its an alternator, and its USCG approved, so figured I couldn't go wrong.

Hopefully I'll get it in a couple days and I'll be back in business.

On another note, I finally hopped in yesterday and completely cleaned/scrubbed the interior painted surfaces to get all the grime out and it looks fantastic... but man do I need sunglasses now... shes bright!

Now I'm gonna have to give the bilge a good scrubbing to get the belt dust lol.

I also ordered these cool clips that you can hang fenders on, so I need to get those installed.. I also think I want to buy a new anchor because the one that came with the boat doesn't fit under the front seat.

Any suggestions on an anchor for a 20' boat? I'm mostly in lakes with rocky/muddy bottom anywhere from 10-60' deep.
 

AShipShow

Lieutenant Commander
Joined
Jul 8, 2016
Messages
1,792
I keep my anchor under the bow seat.

Thats where I'd like to keep my anchor, but the danforth style anchor that came with the boat doesn't fit...

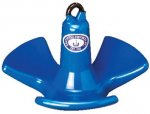
I ended up ordering a PVC coated "river" anchor from iboats... Hoping it will work out.

238-514R.jpg
 

chevymaher

Commander
Joined
Mar 29, 2017
Messages
2,921
Really mine is a danforth anchor. I got it and all kinds of other crap on that side. How big is the one you got?
 

AShipShow

Lieutenant Commander
Joined
Jul 8, 2016
Messages
1,792
I'd have to go measure it buts raining... I'm guessing tip to tip is probably 20"...
 

davedog

Seaman Apprentice
Joined
Aug 4, 2010
Messages
33
I have used every anchor there is over the last 20 years and can 100% say that the box anchor is the only one that has never let me down. It sets right away, and holds no matter what the ground is like.
 
Top