'93 Monark Pro 1900 rebuild

redneckpunk

Petty Officer 2nd Class
Joined
Nov 19, 2008
Messages
130
I finished my first alum rebuild about a year ago, a 12ft, and right away the g/f said "its too small, I want a bigger one". If only I had a $1 everytime I've heard that, but luckily this time she was referring to the boat. I search high and low until the end of June when I found this one on CL. The seller was asking $2000 but I talked him down and after selling the 12ft I was out of pocket about $500. I had to put a new steering cable on it and do some maintanance but we were able to enjoy it though the first week of November before I started my rebuild. So here are some pics
Before
069.jpg

067.jpg

monarkproject004.jpg

073.jpg

monarkproject001.jpg


(cont)
 

Teamster

Lieutenant Commander
Joined
Nov 8, 2010
Messages
1,923
Re: '93 Monark Pro 1900 rebuild

Those are nice boats,...

I'm guessing someone re-powered with the older Merc???
 

jigngrub

Fleet Admiral
Joined
Mar 19, 2011
Messages
8,155
Re: '93 Monark Pro 1900 rebuild

That should be a nice boat when you get the mange cured.
 

redneckpunk

Petty Officer 2nd Class
Joined
Nov 19, 2008
Messages
130
Re: '93 Monark Pro 1900 rebuild

teardown
074_zpsac14c156.jpg

079_zpsa08e0b7e.jpg

083_zpsd4530bb7.jpg

081_zps14b5676b.jpg

079_zpsa08e0b7e.jpg

076_zps1b3c4f39.jpg

I have since pulled all but the rearmost deck board out but no pics yet.
 

redneckpunk

Petty Officer 2nd Class
Joined
Nov 19, 2008
Messages
130
Re: '93 Monark Pro 1900 rebuild

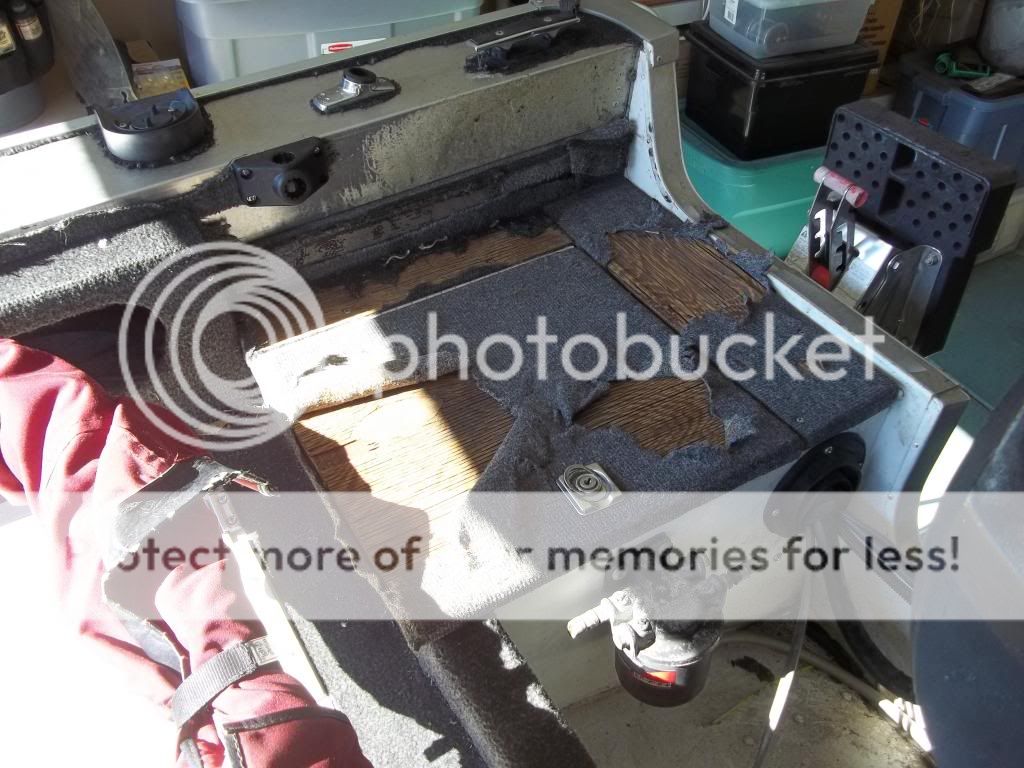
Before taking on this project I was a lurker on almost all the builds on the site getting an idea of just what I was getting into....little did I know. LOL!! I have had a couple surprises along the way I hadnt counted on. First was the fact that in order to get the deck boards out I had to remove the lower side section shown in the second to last pic here under the shifter. Fortunatly, once the rivets were drilled out the pieces came out and the poured in foam behind popped right off with it. My next surprised was the pitted metal on the side rail where the starboard console was mounted (last pic).

However, today as I pulled up more decking I was surprised to find two small holes in the top of the plastic fuel tank. At first I thought maybe I had drilled too deep removing rivets, but upon further inspection I found the holes appeared old and no holes in the deck above. The holes are small, less than 1/8in, side by side about 1.5in apart. I cannot think of why they'd be there but perhaps someone on here would. Also, if they are not, what is the best way to patch these? Im on a tight budget so would hate to blow a lot on replacing it.

So a little about my plans. Replace deck. Debating between vinyl and a roll-on coating but either way no carpet on floors. New carpet on gunnels down to bottom of the rod lockers. The stern of the boat has side storage besides the splashwell and an 18in "bench" in front of the splashwell that had more storage on one side and a livewell on the other. But what I dont like is this bench is first taking up floor space but also isnt level with the splashwell and rear storage. This creates an issue when trying to stand up there and fight a fish without tripping. I'm considering removing the deck and closing in the underneath of the splashwell with only hatch access. So far, Im not planning on removing the pour in foam under the deck as Ive done several core checks and no sign of any rotted foam. Had thought about removing and sealing but I know the boat sat in the water for 4 days on my last trip and the water in the bilge was minimal and I know where the loose rivet causing the leak is. Other things planned include new bildge pumps(2), a washdown pump, new stereo (of coarse), new dash, some rewiring, new plumbing to livewells, new fuel fill hose and vent hose, etc..

Any suggestions and/critiques (even negative) are more than welcome. My plan is to splashdown memorial day weekend. For those tagging along, there will be some slow times in the build as my times are limited week nights and weekends seem to be filling up quick with plans but I will do my best to update when work is done

BTW- I've seen it asked several times what is best for removing the old carpet glue and what I found was an orange citrus spray called Goo Gone. Spray it on, let sit about 10min, and scrape with a putty knife, rinse clean. Cleans right down to alum and best of all no chemical fumes and leaves the garage smelling citrus fresh

~RNP
 

redneckpunk

Petty Officer 2nd Class
Joined
Nov 19, 2008
Messages
130
Re: '93 Monark Pro 1900 rebuild

Those are nice boats,...

I'm guessing someone re-powered with the older Merc???

Best I can tell the motor is about a '78. I cant find serial numbers so not positive. There was a tag from a local shop that did previous work so I called and the mechanic couldnt remember. Merc stickers on lower unit indicate 1500 but wrap around cover on powerhead says 1150. Figure was done for insurance reasons since max rating on hull is 135.

~RNP
 

jigngrub

Fleet Admiral
Joined
Mar 19, 2011
Messages
8,155
Re: '93 Monark Pro 1900 rebuild

The 2 small holes in your fuel tank is a redneck vent... you should know that.:laugh: Post pics of them for the best method to patch them.

The pitted aluminum on the gunwales is more than likely galvanic corrosion from water or a wet material (carpet) being up against it.

Carpeting the gunwales can hold moisture and make mildew a problem, but it may be dry enough over there on the left coast that you don't have that problem like we do in the southeast.

I wouldn't remove the bench at the splashwell, it's part of your boats structural support. Instead I'd reframe it so everything was level and not a trip hazard.

Foam doesn't really rot, it just gets wet and adds weight to your boat... the water in it also decreases the foams buoyancy. If your foam is dry all the way to the bottom I'd leave it in, if it's wet you may want to consider removing and replacing it.

If you install the marine vinyl you'll love it, dried fish blood doesn't even stain it and it's very easy to clean.
 

redneckpunk

Petty Officer 2nd Class
Joined
Nov 19, 2008
Messages
130
Re: '93 Monark Pro 1900 rebuild

The 2 small holes in your fuel tank is a redneck vent... you should know that.:laugh: Post pics of them for the best method to patch them.

:hail: LOL!

Thanks jig! The foam I've core sampled shows no sign of anything, not even discolorization from getting wet so I think thats all good. And not too worried about mildew under carpet as you said on the left coast it dries out fairly well and the boat is garage kept. Still debating the vinyl vs. roll-on because we use the boat alot for camping and load it with gear and I'd hate to tear the vinyl with something sliding on the floor. With roll-on patching is easy. I dont plan on removing the decking again once its reinstalled!! I will get some pics up soon of the holes.

~RNP
 

Teamster

Lieutenant Commander
Joined
Nov 8, 2010
Messages
1,923
Re: '93 Monark Pro 1900 rebuild

I don't know if you could tear the Nautilx (sp) vinyl,..........
 

jigngrub

Fleet Admiral
Joined
Mar 19, 2011
Messages
8,155
Re: '93 Monark Pro 1900 rebuild

I dont plan on removing the decking again once its reinstalled!!

~RNP

Most people don't plan on removing their decking after they've done a resto, but some people find out/realize they need/have to because of an unforseen problem when they were installing the deck. For the people that conceal their deck fasteners under their deck finish this is a real problem, like finding out you have a plumbing leak under a concrete slab.

Installing deck fasteners exposed so you can remove them at any time can come in very handy with an aluminum boat. Old aluminum boats can develop leaks at any time, livewell systems can start leaking in the blink of an eye... or you just may want to make a modification/improvement.

Just something you may want to think about.


I don't know if you could tear the Nautilx (sp) vinyl,..........

Tearing the Nautolex vinyl wouldn't be easy, once the vinyl is bonded to the decking it becomes hard and very tough. Tearing it would take dragging something very heavy and sharp across it. Nautolex also has self healing properties, if the vinyl is punctured or cut it will go back together and after a day in the sun you won't be able to find the wound.
 

redneckpunk

Petty Officer 2nd Class
Joined
Nov 19, 2008
Messages
130
Re: '93 Monark Pro 1900 rebuild

Exposed fasteners is already the plan "just in case". Hopefully it wont be needed because to pull it out would require taking the bottom side rails off again. I have heard that about the Nautolex being "self repairing" but still not sure how well it will form to some of the lip edges around the base. Hard to explain without pictures but the side rails run 90 degrees perpendicular to the deck down to a 90 degree lip of about 1 inch that extends and screws down into the deck. Hoping to get a look at some samples this weekend. Sunday is an open day and plan on finishing the demo and cleanup so will post pics then

~RNP
 

jigngrub

Fleet Admiral
Joined
Mar 19, 2011
Messages
8,155
Re: '93 Monark Pro 1900 rebuild

So tell me, are you going to leave the bow rider deck up front... or are you going to deck it solid like a fishing boat?

Every time I see one of those bow rider decks on a tinny I want to go buy a sheet of plywood, cut it to fit and screw it down over that dang blasted V cut. I picture myself fighting a fish up there and stepping into that V cut and falling down and breaking my leg and fishing pole and the fish gets away!:laugh:
 

redneckpunk

Petty Officer 2nd Class
Joined
Nov 19, 2008
Messages
130
Re: '93 Monark Pro 1900 rebuild

It will be solid back to the consoles and left open underneath for stashing tacklebox or portable heater in cold weather. Had considered enclosing the underneath and making hatch but not certain. Currently debating switching from pedastool front seats to storage boxes eliminating need for additional under front deck. But who knows. Will probably decide as its coming together based on amount of work and funds available at the time. First step is finishing demo on sunday. Trying to determine if I can get aft most deck board out without removing entire splashwell, but looking less likely :blue:

~RNP
 

redneckpunk

Petty Officer 2nd Class
Joined
Nov 19, 2008
Messages
130
Re: '93 Monark Pro 1900 rebuild

well plans got changed a bit so didnt finish demo today, but did finish removing the majority of the old carpet glue. Trying to figure out a way to remove the aft most deck board without removing the splashwell but looking impossibe. Good news is my g/f and I spent Saturday at the International Sportsmens Expo checking out the designs of new alum sleds and gathering ideas. Made it alot easier for her to visualize my concepts for ours as far as seating, storage, etc.. As well, she realized that the boat will be better off with no carpet anywhere. WOOHOO!! Now if I could just convince her that easily that we need a new(er) motor.

~RNP
 

Teamster

Lieutenant Commander
Joined
Nov 8, 2010
Messages
1,923
Re: '93 Monark Pro 1900 rebuild

Yeah,...A newer motor would be nice,..

Your 1978 150 had it's horsepower measured at the crank without giving consideration to use of power to the crank,...Making you motor about a 125 or 130 horse by the newer standards,.....

Starting sometime in the mid to late 80's the standard changed to measure the horsepower at the prop,...

Maybe that would be enough to sway her on a newer motor,......
 

redneckpunk

Petty Officer 2nd Class
Joined
Nov 19, 2008
Messages
130
Re: '93 Monark Pro 1900 rebuild

Had a few minutes before heading out to work today so I snapped a couple pics of the previously mentioned holes in fuel tank. First one is from a distance giving a broader perspective and second one is closer showing the size next to a quarter. Any suggestions? As stated, there were no holes in the deck boards from screws or rivets above this spot so not sure what caused them. Just wondering if they are repairable or if only other option is replacing tank?
001_zps2378cb84.jpg

002_zps293cc376.jpg


~RNP
 

redneckpunk

Petty Officer 2nd Class
Joined
Nov 19, 2008
Messages
130
Re: '93 Monark Pro 1900 rebuild

Also, I know I have run across a thread about measuring the fuel tank to determine capacity but was unable to find it again. Anyone know where its at or what the formula is? Using whats left of my memory I tried to do the math but not sure if my formula is correct.

Measurements;
60Lx23.5Wx5.5H

60x23.5x5.5=7755 cubic inches of volume
7755/231 (cubic inches to gallons)=33.57 gallons

~RNP
 

redneckpunk

Petty Officer 2nd Class
Joined
Nov 19, 2008
Messages
130
Re: '93 Monark Pro 1900 rebuild

Nevermind the tank question, I found a calculator online that does the conversion for me....guess my memory isnt all that bad

~RNP
 
Top