81 Sea Squirt Restoration

Overhaul

Cadet
Joined
Jul 16, 2010
Messages
15
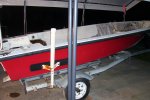
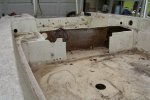
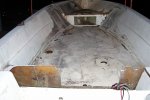
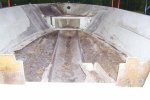
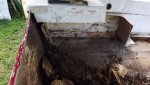
First off just a little history of this boat. This is a 1981 14.5 ft Center Console little boat for fishing. I brought this boat from my brother is 2002 and took it out a few times. The 50 hp Mercury needed some work done to it. I removed the motor an started the work it needed. Some how the motor stand failed and it hit ground on the electronics side of the engine. I got discouraged and just put everything on hold. I kept the boat mainly because these boats were produced in Princeton Florida where I grew up. I have had mild spurts of trying to repair the boat and finally came to the conclusion that it is a major overhaul. Transom, deck and foam removal, which I have the transom and deck removed. Still working on the foam. I have been watching a lot of you tube videos and mainly boatworks today videos. I am just rolling up my sleeves and going for it. Sorry for the long post just introducing myself at this time. I will have many questions along this journey.
 

Overhaul

Cadet
Joined
Jul 16, 2010
Messages
15
Wow, looking at my join date, 10 years and this is my 2nd post. I have been reading a lot of the restoration posts over those years and getting an idea of what I have to do. I have no experience with fiberglass. My plan is to go back together with coosa. I know it is expensive but the boat is very small, so it won't be too bad..
 

Overhaul

Cadet
Joined
Jul 16, 2010
Messages
15
Some of the reason it taken me so long is because my life has had it's ups and downs. I got laid off in Miami and the job took me to North Florida. Another lay off and then my career took me to Missouri. The boat just stayed on hold. Now I plan on retiring next year and the final move to Iowa. The boat will go into a 30 x 36 garage / shop and I will learn all about this fiberglass stuff.
 

Overhaul

Cadet
Joined
Jul 16, 2010
Messages
15
[No message]
 

Attachments

  • photo340836.jpg
    photo340836.jpg
    1 MB · Views: 8
  • photo340838.jpg
    photo340838.jpg
    1 MB · Views: 7
  • photo340839.jpg
    photo340839.jpg
    1 MB · Views: 7

Overhaul

Cadet
Joined
Jul 16, 2010
Messages
15
This is where the deck is removed
 

Attachments

  • photo340840.jpg
    photo340840.jpg
    1 MB · Views: 9
  • photo340841.jpg
    photo340841.jpg
    998.6 KB · Views: 9

Overhaul

Cadet
Joined
Jul 16, 2010
Messages
15
In the photos you can see there is a center trough and no stringers. The deck is supported mainly by foam. I have removed the center trough in 1 piece and put it aside. My question is can I run 2 stringers on each side of the trough and put the trough back in. I would like to put 2 stingers along the both sides of the hull and not put the foam back in. Is this something you experts would do?
 

GSPLures

Chief Petty Officer
Joined
Sep 3, 2019
Messages
564
The foam is there for flotation and support. It also stiffens the hull up. I have seen people not put foam back in but most posts I have read do not recommend it. If things ever decide to go south it would be nice to at least have a hull to hang on to.
 

Overhaul

Cadet
Joined
Jul 16, 2010
Messages
15
Here is where I am at right now. Transom and deck out and most of the foam gone. Thanks GSP for your response. I do want to put a couple of stringers in. I think I will take your advice and put foam back in. I will have to do some research on that part. I read in one of the posts about foam asking if it will stick to the old foam. The answer was that it will stick to just about anything. My remaining foam is dry and I think I will just trim and shape what I have left and put new foam the rest of the way.
 

Attachments

  • DSCF6617.JPG
    DSCF6617.JPG
    1.9 MB · Views: 9

GSPLures

Chief Petty Officer
Joined
Sep 3, 2019
Messages
564
The foam usually holds water on the bottom. Make sure all of the foam is dry. Was the trough made by 2 stringers running the length of the boat? It looks like it in the pictures then the middle was used as a ski locker. Just asking that is how my boat was constructed it then had a bulkhead to separate the bilge and ski locker and another one under where my dash is. Then it was foamed on the outside of the stringers.
 

Overhaul

Cadet
Joined
Jul 16, 2010
Messages
15
The trough acted like it had two stringers but it is only about a quarter inch thick. In the bow it had hatch maybe for the anchor and the trough was a way for water to get to the bilge area. Towards the rear there might have been a ski locker and seating. A former owner cut it out and put the fuel tank in there. I would like to put two stringer in there and some how put the trough back in and glass it to the stringers.
 

GSPLures

Chief Petty Officer
Joined
Sep 3, 2019
Messages
564
Is it possible that there was 2 stringers to the outside of the trough at one point. May not have been glassed on the outside of them and the wood turned to mulch and is no longer there? But adding 2 stringers to the outside should not be an issue.

Just make sure you replace what was originally there because it was designed like that for a reason. You can add more for a better design if you feel it is necessary. I attached 2 pics of my stringer layout the original was just the 2 main stringers(like you want to add) with the bulkheads just in the center of the stringers to box out the ski locker and bilge. The rest i added for more support. I am going to foam around the main stringers and under the enclosed bow.
20200923_142457_compress54.jpg

20200923_142557_compress92.jpg
 

Overhaul

Cadet
Joined
Jul 16, 2010
Messages
15
Thanks for your photos. That is pretty much what I had in mind but put the trough back in down the center. In your photos I see that you have the side walls cut out also. At this point I only have the floor removed. I kind of want to take my side walls out also but I am a little afraid of getting over my head. I think it would make for a better repair and I would get more foam out. What are your thoughts?
 

Baylinerchuck

Commander
Joined
Jul 29, 2016
Messages
2,726
Are the sidewalls you’re mentioning part of the cap of the boat? Normally it is and would require removing the cap. If you can do all the work without removing the cap it would be much better in the long run. Just my opinion.
 

Overhaul

Cadet
Joined
Jul 16, 2010
Messages
15
It is part of the cap. There is an inner wall and the cap making the outer wall. My thought is to cut the outer wall cap about foot and replacing it. Would also like to add some bracing along the sides (not sure of the term maybe called knees)
 

GSPLures

Chief Petty Officer
Joined
Sep 3, 2019
Messages
564
It is part of the cap. There is an inner wall and the cap making the outer wall. My thought is to cut the outer wall cap about foot and replacing it. Would also like to add some bracing along the sides (not sure of the term maybe called knees)
My side walls are not part of the cap they were screwed to the cap, and a support shelf(not sure the proper name) that is glassed to the sides of the hull
 

Overhaul

Cadet
Joined
Jul 16, 2010
Messages
15
Been on 12 hr shifts, off for weekend, back at it on Monday. Since the transom is out I went out to grind the peanut butter remnants or whatever it is. Went at it for 2 hrs with an orbital sander w/ 36 grit and a dremel w/ oscillating blade and got about maybe 8" worth cut out. Here comes the dumb question, what grinder or other tools are you using to grind this stuff out?
 

GSPLures

Chief Petty Officer
Joined
Sep 3, 2019
Messages
564
I used a 4" angle grinder with a resin backed sanding disc 60 grit, it will sand through quick so keep it moving.. If you do not own one I suggest going to a harbor freight if you have one around you. The dust will destroy the tools you use, so in this case cheaper is better.
 

GSPLures

Chief Petty Officer
Joined
Sep 3, 2019
Messages
564
Baylinerchuck is correct I meant to say 36 grit and 4 1\2" angle grinder. Not really sure why I was so off on my numbers, do they even make a 4" angle grinder lol.
 
Top