'64 Eliminator restoration

64Eliminator

Cadet
Joined
Dec 12, 2013
Messages
7
Hello all

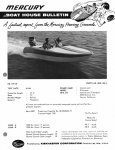
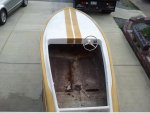
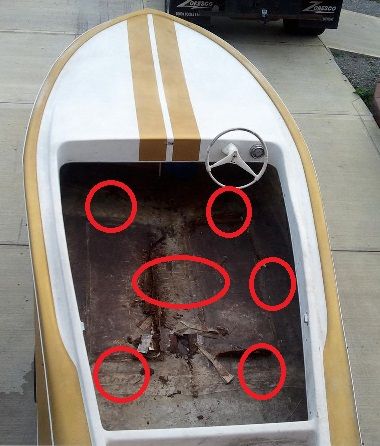
Just a short introduction first...I'm from PA and have loved boating since I was around 15-16 (back in 1988) when Dad got his old boat out and we started using it again for the first time since the late 60's early 70's when he put it away to raise a family. It's a 1964 International Eliminator model it has a Merc 1000 engine on it which was NOT the recommended one for that boat but like everyone else in the mid 60's when he bought it he wanted HP. He pulled it to the lakes with a 1967 Cougar with a 390 4 speed car..How cool was that!!!! We ran it for 2 years having fun and like before it got put away for other projects but this time my older brother let it sit out unlike before when it was kept inside so needless to say you all know what happened....ROT!!!! My dad passed away ten years ago so I feel I have to get this boat back to what it was when he had it. So last year I went and pulled it to my house to get it back to what it was and start to use it again.Heres some original brochure pics ...Jim
 

Attachments

  • BHBPHOTO141.JPG
    BHBPHOTO141.JPG
    102.3 KB · Views: 0
  • Eliminatora64001.jpg
    Eliminatora64001.jpg
    102.7 KB · Views: 0
  • BHBPHOTO142.JPG
    BHBPHOTO142.JPG
    94.7 KB · Views: 0

64Eliminator

Cadet
Joined
Dec 12, 2013
Messages
7
Re: '64 Eliminator restoration

Soooo.... now its time for the rebuild heres what it looked like after dragging it home and ripping out everything that was inside and washing it. IT WAS BAD!! to say the least .The transom was rotten about half way thru and the floor was rotten right around where they had holes in the floor for the small skag thats on the bottom. I was able to save enough of the seats to get good templates off of them to rebuild .There are some cracks in the hull from the weakening of the transom and that heavy engine hanging on it. Its a very shallow V boat that does not have stringers ,the plywood is epoxied right to hull floor, which came up really easy. Ill post more pics later from what has been done so far. The plywood floor and transom have been taken out ,now I'm in the template stage to get them made and ready to put back in...Jim
 

Attachments

  • 2012-07-14 18.02.12.jpg
    2012-07-14 18.02.12.jpg
    135.2 KB · Views: 0
  • boat1.jpg
    boat1.jpg
    70.6 KB · Views: 0
  • 2012-07-14 18.42.33.jpg
    2012-07-14 18.42.33.jpg
    140.6 KB · Views: 0

zool

Captain
Joined
Aug 19, 2012
Messages
3,433
Re: '64 Eliminator restoration

Welcome to drydock, 64eliminator...thats a really cool boat, and a good story to go with it. Worthy of the resto for sure....

now if you just had a Cougar XR7 Eliminator to pull it when done...what a blast from the past package you would have!! :D
 

64Eliminator

Cadet
Joined
Dec 12, 2013
Messages
7
Re: '64 Eliminator restoration

now if you just had a Cougar XR7 Eliminator to pull it when done...what a blast from the past package you would have!! :D[/QUOTE]

Actually we still have that car too..lol.. Its been in storage since it was wrecked in 1971... car VS coal truck ..major front end damage..thats the next thing I'm pulling home after the boats done !!!...Jim
 

zool

Captain
Joined
Aug 19, 2012
Messages
3,433
Re: '64 Eliminator restoration

Actually we still have that car too..lol.. Its been in storage since it was wrecked in 1971... car VS coal truck ..major front end damage..thats the next thing I'm pulling home after the boats done !!!...Jim


Sounds like you got your work cut out for you!.....looks like you'll be pulling the cap off the boat to do the transom.
 

Woodonglass

Supreme Mariner
Joined
Dec 29, 2009
Messages
25,932
Re: '64 Eliminator restoration

Jim,

welcometoiBoats-1.jpg


Great story...Great Boat. It appears in fact that the hull DOES in fact have some sort of "Stringer" System in it that bears investigation. It may be a foam filled glass structure but it still needs to be checked out, IMHO. I've circled the areas that I believe need to be core sampled to verify their structure.
eliminator.jpg

Since they are raised above the surface of the hull they are strengthening features of the hull and not just there for the deck to sit on. I'd recommend to carefully drill into them and see what the shavings reveal. I'd bet on foam but it might be wood and if so and if it's wet and rotten it would need to be replaced. If it's foam and it's wet then it could be adding significant weight to the boat and again would need to be removed and replaced. Just my 2?. Your boat...your decision. I'm subscribed and watching.;):)

WelcomeAboard.jpg
 
Last edited:

64Eliminator

Cadet
Joined
Dec 12, 2013
Messages
7
Re: '64 Eliminator restoration

Thanks woodonglass for taking the time to check out the pics. Tomorrow I'll post some pics of the floor with the wood off ,it was epoxied right to the hull with no stringers,I was surprised too. As far as taking the cap off I was worried about it not holding shape and not being able to get it properly aligned since it was a butt joint ,there is no inner lip. So what I did and you'll see in pics was to cut off the rear "tray" which was cracked in several places anyway,it will let me angle the transom pieces in.Theres some cracks in the corners of the hull where the transom sits that I need to fix before I it goes in..I just want to add I have NEVER done a boat rest before so I'm learning as I go so any help or words of wisdom will be appreciated.
 

64Eliminator

Cadet
Joined
Dec 12, 2013
Messages
7
Re: '64 Eliminator restoration

OK.. so heres the stage where the project is now and where I am going to need the advice of guys on the forum. In the pics you'll see I have a crack in the hull right on the corner where the transom is..Now do I fix this from behind then put the transom in or put the transom in and fix it from the front????...I'm thinking from the back because I can get to it but not 100% sure. I've seen videos on Youtube showing it done both ways.

Then you can see the boat had the plywood epoxied right to the hull with no stringers , and the hull is not real thick at all, I have it supported every 16-18 inches then lay 2x4's across that on the inside then plywood on top of that to work on the inside.I did manage to get the floor pieces out in full pieces so I can use them for templates. There was a left/right and a tapered narrow center section about 3 " wide. I'll have more questions on that when its time..haha

Anything you guys see please don't be afraid to tell me I'm wrong. THANKS ..Jim
 

Attachments

  • IMG_0011.jpg
    IMG_0011.jpg
    139.9 KB · Views: 0
  • IMG_0008.jpg
    IMG_0008.jpg
    135 KB · Views: 0
  • IMG_0010.jpg
    IMG_0010.jpg
    124.8 KB · Views: 0
  • IMG_0012.jpg
    IMG_0012.jpg
    127.3 KB · Views: 0

GT1000000

Rear Admiral
Joined
Jul 13, 2011
Messages
4,916
Re: '64 Eliminator restoration

Welcome '64 Eliminator,
Nice looking hull design and an awesome reason to restore this very cool looking boat.
My first impressions are basically the same as 'Woodonglass'...whatever is hiding under those 'lumps' on the hull need investigating.
The crack in the transom should be no big deal to fix once you get into it. Especially if you are going to re-paint the hull.
My advice is related to whether or not, where the rub rail is removed, if you could fairly easily remove the cap?
If you could it would make replacing the transom much easier and you could do it all in one piece, which would be much stronger than sections...
The other advantage is that it would be easier to do any prep or repairs to the hull.
Otherwise, your progress is looking great and I would like to come aboard and see this beauty brought back to better than new condition.
Best of luck and have fun!
GT1M:D
 

64Eliminator

Cadet
Joined
Dec 12, 2013
Messages
7
Re: '64 Eliminator restoration

Thanks GT1000000 .My issue with removing the cap was its a butt joint with no lip to get it positioned right and I'm thinking if I split it, the hull will just go all over the place. I cut the new transom pieces out today and I can get both layers in easily ( two layers of 3/4 marine plywood ) to get me the original 1 1/2 transom thickness..

What I was thinking about after the transom is in was where the cap is butted to the hull is replacing it in 3- 4 foot sections the whole way around that way it retains it shape but gets redone all around because there are two small sections where it is split from the hull.. THANKS Jim
 

64Eliminator

Cadet
Joined
Dec 12, 2013
Messages
7
Re: '64 Eliminator restoration

Hi guys/gals here is where I need some help on the restoration. I need help picking out the right resins/epoxies and cloth to get this thing underway


For the floor do I resin the hull to capture all the chop strand that came up from taking the plywood off and then resin the new plywood to that then tab in the plywood and cover that with new cloth ,OR do I resin the chop strand and lay down new chop strand for some added strength then resin the plywood to that,then tab in the plywood and cover that with new cloth ..Which resin is the best for this application and cloth weight? and tabbing material. The cloth that was on the top of the plywood was the woven cloth should I stay with that or use the biaxial ?

For the transom, what resin do I use to adhere the plywood layers together then to the fiberglass hull. In the picture you can see some type of filler epoxy was used to take up the gap from the plywood transom to the hull, what is the material I need for that.

The crack in the corner of the hull, do I fix that from inside before I put the transom back in or put the transom in first then fix the crack?

Thanks for your help !!!!! Jim
 

Attachments

  • IMG_0011.jpg
    IMG_0011.jpg
    139.9 KB · Views: 0
  • IMG_0014.jpg
    IMG_0014.jpg
    132.6 KB · Views: 0

Woodonglass

Supreme Mariner
Joined
Dec 29, 2009
Messages
25,932
Re: '64 Eliminator restoration

Jim, the Ridges I circled in my original post are your stringer system. Your later pics clearly show that the smooth deck was laid on top of this structure. A boat hull with no stringers would be rounded and smooth yours is not because it has an unusual support system. Not the typical stringer system but still it is a support system of some kind. Have you opened those raised areas up to see what's inside? What CSM are you talking about. Pics are needed. Transom wood layers can be glued together using Regular Tirebond III wood glue (Yes, when cured it's 100% waterproof.) You use Thickened Resin to attach the transom to the hull. We call it Peanut Butter. Mix the resin with Cabosil and Chopped milled fibers. The crack is repaired both on the inside and the outside. Inside first.

Again, you really need to inspect your substructure prior to installing the deck.
 
Top