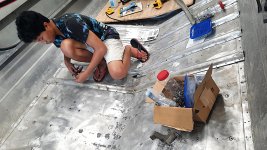
22' starcraft islander, crack(s) in hull -- aluminum repair options?

racerone

Supreme Mariner
Joined
Dec 28, 2013
Messages
37,830
I doubt any welding shop would " attack " if from the outside.----Too much risk of the whole works going up in smoke !!
 

BWR1953

Admiral
Joined
Jan 23, 2009
Messages
6,178
Thanks all. Riveting a patch down from the outside seems like the agreed-upon best fix, so I'll likely do something like that (but will continue to get advice for a few days while I mull it over).

I think the big outstanding questions for me are:

1) How do you "form" it to the hull? Do you mean just like rough forming it, or how precisely does this need to be done? Are we talking... making a cast of the hull and having a patch custom made, or something more like just getting the angles pretty close and then riveting it down?

2) What kind of rivets? Are blind rivets good here?

3) Does the patch get... I guess "treated" at all? The way I'm imagining it, the edges of this patch will catch a lot of water and take a lot of force. Do people.... i dunno, Bondo over it or something just to make that leading edge more hydrodynamic?

Thanks!!
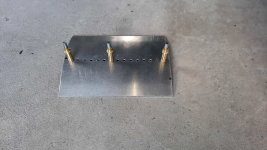
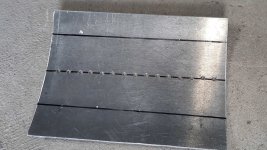
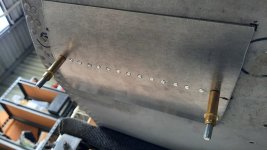
1. For the patch at the very stern of my Chieftain, I used 0.080” sheet aluminum. I measured the saggita distance inside the hull for the location, then had the fabrication shop roll it to shape. They got it very close, but I ended up using a rubber hammer to very gently whang it to final conformation. No need to get it shaped to within thousands of an inch or anything. Remember, there will be a layer of 5200 between the patch and the hull, plus a bunch of rivets securing it in place.
5.jpg

6.jpg

10.jpg


2. Solid rivets are the standard below the waterline, not blinds.

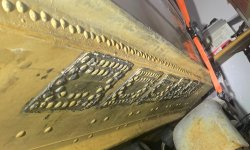
3. Here’s a pic I found on the internet which shows a pretty hefty patch job. The patches are seriously riveted into place and back buttered with a sealant. No worries about hydrodynamic concerns.
patches2.jpeg

4. Probably two.
For the rest, I’ll defer to @Watermann and @classiccat.
 

jimmwaller

Petty Officer 1st Class
Joined
Nov 30, 2013
Messages
265
Wow, thanks, @BWR1953! These photos are really helpful.

If I need to use solid rivets... I'm guessing that there's no magic way to do this without access to the back of the panel. So I'll need to take out my carpet, floor, side panels, etc.? Just for my own knowledge, why are solids preferred beneath the waterline?

thanks
 

BWR1953

Admiral
Joined
Jan 23, 2009
Messages
6,178
Wow, thanks, @BWR1953! These photos are really helpful.

If I need to use solid rivets... I'm guessing that there's no magic way to do this without access to the back of the panel. So I'll need to take out my carpet, floor, side panels, etc.? Just for my own knowledge, why are solids preferred beneath the waterline?

thanks
Solids are far stronger than blinds, which is why they're needed.

Here's what I had to do on my Chief. Completely gutted the interior and pulled 3 ribs in order to repair corrosion. 🤪
1.jpg
 

classiccat

"Captain" + Starmada Splash Of The Year 2020
Joined
Dec 20, 2010
Messages
3,412
late to the crack party :LOL: .

Deck and sidepanel removal is needed. There's no easy button for fixing this right...we're just seeing a small window...i wouldn't be the least bit surprised if there are other areas that need repair.

Given how that crack propagates along the chine break, I'd remove the double seam rivets and add angled patches to the interior as well as add flat patches to the exterior...all buttered with 5200.
 

airshot

Vice Admiral
Joined
Jul 22, 2008
Messages
5,085
You dont weld riveted boats, the excess heat will causevthe surronding rivets to leak. Also way to much corrosion ans thinned out aluminum, when the heat hits it....you will just have a puddle of melted aluminum!!! Patching from both sides for structural integrity is a must. Hate to see a wave hit hard and cause a real hull breech there. If you decide to do a quick patch, keep her at idle speed in calm water or suffer the consequences.
 

RBoyd1971

Petty Officer 2nd Class
Joined
Oct 20, 2020
Messages
165
Be sure to drill the ends of the cracks to stress relieve them. Whatever you do, don't put heat on them or they'll run on you. I've seen plenty of those patches put on with sealed blind rivets and 5200 from just the outside. Best is with solid rivets if you have access to both sides. Be sure the aluminum is pristine clean, both the patch and boat were they touch so the 5200 has a good bond. The good thing about solid rivets is when you buck them you draw the two surfaces tight together. With the sealed blind rivets, you are relying more on the adhesive. I will say though, the location of that repair does present a challenge. Stay sober when attempting it. 🤣
 

Rasdiir

Petty Officer 2nd Class
Joined
Jul 18, 2011
Messages
167
also, thanks for the threads, @Rasdiir they were really helpful. Those patches look really nice, I'd be psyched for an outcome like that.

Three more quick questions to add to my list, above.

4) Given that I have what seems to be two cracks that are about 4-5 inches apart, is it better to do two patches, or one longer patch?

5) Either way, I have a ton of rivets that I'll have to take out it looks like... I'll probably have to remove all the rivets on the "side wall" part of the chine and then a few others. Is the goal simply to take out all the rivets that would naturally end up under the patch, and then replace only those rivets? Or should I replace all those rivets but then add additional rivets as necessary to create a tighter seam around the perimeter of the patch?

And I guess the follow up question: Do I need to take out the rivets that are under the patch, too, or just the ones around the perimeter? Any tricks for mapping the rivet holes onto the aluminum?

6) How can I tell if there's a rib in there? One of the threads noted that, when all the rivets are pulled from a rib, the rib pops up so you can't rivet it down without holding it back in place. If I have ribs, and they're under the floor, this seems like worst-case scenario. How can I tell if there's a rib, and what do I do if there is?

Thanks!
I'm just starting my resto and have yet to actually do any riveting, but from what I've read:
  • Forming can be done with a rubber mallet and gentle banging. The hull may need a board or something held on the inside while you wack it to make sure it doesn't bounce or dent.
  • There is a rivet thread in the Starcraft forum that has a ton of info, but you would need brazier head solid rivets either 3/16 or 1/4 shaft diameter, and either 3/8 (2 layers), 7/16 (3 layers), or 1/2" length (4 layers, but that would be tough). You will also need a rivet gun, bucking bar, and probably some bolts and nuts to hold the pieces together while you rivet. I've found in my practice pieces that the rivets will not draw the layers together, so you can use spare holes with bolts to suck the layers together, then set the rivets to keep them that way.
  • A lot of people just round off the edges of the patch (aluminum sands easily) to make them more hydrodynamic, but I don't think it matters much.
  • I imagine one big patch would be more stable then several small ones.
  • I would remove all of the existing rivets and redo new ones using the same holes but also through the patch. I would also do new rivets and holes around the edges of the patch (probably these can be a little more spaced out then the 1/2" spacing of the existing ones). All the rivets that will be under the patch would have to be removed and then replaced once the patch is in place otherwise the heads will not allow the patch to stay flat.
  • To map the holes I would remove the old rivets, lay the patch down with one or two holes already lined up and bolted together (this might be the time to do a couple of the new ones around the edge), then drill from the inside using the old holes as a guide.
  • You will have to remove the floor to do this, so you will be able to see the ribs for sure. If you do have to remove rivets from the end of the rib and it pops up then use the bolts in a few holes to hold it down while you rivet the other holes.
 
Top