1st boat - 1981 Starcraft SS 160

Watermann

Starmada Splash of the Year 2014
Joined
Jan 12, 2013
Messages
13,787
Racerone could you please elaborate? I’ve always heard that if your cylinders are within approximately 10% of one another then it should be all good. Any clue what the compression was from the factory in ‘82?
Those numbers are alright for that motor with it's age, I would run it until it dies which would most likely be many years to come, that 90 is not over worked at all on a 16'r.
 

Dacranks

Cadet
Joined
Jan 31, 2021
Messages
17
My 16SS was an enjoyable build. Really liked the layout for fishing with a modified front casting deck and removable pedestal seats throughout. I went with US Composites epoxy for my transom, Spar on the decking covered by Nautolux vinyl.
View attachment 333123View attachment 333124
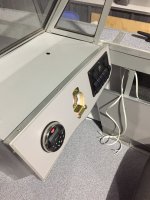
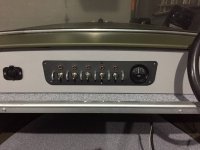
@MNhunter1 That's an awesome rig! I really like the color schemes and set up in general. I noticed you have a rocker switch panel on your dash. From what I can tell It looks some of the ones I've seen on amazon for about $40...is that right? How do you like them/do they work well/have any issues with getting them wet? I was planning on doing the same thing.

Are those storage hatches in the bow...or live well/coolers?
 

Dacranks

Cadet
Joined
Jan 31, 2021
Messages
17
Those numbers are alright for that motor with it's age, I would run it until it dies which would most likely be many years to come, that 90 is not over worked at all on a 16'r.
That's what I'm thinking as well...I'd like to get out on the water and enjoy the boat this summer even if I might be missing a little power. Then maybe do a tear down in the fall/winter.

But on the other hand I have very little experience with outboard engines and don't want to overlook any major issues that could leave me stranded somewhere. You guys are experts compared to me so I really appreciate the advice!
 

racerone

Supreme Mariner
Joined
Dec 28, 2013
Messages
37,827
Inspection is so easy on these motors I say.-----Find out about the condition of cylinders now.-----Not 1 day after launching.------Well then pull the 4 bypass covers ( 6 screws each ) to look at pistons an rings.----Cost you 4 gaskets $2.00 each.-----Yes parts and cylinders are precision made these days !------At 95 PSI on my gauge ( yes it is a good one ) that motor would come apart.----I have seen lots of " good looking motors " that needed rebuilding.
 

Dacranks

Cadet
Joined
Jan 31, 2021
Messages
17
@MNhunter1 That's an awesome rig! I really like the color schemes and set up in general. I noticed you have a rocker switch panel on your dash. From what I can tell It looks some of the ones I've seen on amazon for about $40...is that right? How do you like them/do they work well/have any issues with getting them wet? I was planning on doing the same thing.

Are those storage hatches in the bow...or live well/coolers?
Couple questions on the flooring...How much vinyl did you end up ordering to do your whole boat? I'm trying to estimate my total costs going into this build.

Has anyone used the foam backed vinyl for doing trim/top of gunwales/maybe even floors for comfort...curious how it holds up.
 

MNhunter1

Lieutenant Junior Grade
Joined
May 12, 2014
Messages
1,053
@MNhunter1 That's an awesome rig! I really like the color schemes and set up in general. I noticed you have a rocker switch panel on your dash. From what I can tell It looks some of the ones I've seen on amazon for about $40...is that right? How do you like them/do they work well/have any issues with getting them wet? I was planning on doing the same thing.

Are those storage hatches in the bow...or live well/coolers?
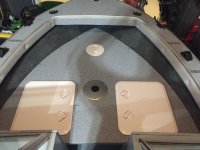
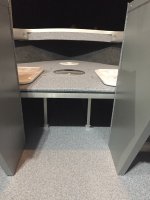
Yes, I was going to do a custom switch panel but just went with the store boat one. Nothing fancy and I swapped out some of the included wires with known tinned marine grade and waterproof connectors. The complete front casting deck is open underneath, so the hatches just allow for different access points. I thought about separate compartments, but figured the open concept doesn't limit my storage space and allows things like wet lifejackets, ropes, etc. to air out. I also would feed my rod tips underneath and lay them on the deck during transport/trailering.
IMG_6481.JPGIMG_6482.JPGIMG_6329.JPG
 

MNhunter1

Lieutenant Junior Grade
Joined
May 12, 2014
Messages
1,053
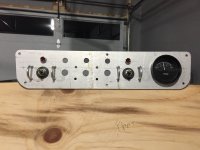
Here is a custom switch panel I did on my '72 Nova. Plenty of options, just depends on the effort and expense you want to throw at it.
AFC9B614-BECB-4B54-BBE3-8C8D746C8850_zpschme5ae9.jpgIMG_4596.JPG
 

racerone

Supreme Mariner
Joined
Dec 28, 2013
Messages
37,827
New rings in worn piston grooves is a bad , bad concept on these motors with " pressure back rings " in them.-----It can be hard to convince folks with used boats to do some simple inspection.----Remove 4 bypass covers and look at pistons and rings.
 

Moserkr

Chief Officer + Starmada Splash Of The Year 2021
Joined
Nov 23, 2020
Messages
869
@MNhunter1 That open deck underneath is pretty sweet for easy access. Clean too with the AL bracing.

One thought on floor material as an alternative to vinyl is the jetski material hydroturf. Had an ugly green one in my boat that faded, but feels awesome barefoot. I plan on having it again but in a different color. Lots to think about!!
 

Dacranks

Cadet
Joined
Jan 31, 2021
Messages
17
Inspection is so easy on these motors I say.-----Find out about the condition of cylinders now.-----Not 1 day after launching.------Well then pull the 4 bypass covers ( 6 screws each ) to look at pistons an rings.----Cost you 4 gaskets $2.00 each.-----Yes parts and cylinders are precision made these days !------At 95 PSI on my gauge ( yes it is a good one ) that motor would come apart.----I have seen lots of " good looking motors " that needed rebuilding.
@racerone As
Inspection is so easy on these motors I say.-----Find out about the condition of cylinders now.-----Not 1 day after launching.------Well then pull the 4 bypass covers ( 6 screws each ) to look at pistons an rings.----Cost you 4 gaskets $2.00 each.-----Yes parts and cylinders are precision made these days !------At 95 PSI on my gauge ( yes it is a good one ) that motor would come apart.----I have seen lots of " good looking motors " that needed rebuilding.
If its that simple I'll definitely order up some gaskets and pull those covers to take a look! I'll look for any scoring/ring condition/excessive carbon build up...anything else I'm overlooking?? Much appreciated advice.
 

MNhunter1

Lieutenant Junior Grade
Joined
May 12, 2014
Messages
1,053
@MNhunter1 That open deck underneath is pretty sweet for easy access. Clean too with the AL bracing.

One thought on floor material as an alternative to vinyl is the jetski material hydroturf. Had an ugly green one in my boat that faded, but feels awesome barefoot. I plan on having it again but in a different color. Lots to think about!!
Yes, I've looked at the hydroturf as well. Used a lot on duck boats, just no personal experience with it and unsure of the longevity. They use to have some discounted "B" sheets available, but don't see them on their website anymore. I plan to do my MR180 in the same Duralux green paint I used on my Nova and am debating staying with the grey Nautolux for the deck, or using something like the hydroturf in an olive drab or darker grey. Another thought I had was covering the complete deck in the Nautolux and using hydroturf on top, almost as pads, in a similar fashion you see the snapped in/removable carpet on many boats today.
 

MNhunter1

Lieutenant Junior Grade
Joined
May 12, 2014
Messages
1,053
Sorry, not to derail Dacranks thread. Several different options for bow seating/casting deck, switch panels, and deck coverings. Looking forward to the progression.
 

Dacranks

Cadet
Joined
Jan 31, 2021
Messages
17
Yes, I was going to do a custom switch panel but just went with the store boat one. Nothing fancy and I swapped out some of the included wires with known tinned marine grade and waterproof connectors. The complete front casting deck is open underneath, so the hatches just allow for different access points. I thought about separate compartments, but figured the open concept doesn't limit my storage space and allows things like wet lifejackets, ropes, etc. to air out. I also would feed my rod tips underneath and lay them on the deck during transport/trailering.
View attachment 333129View attachment 333130View attachment 333131
Couldn't help but notice you aren't running any gages... how do you keep track of engine temp and RPM, especially? But man do you build some clean looking boats!! Great work on the aluminum trim.
 

MNhunter1

Lieutenant Junior Grade
Joined
May 12, 2014
Messages
1,053
Couldn't help but notice you aren't running any gages... how do you keep track of engine temp and RPM, especially? But man do you build some clean looking boats!! Great work on the aluminum trim.
Sound, smell, sight:) As long as I can see the tell tale and know the impeller is working, the sound of the outboard pretty much tells me what I need. I'll likely add some gauges to my next build, but I wouldn't consider them a necessity for an outboard.
 

Dacranks

Cadet
Joined
Jan 31, 2021
Messages
17
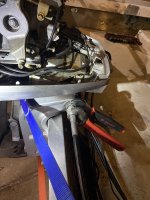
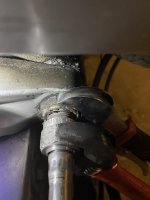
So I'm out in the cold working on getting all my cables, wires and such disconnected in order to remove the splash pan to get after the transom. Any tips on how to disconnect the steering cable would be much appreciated. The bolt against the housing is able to spin and the nut(?) closest to the camera on the threaded portion wont come loose from the threads. I thought I read somewhere that is what needs to break loose in order to free up your cable. Any takers?F0E384EA-E136-47DA-B59A-8C8F7B4CB8BD.jpeg44E397DB-3DCE-48C5-8C5B-F01FFBEDFAE2.jpeg
 

Dacranks

Cadet
Joined
Jan 31, 2021
Messages
17
So I'm out in the cold working on getting all my cables, wires and such disconnected in order to remove the splash pan to get after the transom. Any tips on how to disconnect the steering cable would be much appreciated. The bolt against the housing is able to spin and the nut(?) closest to the camera on the threaded portion wont come loose from the threads. I thought I read somewhere that is what needs to break loose in order to free up your cable. Any takers?View attachment 333148View attachment 333149
Never mind....just needed a little convincing from the torch and a couple soaks with WD40.
 

SHSU

Lieutenant Junior+Starmada Splash Of The Year 2019
Joined
Mar 8, 2017
Messages
1,725
@Dacranks
You have gotten a lot of good advice on the motor. So sounds like you are on the right track. If you have never pulled one of these apart (It was a first for me), look at getting a Seloc or similar manual for info and troubleshooting.

Also, look up Brandon's Garage on YouTube. This guys has a lot of videos of him pulling apart different Evinrude motors and fixing them. Plus just general tear downs just to show people what is inside.

https://www.youtube.com/channel/UCtMF1u1XaHvDbZIifNsOpoQ

SHSU
 

racerone

Supreme Mariner
Joined
Dec 28, 2013
Messages
37,827
It almost appears that BG garage is unsure of how to remove tapered dowels on these motors.----Trying to hammer them out in the wrong direction.
 

Dacranks

Cadet
Joined
Jan 31, 2021
Messages
17
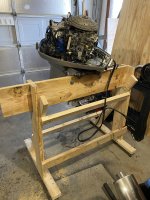
With all of your suggestions in mind I have been getting to work! Got my hands on a friend's engine hoist and made a stand for the OB. Since then I got all wiring and cables disconnected, motor and splash pan off the boat, and pulled the bypass covers to get a peak into the cylinders. Thanks for the encouragement @racerone & @SHSU, I appreciate it....You were right, it was a really easy job and worth the $15 in gaskets and the peace of mind!


I took some pics to show you guys below.
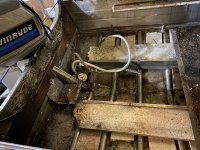
The PO definitely ran this boat with the bad transom based on the bracket being destroyed!
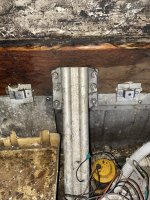
4103E5CB-3461-4F3F-9E96-29DF9666A1EA.jpegA752410F-062A-48E8-ACA5-F5C34FC6DC0F.jpegC28A4710-D23B-4FE9-8550-DE3988C2841E.jpegCBFA5EE7-A599-45C2-A025-3781E558B47B.jpeg
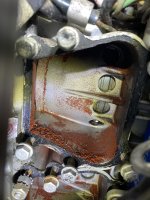
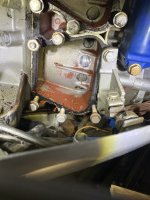
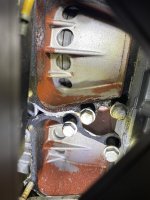
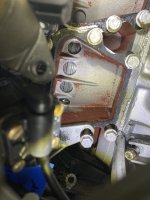
Any clue what all the orange stuff is on intake ports? I've never seen varnished fuel turn this color or texture. My guess would be some sort of coating that has broken down over time? Regardless....I think pistons and rings look pretty good! I stuck a pen light into the intake ports and tried seeing the cylinder walls as best as I could. They all looked pretty good from what I could see (which wasn't much) except one cylinder wall had minor scoring. I don't think anything worth pulling the motor apart for...at least at this time.
7524EA1F-25CF-47C1-8025-4016A0E6FB27.jpeg4BCB9F52-85DC-42F2-811E-1211BDC89920.jpeg5D9AC01A-E389-4431-A4D8-DB452A252DC7.jpegD1A45C75-75FB-4F0D-BA18-6640483D26D6.jpeg

Let me know what y'all think!
 

SHSU

Lieutenant Junior+Starmada Splash Of The Year 2019
Joined
Mar 8, 2017
Messages
1,725
Thanks for the encouragement @racerone & @SHSU, I appreciate it....You were right, it was a really easy job and worth the $15 in gaskets and the peace of mind!
Just make sure to torque all the bolts to spec. I didn't in some areas and it caused issues..... Couldn't figure out why it would run like a champ at idle but when I tried to give it gas it would die or just sputter with no power. Turned out I had forgot to torque the intake manifold and extra air was being pulled in after the carbs....

I took some pics to show you guys below.
The PO definitely ran this boat with the bad transom based on the bracket being destroyed!
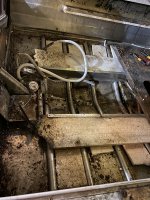
View attachment 333534
Unfortunately that is a common issue on these older hulls. Different ways to fix it: Aluminum Angle Iron or Welding are the common methods

Any clue what all the orange stuff is on intake ports? I've never seen varnished fuel turn this color or texture. My guess would be some sort of coating that has broken down over time?
I would go with a coating. You can see in other crannies that were not exposed to the wear and tear of gas/combustion the "red/orange" coating looks undamaged.

SHSU
 
Top