1996 Four Winns Sundowner with 5.0 Cobra engine and drive

ScottinAZ

Master Chief Petty Officer
Joined
Jun 25, 2009
Messages
831
if yours is like mine, the choke has a large round cylinder like thing on the port side of the carb. there are 2 wires going to this. one is 12v, the other is ground. This contains a small heater and the bimetallic spring. There are no other controls for the choke. Ill double check my manual in a bit, but thats how the one on my 4.3 is. I think the carbs, save for the jets are essentially the same thing.

for the thermostat, you will have to check that one to be sure. Dont know if yours takes the same as mine. they arent hard to change, and arent expensive at least.

Dont feel bad about the dash gauges, mine dont work at the moment either save for oil pressure......
 

Lpgc

Petty Officer 1st Class
Joined
Jun 17, 2023
Messages
258
if yours is like mine, the choke has a large round cylinder like thing on the port side of the carb. there are 2 wires going to this. one is 12v, the other is ground. This contains a small heater and the bimetallic spring. There are no other controls for the choke.

Ahh I see what you mean, yes I think mine is a similar design.

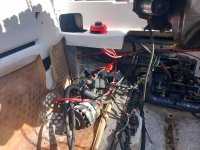
My main reason for wanting the gauges to work properly at the moment is because it's a newly rebuilt engine, want to keep checking oil pressure and engine temp. The ex owner said he didn't understand engines but was good with electronics, from what I've seen he wasn't good at either! There's a 'sub' speaker fitted in the panel in front of the drivers legs, the speaker housing protrudes into the cabin, wires hanging down from the instrument cluster above the drivers legs. I'd rather have it with the cabin standard, without the sub, and need to tidy up that wiring. There's also some sort of engine immobiliser fitted, the engine won't start unless the cabin lights switch has been flicked on/off after the key is set to the on position. Pointless in my opinion becuase everyone knows that all a simple setup needs to run is + to the coil positive and the engine to crank and it will run.... so eventually I want to put it back to standard but before then I'll be happy if it runs well and I can get most of the gauges working properly.
 

ScottinAZ

Master Chief Petty Officer
Joined
Jun 25, 2009
Messages
831
Yeah, I can understand why you want the gauges working. I feel the same with mine. I like knowing what the engine is doing. Thing is, these factory gauges are 30 years old, and dont take kindly to being outside as much as they are..... Ill probably replace most of mine with some same sized Faria gauges, and call it a day. I dont know if yours has the "automotive" style integrated panel that Four Winns was touting about that time frame, if so, good luck, if not, you should be able to replace with a good quality gauge. In a pinch automotive store gauges wired in will tell the tale until you get the factory gauges working.....
 

Lpgc

Petty Officer 1st Class
Joined
Jun 17, 2023
Messages
258
Yeah, I can understand why you want the gauges working. I feel the same with mine. I like knowing what the engine is doing. Thing is, these factory gauges are 30 years old, and dont take kindly to being outside as much as they are..... Ill probably replace most of mine with some same sized Faria gauges, and call it a day. I dont know if yours has the "automotive" style integrated panel that Four Winns was touting about that time frame, if so, good luck, if not, you should be able to replace with a good quality gauge. In a pinch automotive store gauges wired in will tell the tale until you get the factory gauges working.....
Yes it does look like a car style set of dash gauges. Like you, the thought did occur that if I couldn't get them working properly I could replace them all with aftermarket gauges, maybe make a wooden panel to hold them and fit where the factory gauge panel was, a wooden panel would look even older but could at least work. But I'm not sure if some of the gauges haven't been working because they're broke, or because the engine sensors they connect to were broke, or becuase of a wiring issue (probably caused by the last owner). I hope to have already fixed some engine sensor issues like the oil pressure gauge and audible low oil pressure alarm by replacing the respective engine sensors. I think the speedo kind of worked, but that's a standard marine pressure sensor type reading, not sure how accurate that was because I never checked it with GPS but I expect it was roughly correct at max speed reading of 25mph when the engine was broke. IIrc the revcounter might have worked but I only ever saw max 2500rpm, but if the 25mph max reading was correct that too mght be correct. Not sure about the trim gauge because when I used the boat the trim didn't work properly, I hope to have fixed the trim hydraulics now so we'll see but at least I've seen the trim gauge move across its entire scale so hopefully that'll work. The temp gauge never moved but I don't know if the thermostat is stuck open. I need to look at the thermostat but that's another subject...

The thermostat sits in a cast iron housing, obvously the housing is 2 parts bolted together, looks like the lower thermostat housing was broke next to where one of the bolts goes through so someone has welded an upward pointing bolt to the broken bolt hole in the lower housing. So my problem regards changing the thermostat is that if I break that welded in bolt I break the lower thermostat housing and I expect the bolt/nut to be quite seized. Do I risk changing the thermostat and breaking the bolt because I didn't see a temp reading on the dash (and because I think it really was running too cool before) or do I leave the existing thermostat fitted (which would be assuming the dash reading was wrong and I was wrong about it running too cool)? Heh, I think I already know the answer, I'm going to risk changing the 'stat and probably test the old stat in a pan of hot water. I can see the stat through one of the pipe connection holes, it looks gold coloured, not sure if that is some sort of corrosion... but I don't trust it to work properly.

Next time I get in the boat I'll take and post a pic of the dash.
 
Last edited:

alldodge

Moderator
Staff member
Joined
Mar 8, 2009
Messages
42,054
There's also some sort of engine immobiliser fitted, the engine won't start unless the cabin lights switch has been flicked on/off after the key is set to the on position.
Should not be there, something is missed wired
 

Horigan

Senior Chief Petty Officer
Joined
Jun 12, 2016
Messages
673
@Lpgc, I've read here and other places that Volvo gear oil is better for clutch cone performance and at working as a lubricant with some water in it.

For the gimbal bearing, U-joint nipples, and wheel bearings I use marine wheel bearing grease. Triple Guard is too thick for those applications.
 

ScottinAZ

Master Chief Petty Officer
Joined
Jun 25, 2009
Messages
831
if I were you, and had access to the "automotive" stores that we do, I would get a good old fashioned automotive direct reading temp gauge, and screw it into one of the plugs in the block, or even where the temp sensor currently is.... something like this:


doesnt have to be (and I wouldnt want) an electric gauge, but a direct reading one with its own sensor probe and a couple feet of sensor tubing.... its just "temporary" to ensure the engine isnt getting hot. The calibration of the scale isnt good for marine, but it will tell you if its getting hot (you want it around 150F, IIRC...... and not much if any more).

Hopefully something similar exists in your part of the planet, without being a PITA to source.

the thermostat housing on mine is a bit different, its one piece, with a myriad of hoses coming/going from it. The thermostat is held into the housing with an o-ring, and was pretty easy to change out. They are naturally a bit of a gold color from the coatings on them. Yours MAY be OK, but not sure I would trust it myself. I would have to see the housing directly in front of me
 

Lou C

Supreme Mariner
Joined
Nov 10, 2002
Messages
12,650
@Lpgc, I've read here and other places that Volvo gear oil is better for clutch cone performance and at working as a lubricant with some water in it.

For the gimbal bearing, U-joint nipples, and wheel bearings I use marine wheel bearing grease. Triple Guard is too thick for those applications.
Agreed I use triple guard on the D/S splines & use Lucas Marine grease on the gimble bearing & ujoints. Triple guard also on the prop shaft splines.
 

Lpgc

Petty Officer 1st Class
Joined
Jun 17, 2023
Messages
258
Thanks for the replies and info since my last visit to the forum.

@alldodge Seems somebody intentionally wired in an engine immobiliser... not that it would take anyone who knows how to oldskool hotwire a car long to get around it.

@ScottinAZ It could be a good idea to fit a gauge directly to the engine, the one you linked to is a 'normal' aftermarket elecronic gauge though? I can easily buy senders/gauges/etc, not sure about a 'direct reading' gauge but I could wire up a gauge temporarily near the engine and check its accuracy before trusting it. Been thinking about testing the existing dash gauge and sender... take the sender out but leave the wiring connected and stick it in a pan of boiling water to see if the sender and dash gauge work.

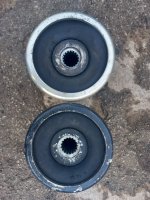
The second hand coupler I bought arrived today, I tried it on the drive input shaft splines and it does seem tighter on the splines than my original coupler. Noticed my original coupler had 'Sierra' written in the casting, so it seems my original coupler was a replacement part anyway? The one that arrived today doesn't have the Sierra writing so is more likely to be an OEM part? The rubber in my original Sierra coupler is recessed from the rear edge/lip of the metal body by 1/4" around most of the circumference but meets the edge of the metal body at one point around the cirumference (which is why I originally tested the couple on the splines to see if the splines were aligned with the body, found the splines seemed to be aligned with the metal body but found play on the splines instead). The rubber in the coupler that arrived today is right up to the lip all around the circumference and the splines seem aligned when I turn the input shaft.

How much play should there be on the input shaft (the drive is fitted so the input shaft is obviously through the gimble bearing but the engine isn't fitted so I am able to pull up/down/left/right on the input shaft)? There does seem a bit of play on it, I don't know if that's normal or points to a problem with the gimble bearing? The gimble bearing did seem to turn smoothly when I reached inside and turned it with a finger. Is it possible to check the condition of the gimble bearing? How much of a pita to change it?

The picture below shows my old coupler (Sierra) top and the new (second hand but new to me) coupler that arrived today bottom. There doesn't seem to be much difference between them regards the splines but the splines do look a bit better on the 'new' one when looking up close, doesn't seem to look that way in the picture though.
20240410_170729.jpg

Evinrude triple guard grease arrived since my last post, had a few deliveries but been busy with work so only opened the packages today. I also ordered an alignment tool, I don't think that's arrived yet.

I'll remember to take pics of the dash next time I'm in the boat, I only removed a small area of the rear of the boat cover to check the coupler on the splines today.

Forgot how many bolts connect the marine bell housing to the engine but think I've found those. Hoping I left the 2 nuts that hold the rear of the bell housing to the transom components inside the boat but haven't found those yet. Can anyone tell me what bolts and 2 nuts are needed in these positions in case I need to buy new ones? At least I know where the 3 small bolts that hold the back/spacer plate to the engine and the nuts that hold the flywheel and coupler to the engine are, I think... Heh this was supposed to be a quick job - Back in July I thought I'd remove the engine, fix it, put it back in the boat and be using the boat again before the end of the season. I might have remembered where I put more of the nuts and bolts if it had all gone that way.

Edit - Just thought, how do I know if grease I'm adding to trailer bearings is compatible with the grease already there...? Not so much a problem with the UJ joints because there isn't much grease on them but it will be a pita to strip and clean out the trailer bearings. Any thoughts on this grease https://www.ebay.co.uk/itm/303898972420 ?
 
Last edited:

kenny nunez

Captain
Joined
Jun 20, 2017
Messages
3,290
Since the gimbal bearing turns smooth it is good so do not worry about it. As the drive goes from left to right up and down the shaft moves in and out so the Triple guard grease will keep things moving and prevent wear.
If you raise the trailer wheels and spin the them, you should hear nothing. A good indication of good bearings. Be careful not to pump too much grease in the hubs, it is possible to push out the grease seal. I had a customer who did that and since the trailer had drum brakes there was about 2 lbs of grease packed on the backing plates and of course the bearings were ruined.
 

Lpgc

Petty Officer 1st Class
Joined
Jun 17, 2023
Messages
258
Since the gimbal bearing turns smooth it is good so do not worry about it. As the drive goes from left to right up and down the shaft moves in and out so the Triple guard grease will keep things moving and prevent wear.

Thanks Kenny.

What I mean by up/down/side to side is that I can move the input shaft (in the engine bay with the engine removed but drive fitted) in all directions a little. I can understand the shaft needing to move forward/backward a little but didn't know if being able to move it in the other directions means there's a problem... I don't think it's a problem but thought it better to ask. Heh I don't suppose many people fit the drives without the engine fitted? I did it to check the drive would refit OK after spending the winter removed from the boat and to check the hydraulics. At first it wouldn't refit OK but I removed some old grease and a bit of rust from the input shaft, greased the bolts and it slid straight on no problem, the hydraulics seem to be OK now (I changed a leaky O ring where a line meets the pump).

Not sure if you've seen my post #136 showing the trailer, it has what @ScottinAZ explained to me are bearing buddies. I should've asked Scottin if the bearing buddies are added to 'normal' bearings or built into the bearing/hub? Do they complicate cleaning old grease out (in case I should avoid mixing greases)?
 

ScottinAZ

Master Chief Petty Officer
Joined
Jun 25, 2009
Messages
831
The bearing buddies just pop in replacing the normal dust covers.


As for the gauge, there are ones that have a built in sensor and take no electricity hence being a direct reading type. It’s literally a thermostat bulb attached to a gauge.
 

Lpgc

Petty Officer 1st Class
Joined
Jun 17, 2023
Messages
258
The bearing buddies just pop in replacing the normal dust covers.
Thanks Scottin, heh that makes sense, I feel daft now for asking. Are they just tapered roller bearings?

I bought some of the lithium+calcium grease I linked to above. Also bought this GL5 75/90 gear oil from a marine parts supplier who listed it on Ebay https://www.ebay.co.uk/itm/373859721624
 

ScottinAZ

Master Chief Petty Officer
Joined
Jun 25, 2009
Messages
831
Thanks Scottin, heh that makes sense, I feel daft now for asking. Are they just tapered roller bearings?

I bought some of the lithium+calcium grease I linked to above. Also bought this GL5 75/90 gear oil from a marine parts supplier who listed it on Ebay https://www.ebay.co.uk/itm/373859721624
The bearings are whatever your hub takes. The buddies are just a type of dust cap with a grease nipple.
 

Lpgc

Petty Officer 1st Class
Joined
Jun 17, 2023
Messages
258
Thanks @ScottinAZ.

It's not at the top of my list of priorities regards the boat at the moment but I will be wanting/needing a spare wheel for the trailer and I like to carry a spare wheel bearingfor a boat trailer even if all the bearings seem good. The bearings seem OK (or at least they didn't get warm and I didn't see any wheel wobbles in the mirror) but I've only towed it 60 miles and plan on towing it a lot further. I think if I were to have a puncture or worse damage a wheel it could be a problem to get another correct wheel (in not tyre) from a roadside tyre fitting company because both the wheel and tyre are unusual size/specs in the UK. I suppose a good way of finding what bearings will fit will be to ask the US trailer manufacturer for details, or maybe remove the outer bearing and hub and take it to ask a trailer specialist. I think I've seen the same wheels for sale on Ebay from a supplier in Northern Ireland https://www.ebay.co.uk/itm/324484136946 . I can get the 175/80 D13 tyre from lots of places, even though it's an unusual tyre in the UK where even trailer tyres are mostly radial (seems the D means it's some sort of compromise between radial and the old crossply). Heh, before I investigated D tyres I thought I'd need to change all 4 tyres as they looked defective due to the bike tyre like look where they protrude/curve outward toward the middle of the tread pattern, seemed to me they all bulged out unusually, at least I now know that's normal for the spec of tyres.

I've had a couple of tubes of calcium/lithium 'marine' grease delivered which I'll use on the wheel bearings and drive UJ joints as advised above. New grease gun, I've got at least 4 grease guns now but couldn't find the other 3! New distributor cap and rotor arm.

I'll be ordering a new set of plug leads. I know my setup is oddball being a late OMC Cobra with Ford engine, more a Ford engine bolted to a Volvo SX drive really, the suppliers/marinas (at least in the UK) don't seem to stock as many spares for this setup as they do for (say) a Mercruiser or Chevy engine setup. But it seems my setup is even more oddball having factory electronic ignition (still distributor but inductive pickup instead of points). At first I didn't think the new rotor arm fitted onto the dizzy shaft, it fits but is tighter on the dizzy shaft than the existing rotor. Much the same with the dizzy cap. Fingers crossed I bought the correct cap and rotor, they fit but are a slightly different fit to the parts that were already fitted. I believe these (following link) leads will fit, can anyone advise? https://www.ebay.co.uk/itm/285263310187

Still haven't checked to make sure I have all the correct bolts to refit the marine drive bellhousing to the engine, I must have them somewhere but I only found 4 x 7/16 x 1.25 inch long bolts. If I can't find the other 2 x bolts that bolt the bellhousing to the engine before I install it I don't think it will matter too much because I'll be able to temporarily use the cut threaded bar and nuts I used to bolt the engine to the stand and swap them to correct bolts later.

Next on the worry list is the carb and fuelling. I should've run some fuel through the fuel pump before refitting it to the engine, bit late to think about that now I've bolted the fuel pump up to the engine and filled the engine with oil. I should also have stored the carb indoors, its been outside in the boat all winter same as the filter / water separator. I'll need to do something to make sure the carb doesn't get contaminated fuel before I bolt all the fuel lines up but have a few ideas how to do that (I have a few electric fuel pumps that I'll use to pass fuel from the tank through those components). I don't know whether to rebuild/service the carb which will probably mess settings up or fit it as it is which would keep settings but then I don't know if there's lacquer etc inside.

Just about ready for putting the engine back in, which I could do as early as Monday but I'll be working outside and the weather forecast predicts a 95% chance of heavy rain on Monday. The same customer who helped me remove the engine wants to help me refit it but I'm sure he'd prefer to help on a nice day instead of a rainy day. Hope to get it fitted this week coming though.... then we'll see if I built a good engine or not.
 
Last edited:

Lpgc

Petty Officer 1st Class
Joined
Jun 17, 2023
Messages
258
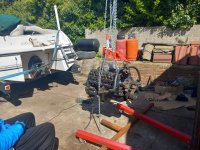
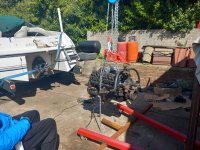
Got the engine back in today :)

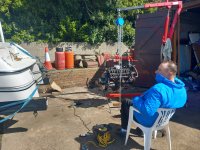
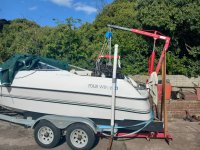
Ex police inspector friend came over to help but didn't have much to do after we'd moved the engine from the stand to the crane while I attached the spacer plate, flywheel, coupler, bellhousing and starter motor. I couldn't find what torque to tighten the coupler to crank stud nuts on Google or this and other forums so I kind of tightened them as much as I thought/dared and applied threadlock.

20240416_135116.jpg


20240416_164811.jpg

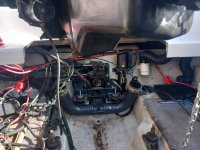
In the pic below I'm lowering the engine onto the mounts for the second time. First time I lowered it into position I didn't realise that the 'square locating washers' on the rear mounts are not just locating washers, they are threaded and by tightening them we increase the preload on the sandwich of the rear engine mount bushes. At first I was confused because when I removed the engine I didn't have to hold a spanner on the 3/4 bolt head under the rear engine mounts but on attempting to refit the bolt just spun unless I held it, also it seemed when the starboard side was tightened there was a lot less of the bolt thread sticking above the nut than on the port side. So I lifted the engine again to investigate and that's when I found the square washer is threaded and tightened the 'sandwich' on both sides before lowering the engine onto the mounts the 2nd time. There's a pipe hanging down that's connected to the bottom of the bellhousing, where is this pipe supposed to run/connect to?

20240416_164858.jpg

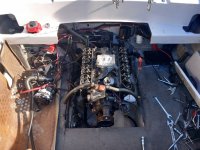
Ahh well, it's in now :)

20240416_171930.jpg


I did break an earth wire running from the inside transom mount stuff to the engine when lifting the engine
after lowering it the first time. I didn't have it connected/bolted to the engine but it somehow got stuck on the engine during lifting and without my 2nd set of eyes (my friend had left by this time) I didn't notice it was stuck. I fixed it by soldering the earth wire to the ring terminal it had pulled out of.

Not pictured but I did use my alignment tool to try to check alignment. The tool went through the gimble bearing and into the coupler no problem, which I found maybe a little odd as I was expecting to need to adjust the engine position/mounts because I'd had the mounts removed from the engine during the rebuild and not even sure if I put the mounts back on the same sides of the engine I removed them from. I still don't know if that's because I've been lucky or because the alignment tool would fit OK anyway due to wear of the coupler splines, but I did put some grease on the end of the alignment tool and insert/remove it without turning it and found spline marks were around equal in the grease all the way around the end of the alignment tool. Not sure if the next thing I did is a valid way of testing alignment, just looking through the gimble bearing to the coupler it does look aligned (trying to kind of bore sight it) and the handle end of the alignment tool seems central as it comes out of the exterior transom stuff, as though the UJ's would be more or less straight with the drive at zero trim and parallel with the keel.
 

Attachments

  • 20240416_135128.jpg
    20240416_135128.jpg
    3.1 MB · Views: 3
  • 20240416_135133.jpg
    20240416_135133.jpg
    3.3 MB · Views: 2
  • 20240416_164903.jpg
    20240416_164903.jpg
    2.4 MB · Views: 2
Last edited:

alldodge

Moderator
Staff member
Joined
Mar 8, 2009
Messages
42,054
You said pipe coming from bell housing but I only see what appears to be a hose. Pipe or hose I don't know why it would be attached to the bell
 

Lpgc

Petty Officer 1st Class
Joined
Jun 17, 2023
Messages
258
You said pipe coming from bell housing but I only see what appears to be a hose. Pipe or hose I don't know why it would be attached to the bell

I should've taken a picture of it showing where it attaches to the bottom rear of the bell. Very securely fitted, has a 90degree pivot (at least free turning) joint to the bell. Can only presume it's intended as some kind of vent/drain but such vent/drain seems uncessary because the spacer plate isn't sealed to the bell anyway so any water etc inside the bell could just drain out anyway. Even if they did intend to fit a drain there'd be no need for it to be piped anywhere, a drain could just be an open channel to the bilge. The other end of the pipe/hose ends at an angle, it doesn't look like it could have been connected to anything or it would end with a straighter cut.
 
Top