1995 Astro 2100CC Rotted

jayboy76

Cadet
Joined
Mar 6, 2011
Messages
27
Haven' got any pictures downloaded from camera yet but will in a few days.

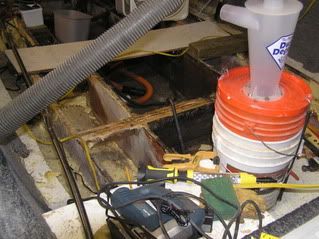
Started opening up the deck from about midway toward the front to see how far the rot goes. A dealer had started opening it up to check a soft spot just in front of the transom area. He drilled and said the transom looked OK for now. My son owns the boat but I am the one with the time to DIY. The dealer just wanted more than he could afford so it has been siting in my yard for almost a year now.

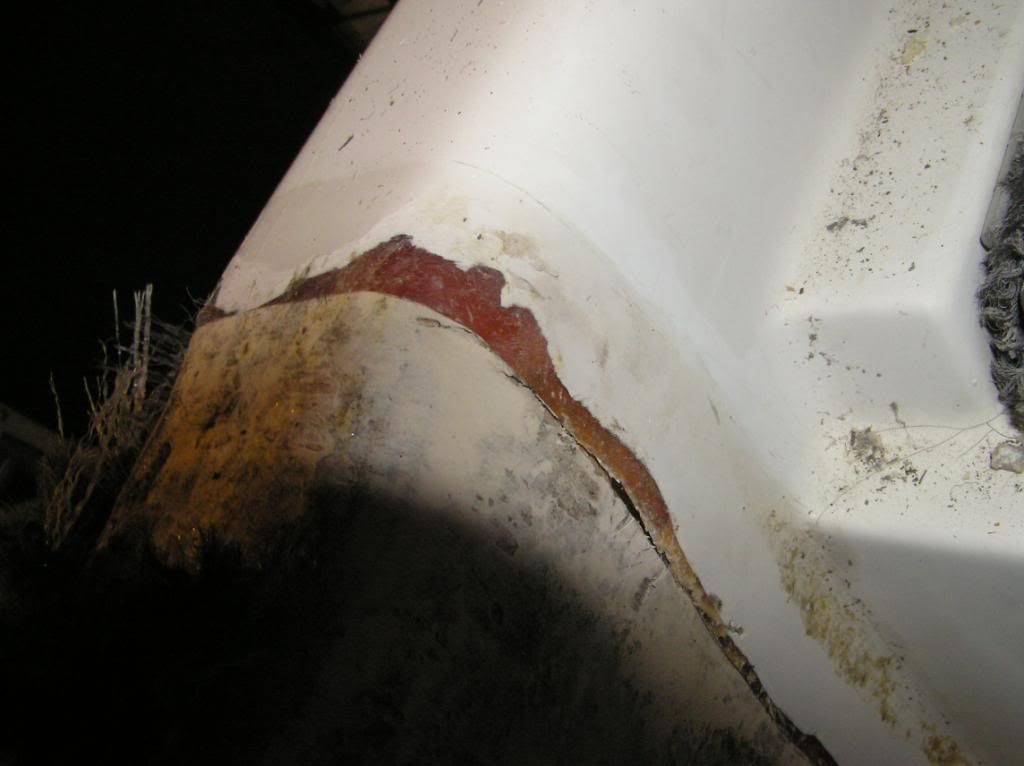
I started about 3 weeks ago and have removed another 4 feet of deck and think I have found the end of the rot under where the CC is located. Looks like a lot of the water came in around the cable boot going through the floor. It was loose. Also have found pockets in the foam that had water in it. Foam not saturated except the bottom quarter inch. I read somewhere in here that if the foam is rubbed or cut it bursts the closed cells and that is where the water is held in the foam.

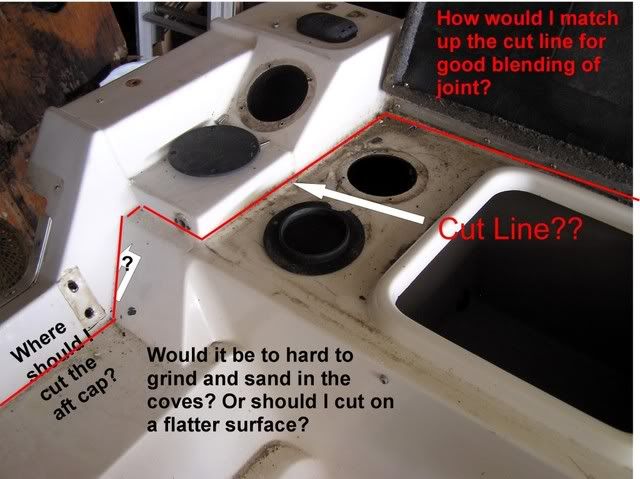
I live close to friscoboater and have been following his adventures in his driveway. I am also a Jay but have a few years on that Jay so plan on taking a lot longer on my restore. At least I have a 40' x 40' barn. Not really a barn but for some reason they like to call them that out here in our area North of Fort Worth. I also have a shop full of woodworking equipment and have some skills in that area. I do plan on building a beam lift arrangement to lift the motor off so I can pop the back cap. I think I have to take it off to replace the rotted stringers from the transom forward. In fact I don't have any choice since the deck and stringers go under these boxes and they are not accesable unless I can get the cap off. Also I am thinking that the transom should also be replaced while the stern is opened up.

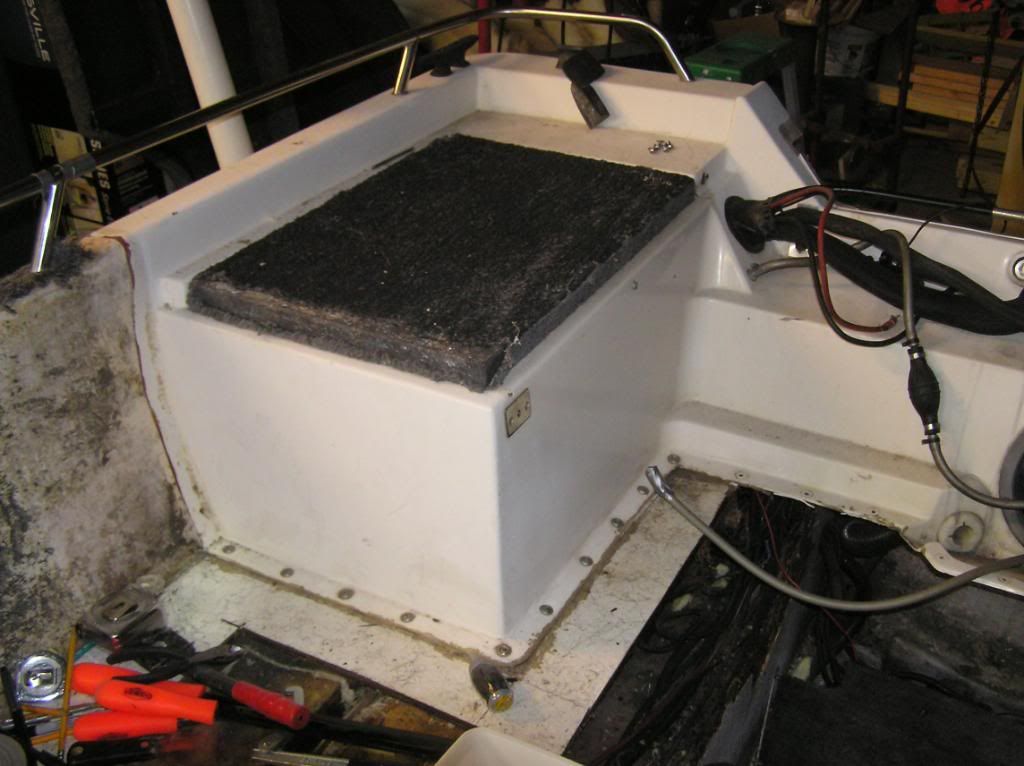
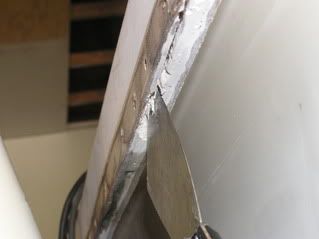
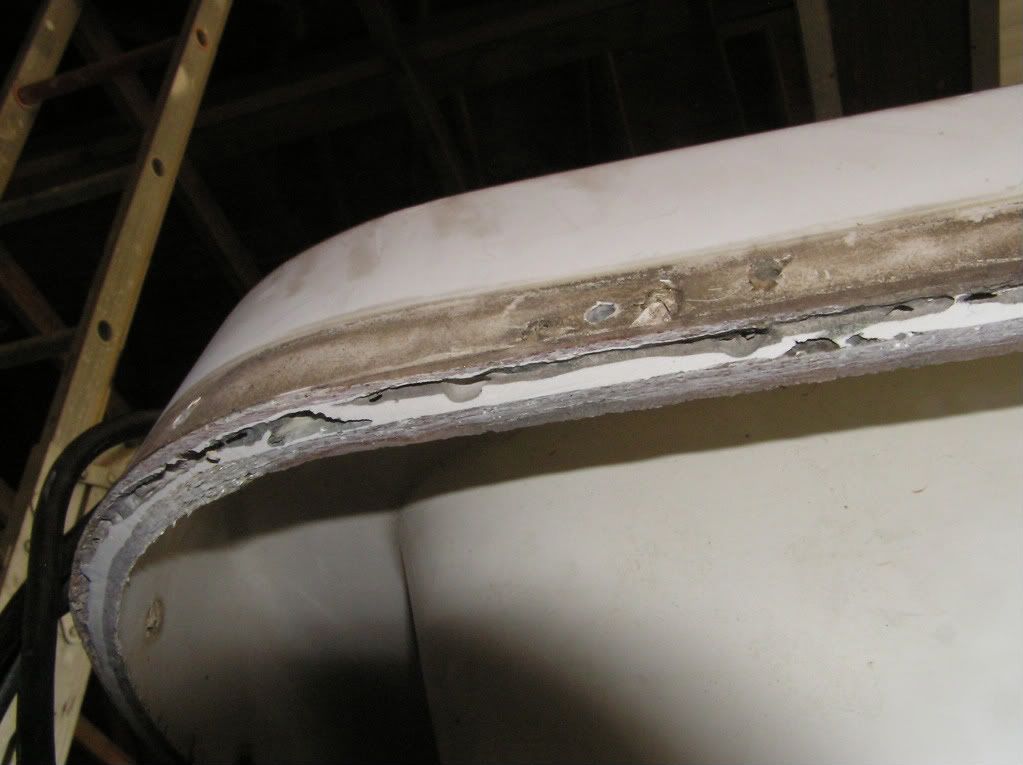
That's my area of questions on how to get the aft cap loose. There is a battery compartment and live well on each side of the back with a metal bridge that makes up the fishing deck on the rear. I can see a fine seam with a black adhesive of some sort that was squeezed out at the seam where it blends into the sides of the boat. Seems to be hard and doesn't just scrape of easily. I haven't drilled out any rivets on the rub rail yet but I think I will this weekend and see it the cap is glued down over the gunnel. Anyone have any experience with this and even better with an Astro boat of this vintage. I hope I can cut a little of the flange off the front of the 2 boxes at a time and see how far the glue goes under that flange. The flange is about 2" wide in this area. This same flange continues down to the floor where it is screwed to the deck on 2 sides.

Not so sure I have painted a great word picture so will try to get the pictures on the computer and uploaded in a few days. Have a bunch of them so will have do a lot of culling.

Thanks for any advice, except don't do it, you guys can offer. I have learned a lot from the iboats forumns but have a lot more to learn.

Thanks, Jay (the second one)
 

jayboy76

Cadet
Joined
Mar 6, 2011
Messages
27
Re: 1995 Astro 2100CC Rotted

Well productive weekend but not on boat or downloading the pictures. After spending several hours working on my Craftsman riding mower, typical maintenance items like oil and filter change and some non typical items to replacespecial bolts/fittings that had dropped off at the end of the mowing season. Wife jumped for using my time and that I ought to get a new riding lawn mower. A lot looking on the internet for ratings and reviews with out any thing very definitive. I think I got into the ford vs cherolet age old arguements. I ended up going with name recognition and gut feel. Also go a super price on the unit from the Navy Base exchange Lowes had it for $3300 and I got it for $2300 with a bonus 10% discount by putting it on a new BX credit card which I will pay off in 21 days or less. Picked up a Huscavarna Zero Turn 54" cut with a 24 HP Kohler engine. Got back after dark so only drove it into garage. Boy does that thing run like a scalded dog. Off subject but caused delay getting the pictures posted. Hope to check the minimal setup the retailer did to put on showroom (curbside in the parking lot), give it a good washdown, and tweak some adjustments on the steering, then cut some grass.
Hope to get back in the boat late tommorow afternoon to cut some more decking and foam out. Want to go far enough forward to assure that the stringers in the bow doesn't have rot too like friscoboater found. Hope I don't have to rip the front fishing deck out too.
Hope my next post will have some pictures too.
Jay
 
Last edited:

Woodonglass

Supreme Mariner
Joined
Dec 29, 2009
Messages
25,924
Re: 1995 Astro 2100CC Rotted

You're gunna LOVE your Husqvarna. I have a 46" and it is a great machine. As for the boat, a 4 1/2" grinder and Recip Saw will soon become your best friends. MAKE SURE you get a FULL FACE Respirator. Grinding Glass IS NOT a JOKE. The dust IS a KILLER. Protect yourself at ALL COSTS!!!!!

31GKh3lQGFL._SL500_AA300_.jpg


This one is a 3M It cost a $100 bucks BUT it will protect you. How much are your lungs worth?
 

jayboy76

Cadet
Joined
Mar 6, 2011
Messages
27
Re: 1995 Astro 2100CC Rotted

Yes, after mowing today it is the best looking yard I have ever had. I guess it is time to shoot my old 48" craftsman and it put it to rest. That 54" swath is hard to get used to.

I like that mask. Got any good sources for it? I used to manufacture fiberglass furnitre and part of the process was grinding before we sprayed a top coat of gel coat on it. We used these soft plastic safety glasses found in HD stores but never was satisfied with them. I worry about my eyes as much as my lungs. Thanks for your input woodonglass.
 

jayboy76

Cadet
Joined
Mar 6, 2011
Messages
27
Re: 1995 Astro 2100CC Rotted

Well I have a few pictures to share with you if I can figure out how to do it. Read somewhere that the uploads do not have to be downsized, the site automatically does it. Hope so!

Well clicking on insert didn't work. guess I need to find someplace to store the photos so you can find them. But I see photos imbedded so?? Will look for a sticky on how to do that. Any help would help.
 

jayboy76

Cadet
Joined
Mar 6, 2011
Messages
27
Re: 1995 Astro 2100CC Rotted

Well I have been occupied this last month with taxes, mowing my yard and just other things but hope to get back to ask some questions. Will try wood's technique for uploading pictures. I have been doing some work on the boat occasionally, an hour or two when I needed to get out of the house.

I continured taking the deck off up to about 30 inches behind the front fishing deck. I think I may have found how forward the rotted stringers go which is about the front of the center console which has a live well/ seat. That would make it about 2/3 rds the way up the boat from the transom. I removed most of the foam and other than the bottom 1/4" it was dry. found a good bit of water in pockets in the foam and there were a lot of those on the top as well as down the stringers. Not a very good job on the foaming by the mfg. I need to drill some test holes to confirm that I have found the end of the rot.

I also took my Dremal tool and cut the seam where the back cap was blended into the gunnel. I was able to slip a putty knife in and break the bond to the hull which was mostly at the line that the black glue or epoxie ran down the seam. I started doing the same on the outside of the gunnel but ran into problems about 6 inches down the gunnel. I wasn't following the seam very well. http://s1231.photobucket.com/albums/ee517/jayboy76/
Here is the link to my photobucket album. At least you can see what I tried to describe in my first post, I think. Still don't understand how to imbed the picture in the text. I did change my settings as you recomended woodonglass. I wanted to show the boat but that picture was on my main computer vs the laptop I am on now. I'll get organized next week.??

My main question is how to get the rear cap off so I can replace the stringers/deck under the boxes that make up the fishing deck and probably the transom. If the cap has glue under the top that wraps around the gunnel I don't know how to get it loose. Thought about trying my heat gun to soften it but not sure that will work.

Been following friscoboater's saga since Jan and am learning a whole lot more that I did before but he didn't have a cap to pull.

Thanks for your help woodonglass and the rest of the members for your help in the future. Got to get the full face mask ordered in a couple of days. I do already have a half face mask but need to get the eyes covered too. I hope it won't fog up to bad here in North Texas summer. I did see someone was using it to mow and that will help my eyes in my dust bowl so I may have more than one use.


Jay
 

jayboy73

Seaman Apprentice
Joined
Mar 25, 2008
Messages
30
Re: 1995 Astro 2100CC Rotted

View attachment 92269
How about that! Finally got an upload. Thanks woodonglass for the setting tips.
This is the 1995 Astro 2100C on the original trailer. Now that I have it figured out will get busy with some more photos and the restoration. Got to run now for our 5 year old grandson's pre school performance tonight. You may also note I signed in as jayboy73 vs jayboy76. Wasn't able to get 76 working on this computer and accidently found where I had stored the 73 password. It's heck getting old!
 

Cadwelder

Lieutenant Commander
Joined
Aug 30, 2010
Messages
1,780
Re: 1995 Astro 2100CC Rotted

I've repaired a couple of Astro's actually doing one now..but not familiar with that Model #, I'm sure it's a 21 footer and most likey and I/O, am I close?

I can't seem to get the picture to open, least not on my computer. Really need to see what we're dealing with on removing the cap.
 

jayboy73

Seaman Apprentice
Joined
Mar 25, 2008
Messages
30
Re: 1995 Astro 2100CC Rotted

It is a 21' center console with a Mercury 150 hanging on the back. Nice solid boat with fishing decks on the back and front. The cap does not cover the entire hull. It stops just in front of the aft fishing deck. The 2 boxes on each side house a live well on the left and the battery compartment on the right. Try going to my photobucket link http://s1231.photobucket.com/albums/ee517/jayboy76/ in a previous message. I just opened that up OK. Not great pictures and didn't upload in the order I wanted but it worked.

I have no idea why the attachment would not open. When I uploaded it showed in the draft post. When I uploaded it changed to the attachment reference. Right after posting I opened it up OK. Now it will not open but gives me an error message saying it isn't valid and to notify the administrator for the site which I just did. I will try to add the picture again and see if I get the same results.

View attachment 92298
OK in the pre post window I see the boat. Lets see what happens when I post. This is the boat on the original trailer before it destroyed itself and before we found the stringers were all rotted out.

As soon as I figure out how to get the uploads to work properly I'll get some decent pictures embedded in the text. Bear with me and help if you can.

Thanks, I do need some help on the cap and a lot more as I get to the next step.
Jay S

PS I have the preview up now and it changed the picture to attachment xxxxx. I still see the photo in the draft. Not sure we will be able to click on the attachment after it is posted and I reopen the thread. Need help!
edited:
PS #2 I posted, closed iboats and returned to the thread and opened the attachment with no poblems. Did that twice to make sure but who knows what grimlins get into it overnight. Still see the photo in the draft but not the posted thread.
 
Last edited:

Cadwelder

Lieutenant Commander
Joined
Aug 30, 2010
Messages
1,780
Re: 1995 Astro 2100CC Rotted

Okay could see the photobucket pictures fne....the cap is quite obiviosly glue down as well as screwed. One of the Astro's I've done had nothing but silicone sealing the top cap to the hull (at the rub rail joint, and the other had nothing at all. Now where yours is attached to the deck it would appear an adheshive was used....try driving a heavy duty putty knife to break it loose from the deck.

On the transom you'll have to get a long sawzall blade in there to cut that loose since both the Astro I done had it fiberglassed to the transom in that spot. The sawzall will cut right thru the splashwell drain tubes so don't worry about removing them.

Watch your angle close with the sawzall as it's easy to cut thru the caps splashwell and no need to repair that if you don't have too.
 

jayboy73

Seaman Apprentice
Joined
Mar 25, 2008
Messages
30
Re: 1995 Astro 2100CC Rotted

Okay could see the photobucket pictures fne....the cap is quite obiviosly glue down as well as screwed. One of the Astro's I've done had nothing but silicone sealing the top cap to the hull (at the rub rail joint, and the other had nothing at all. Now where yours is attached to the deck it would appear an adheshive was used....try driving a heavy duty putty knife to break it loose from the deck.

On the transom you'll have to get a long sawzall blade in there to cut that loose since both the Astro I done had it fiberglassed to the transom in that spot. The sawzall will cut right thru the splashwell drain tubes so don't worry about removing them.

Watch your angle close with the sawzall as it's easy to cut thru the caps splashwell and no need to repair that if you don't have too.

I took my Dremal tool and cut the edge of the glue down edge and used a putty knife sucessfully on the vertical seam down to the flange with the screws across the deck. I could not get a knife under the top of the rail. I then started working on the lip where the cap is glued to the hull on the outside vertical lip. Started coming loose for about 6 " then I let it get off line and the knife wandered up under the gel coat of the cap and did some small bit of damage. I think that I need to do some sanding on that glue line to make the cap and gunnel glue line stand out more clearly. Also need to get a short stool so I can keep an eye on it as I tap the putty knife up into it rather than do it by feel. Took one side of the hand rail off hoping to see if there would be any loosness on the cap where it comes over the side but doesn't seem to be. Think I will go to work now and see what happens when I take the screws out of the box floor flanges, do a little more Dremal work on the area where the cap comes over the gunnel, and take the other hand rail off from the left side of the boat.


I appreciate your input very much Cadwelder. It's nice to know that someone out there knows the Astro boat line. I will some day figure out the uploads but until then I guess I will have do the photobucket thing. I have sent 2 messages to the administrator but so far no response.
 

Cadwelder

Lieutenant Commander
Joined
Aug 30, 2010
Messages
1,780
Re: 1995 Astro 2100CC Rotted

Well don't know all of the models but several as well as ProCraft (pretty much the same boat for a while, both made at the same plant in Tennessee) Long since been sold out and changed hands, but where once decent boats. The later built ProCrafts (after the Tennesse buy out) were greatly cheapened and really hurt the ProCraft name.

I'm running a fully restore 1987 ProCraft and I love it. Been 8 years since the restore and still in great shape.
 

jayboy73

Seaman Apprentice
Joined
Mar 25, 2008
Messages
30
Re: 1995 Astro 2100CC Rotted

Made pretty good progress this afternoon. Drilled out the left side rivets, removed the tie down brackets from the transom, removed all the screws holding the 2 boxes at the back to the deck, removed some foam, did some drilling in the stringers about 12 foot from transome. I was hoping for good dry wood shaving but not so. Also found some more water in the foam. Foam soaked about 1/4" deep on the bottom. I have had a box fan on for the last month and still wet up under the foam. This was right up next to the edge of the deck where it meets the hull. Oh well out goes the 2 storage boxes that act as a step up to the bow fishing deck to get access to stringers further forward. Still about 7' behind the bow right now.

I took a heat gun to the rear cap where it wraps around the gunnel. I looks like a grey caulking that does soften some holding the cap to the top of the hull gunnel. I need to get a second heat gun to get enough heat into it. Still going to be a long and slow process getting the caulk out. It was kind of like caulking around a window that had dried out and got hard. Not sure how to pry it off the top of the gunnel yet.

I did do a test that Jay will be interested in. I posted this afternoon on his thread that he may think about using a electricial drill for drilling down from the top plate on a finished wall to drill his channels next to the stringers after he pours his foam. It seem to work just fine with my foam which is dry where I tried it. Made a prefectly round 3/4" hole that was clean. As you pull it out any chips come with it. Have some pictures but no time tonight to fool with downloading the camera and uploading to photobuckets. I just ran the varible speed drill at the low speed and I didn't feel any grinding or resistance from hitting the bottom of the hull. The shaft and drill total length is about 53 1/2" and is very flexible to guide it along the stringer fillet. With his big fillets I think this is an ideal solution for most of the boat. Can cut the shaft as needed to get into short boxes and could even get a right angle drill from Harbor freight to save the length of the drill. They are cheap.

Gong fishing at 5 in the AM so need to close down. Depending on the fishing I'll try to get the pictures I took today.
 

ezmobee

Supreme Mariner
Joined
Mar 26, 2007
Messages
23,767
Re: 1995 Astro 2100CC Rotted

You needed to contact a mod, not an admin. We're happy to help. I would recommend continuing to use photobucket for your pictures. You're 75% of the way there. Here's one of your pictures

034.jpg


use the IMG code links they provide you with for each picture and then just copy/paste them into here. I would recommend resizing your pics to about 640x480 before posting. When uploading pics to photobucket, click the "Customize your upload options" link on the upload screen and you can set it to automatically resize them as they're uploaded. A big time-saver.
 

jayboy73

Seaman Apprentice
Joined
Mar 25, 2008
Messages
30
Re: 1995 Astro 2100CC Rotted

Here is a picture from my photobuckets as a trial. Seemed to work so will post others Friday with descriptions. This is the battery box that is part of the aft cap. I have since removed all the screws holding it to the deck (rotted) and used a putty knife to remove the horrible caulking job the previous owner (PO) did.

036.jpg
 

jayboy73

Seaman Apprentice
Joined
Mar 25, 2008
Messages
30
Re: 1995 Astro 2100CC Rotted

Thanks ezmobee for the help on downloading. I contacted the administrator only because the error message indicated that was what I needed to do. I'm learning as I go. Thanks a lot for the help.

Jay
 

ezmobee

Supreme Mariner
Joined
Mar 26, 2007
Messages
23,767
Re: 1995 Astro 2100CC Rotted

No problem, glad you got it working. Threads with pictures get way more views and advice than ones that don't.
 

jayboy73

Seaman Apprentice
Joined
Mar 25, 2008
Messages
30
Re: 1995 Astro 2100CC Rotted, PICS Now

Re: 1995 Astro 2100CC Rotted, PICS Now

Here are a few pictures.
P5040014.jpg

This looking up under the cap and hull gunnel interface. The material appears to be a caulking material. The joint is held together by the pop rivets used to mount the rub rail. I used a heat gun and the material softened just enough to pick some of it out. The putty knife is stuck into the caulking and just hanging there. Reminds me of window pane caulking we used to use that got hard. Hard to keep the putty knife on a straight line.
I just hope that the material doesn't go all the way up to the top of the gunnel. If it does not sure how to get the cap loose. I may try to see if acetone will eat it. Any ideas guys?

P5020005.jpg


This photo shows my life saver. It is the Oneida Dust Deputy which is a small cyclone separator that dumps most to the dust and debris picked up by the shop vac into the 5 gal bucket. Keeps it from clogging up the shop vac filter which saves bunches of time. On sale now for $39 plus S&H. Just ordered a 2nd one to put in series with my 1st unit to remove more of the fine dust generated by fiberglass grinding. This is something they recommended for fine dust.

P5040018.jpg


This is the corner of the cap and hull gunnel. I haven't started working on this yet. Mfg defect I guess. Need a narrower putty knife to work on that curve.

Hope some of guys come up with some good ideas what I need to do to master the removal of the cap. I hope I don't have to use a Sawzall on very much of this removal.

Thanks, Jay #2
 

jayboy73

Seaman Apprentice
Joined
Mar 25, 2008
Messages
30
Re: 1995 Astro 2100CC Rotted, PICS Now

Re: 1995 Astro 2100CC Rotted, PICS Now

Well haven't worked much on boat restore but have done some. I worked on the joint between the hull and top cap with my multitool. I got about 1 1/2 in and have convinced myself that the glue/caulkng goes all the way up and over under the cap where the 2 gunnels meet. I guess a Sawsall is the next step after I remove the motor. I have annotated a picture with a potential cut line around the aft bait box and in front of the motor. Not sure what that is called.

Just tried to insert picture but didn't work. I clicked on the insert image icon and choose the URL tab and copied the img link from photobuckets but nothing happens.
P1010009-anotated.jpg
This is the link? Tried the direct link also and still nothing on this pane. What am I doing? http://i1231.photobucket.com/albums/ee517/jayboy76/P1010009-anotated.jpg is direct link.

Question now is where to cut the cap. The easiest place would be in the cove around the box and the front of the motor but how hard would that be to put back together? And would I be able to get to the transom to remove and replace it. How about some thoughts on this subject.

Thanks,

PS Looks like the photo did show up when I went to preview just not in this edit pane. My mistake!
 
Top