1993 Wellcraft Eclipse196S Rebuild

AirJordan613

Cadet
Joined
Aug 14, 2022
Messages
19
And so, it begins. I previously started a thread about a seat replacement options, but I'll make this my dedicated build thread.

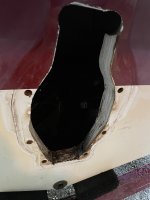
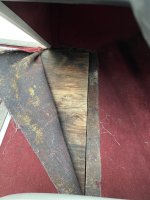
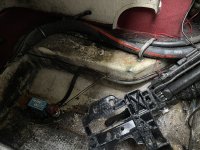
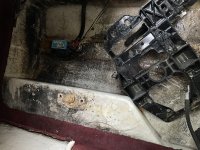
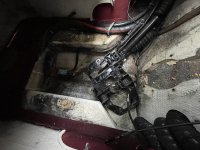
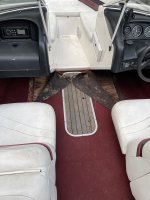
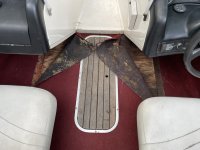
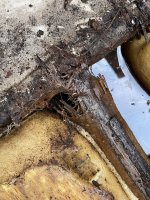
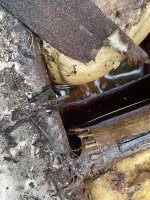
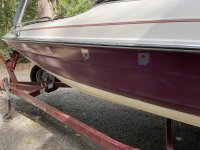
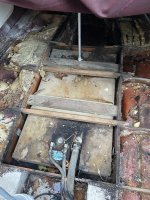
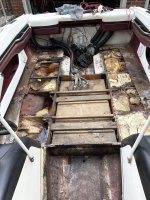
The impetus here is my rotten floor, so as minimum we have a floor replacement and a freshening of the interior. As you can see in the pictures, a previous owner did a pretty mediocre job replacing a center section of floor. Just bare wood dropped in. Definitely can't wait to see how it looks underneath. There are other spots of the floor that are soft, so the entire floor is shot - it'll be an entire new floor.

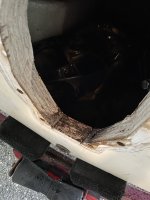
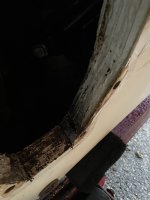
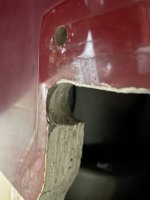
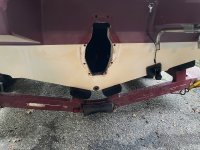
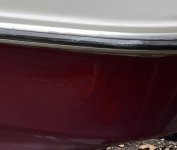
Motor is out and outdrive is off. The transom actually doesn't look half bad around the keyhole. One hole at the bottom-starboard side around the gimbal was definitely mis-drilled - nice job Wellcraft. Around the keyhole is totally solid, but a little discolored at the bottom. Feels dry, but I did have some dampness (no discoloration) at the top of the transom when I ran my transducer wire. Should I just replace the transom anyway? I definitely expected a worse transom given the condition of the floor.

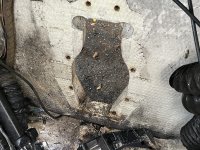
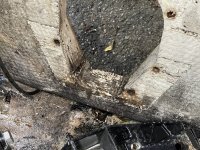
The motor mounts are also solid - required an impact to get the lag bolts out. I suppose it's possible the stringers aren't shot, but I'll definitely need to take some samples from the bottom sides of them. Things seem okay at the top of the motor mounts.

This is a first for me, so any advice is always appreciated!
 

Attachments

  • 20220916_224325126_iOS.jpg
    20220916_224325126_iOS.jpg
    1.8 MB · Views: 19
  • 20220916_224331100_iOS.jpg
    20220916_224331100_iOS.jpg
    2 MB · Views: 19
  • 20220916_224339544_iOS.jpg
    20220916_224339544_iOS.jpg
    1.6 MB · Views: 17
  • 20220916_224359567_iOS.jpg
    20220916_224359567_iOS.jpg
    1.6 MB · Views: 17
  • 20220916_224411658_iOS.jpg
    20220916_224411658_iOS.jpg
    3.3 MB · Views: 17
  • 20220916_225942229_iOS.jpg
    20220916_225942229_iOS.jpg
    2.6 MB · Views: 17
  • 20220916_230047483_iOS.jpg
    20220916_230047483_iOS.jpg
    3.1 MB · Views: 19
  • 20220916_230055644_iOS.jpg
    20220916_230055644_iOS.jpg
    3.8 MB · Views: 19
  • 20220916_230107508_iOS.jpg
    20220916_230107508_iOS.jpg
    3.7 MB · Views: 19
  • 20220916_230112522_iOS.jpg
    20220916_230112522_iOS.jpg
    3.8 MB · Views: 18
  • 20220916_230117409_iOS.jpg
    20220916_230117409_iOS.jpg
    2.1 MB · Views: 18
  • 20220916_230132568_iOS.jpg
    20220916_230132568_iOS.jpg
    1.8 MB · Views: 19
  • 20220916_230215728_iOS.jpg
    20220916_230215728_iOS.jpg
    3 MB · Views: 18
Drivewayboater2

Petty Officer 1st Class
Joined
Aug 21, 2019
Messages
334
Have you taken core samples on your transom? 1/4” drill bit from the inside. check from the bottom to the top. Go in about half inch. Three samples (low middle and high near the keyhole) check what comes out. do the same on he motor mounts.
 

Drivewayboater2

Petty Officer 1st Class
Joined
Aug 21, 2019
Messages
334
I also thought my stringers were good. Took a lot to get the lag bolts out. Top mounts were solid the bottom were toast. Don’t be fooled . Be sure
 

AirJordan613

Cadet
Joined
Aug 14, 2022
Messages
19
I also thought my stringers were good. Took a lot to get the lag bolts out. Top mounts were solid the bottom were toast. Don’t be fooled . Be sure
Will definitely check. Going to drill and/or peel the skin off some test spots. Still assuming I'm going to be doing the transom, stringers, and motor mounts. But I suppose there's still a tiny chance we'll be surprised.
 

Drivewayboater2

Petty Officer 1st Class
Joined
Aug 21, 2019
Messages
334
Good you’re gonna check …….There’s always hope BUT…been there done that… but ultimately I ended up replacing everything. better safe than sorry. Good luck….let us know your progress. The folks on this site are amazing helpful and very knowledgeable. I’ve learned a ton.
 

Baylinerchuck

Commander
Joined
Jul 29, 2016
Messages
2,726
The transom does look better than most as does the deck. Since boats rot from the bottom up, expect to see some rot the lower you go in your investigation. At least you’ll have some good pieces to build patterns from.
 

AirJordan613

Cadet
Joined
Aug 14, 2022
Messages
19
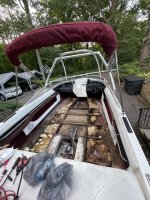
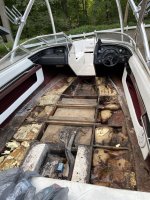
Well, got some demo done and it seems like a mixed bag. Decent wood where I expected bad, bad wood where I expected good. Floor was much more gone than I expected, but the transom is much better than I expected. The bow section of stringers are definitely bad - they’re like mulch, and it’s not even a continuous stringer system up in the bow (separate pieces of wood). There’s some absolutely horrible glasswork - yet it still somehow lasted 30 years. Some stringers aren’t even close to having the glass touch the wood. Others aren’t even capped with glass, yet somehow are totally solid at the top. Wellcraft held the deck down with long staples right into uncapped stringers - nice. A little unsure how to approach the stringers underneath the integrated bow section - I guess cut out the integrated bow section? I’ll need to assess the bottom of the more aft stringers and motor mounts when I get all the foam out. I’m a little torn on how far to go, because I’d like to be able to tow this to the indoor storage facility I have lined up for it this winter - something I’d be afraid to do if I cut all the stringers out of the boat. Boat is definitely a candidate for a total rebuild, but it also might be possible to replace bad sections and keep the good, given wellcraft didn’t really tie all the stringers together to begin with. Will have to take some samples once I get the foam out.
 

Attachments

  • AE3DFBA6-1582-4123-8100-5FF210DB835B.jpeg
    AE3DFBA6-1582-4123-8100-5FF210DB835B.jpeg
    2.5 MB · Views: 28
  • 67CEC5CB-44AD-4A7E-AD77-4DC857BAEEEA.jpeg
    67CEC5CB-44AD-4A7E-AD77-4DC857BAEEEA.jpeg
    2.5 MB · Views: 28
  • 4D48A0F4-002B-4677-90E3-A1CEE67FADA8.jpeg
    4D48A0F4-002B-4677-90E3-A1CEE67FADA8.jpeg
    2.6 MB · Views: 29
  • C1861E90-0A45-42D5-AB23-669F0AF9D872.jpeg
    C1861E90-0A45-42D5-AB23-669F0AF9D872.jpeg
    3.4 MB · Views: 26
  • B91DF061-779A-4F75-88E2-8BBF93B957DE.jpeg
    B91DF061-779A-4F75-88E2-8BBF93B957DE.jpeg
    2.9 MB · Views: 24

Baylinerchuck

Commander
Joined
Jul 29, 2016
Messages
2,726
Best thing to do IMO is to decap the boat. The integrated bow section is part of the cap. Once it’s out of the way, you’ll have full access to everything.
 

AirJordan613

Cadet
Joined
Aug 14, 2022
Messages
19
Best thing to do IMO is to decap the boat. The integrated bow section is part of the cap. Once it’s out of the way, you’ll have full access to everything.
Might be the best way, but probably not feasible in my application. I have limited space to work in as-is, and it could easily get broken.
 

Scott Danforth

Grumpy Vintage Moderator still playing with boats
Staff member
Joined
Jul 23, 2011
Messages
49,574
Might be the best way, but probably not feasible in my application. I have limited space to work in as-is, and it could easily get broken.
raise the cap to the ceiling rafters with ratchet straps. that way, you do the work right, and its a one person job to raise/lower the cap and it is stowed out of the way until you need it.
 

AirJordan613

Cadet
Joined
Aug 14, 2022
Messages
19
raise the cap to the ceiling rafters with ratchet straps. that way, you do the work right, and its a one person job to raise/lower the cap and it is stowed out of the way until you need it.
The boat doesn’t fit in my garage, unfortunately. I have two single doors that are each too narrow, and a ceiling that’s far too low.
 

briangcc

Commander
Joined
Jul 10, 2012
Messages
2,360
I'd build a couple a-frames, roll the boat under it, decap, roll the boat to where ever you're working on it. A-frames keep the cap up high away from potential damage. When work is complete, roll back under and lower.

**This provided you have a spot to do this outside the house.
 

AirJordan613

Cadet
Joined
Aug 14, 2022
Messages
19
I'd build a couple a-frames, roll the boat under it, decap, roll the boat to where ever you're working on it. A-frames keep the cap up high away from potential damage. When work is complete, roll back under and lower.

**This provided you have a spot to do this outside the house.
Not a great spot to decap. Nor do I really have the interest in the first place. Currently thinking of cutting out the nonskid portion of that integrated bow section which should hopefully give enough access to the bow stringers, replace the stringers, reattach the piece I cut out (probably with glass and thickened resin), and carpet over it. Or not even bother reattaching the integrated bow floor piece and see if I can just get the wood/glass floor all the way forward and eliminate the little threshold for the transition from main floor to integrated bow section. That little apx. 1' x 2' bow section is the only interior nonskid on the boat (rest was carpet over fiberglass). My dog slips on that nonskid, so I wouldn't mind it being carpeted anyway.
 

AirJordan613

Cadet
Joined
Aug 14, 2022
Messages
19
Question - is it possible to trail this boat about 20 miles with the stringers cut out? Motor and outdrive are already out. Trailer has four bunks supporting the hull. Basically, getting too cold here to install the new stringers this year, but I'd like to keep going with the demo work. I have indoor storage arranged about 20 miles from here and ideally, I can keep cutting material out and still trail it to its winter destination.
 

kcassells

Fleet Admiral
Joined
Oct 16, 2012
Messages
8,720
Sure you could but I would suggest some type of frame to keep the hull in shape trailering or not.
 

AirJordan613

Cadet
Joined
Aug 14, 2022
Messages
19
Another question - the fuel tank: it's a plastic tank. Any reason not to inspect/clean and reinstall it? Definitely planning on installing new fuel lines and a new sending unit.
 

kcassells

Fleet Admiral
Joined
Oct 16, 2012
Messages
8,720
You always inspect the gas tank. pressure test @ 5 lbs max. etc. at least for 24 hrs aluminum. Might wanna dbl. check for plastico.
 

AirJordan613

Cadet
Joined
Aug 14, 2022
Messages
19
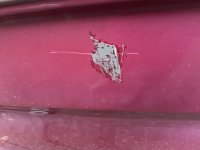
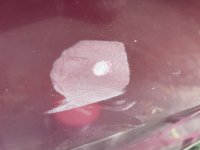
Made some more progress on the boat. This time on the hull. The boat had about 35 bizarre patches in the sides. I’m guessing they were from holes for snaps that were removed. Crazy amount of excess material if so. Anyway, I sanded all that material off, sunk the holes a little below the surface with the dremel, applied a color-matching gelcoat, and sealed with Mylar. Sanded flat then wet sanded the area and the repair turned out pretty nice, can hardly tell. There was the risk of gelcoat not mechanically bonding to the mystery epoxy, but seems to be holding just fine.
 

Attachments

  • 07035A08-273E-4CAF-9A27-E19C190030DF.jpeg
    07035A08-273E-4CAF-9A27-E19C190030DF.jpeg
    2.3 MB · Views: 8
  • BA8EF993-1D5D-426F-B40D-FB7D9FA4AA5B.jpeg
    BA8EF993-1D5D-426F-B40D-FB7D9FA4AA5B.jpeg
    2.5 MB · Views: 7
  • 6536CBC8-71C8-4AF6-B5DF-905D5F3399AD.jpeg
    6536CBC8-71C8-4AF6-B5DF-905D5F3399AD.jpeg
    4.3 MB · Views: 8
  • 33241B5A-CEAA-4E46-8AEA-A5A99C4B0113.jpeg
    33241B5A-CEAA-4E46-8AEA-A5A99C4B0113.jpeg
    88 KB · Views: 8

AirJordan613

Cadet
Joined
Aug 14, 2022
Messages
19
Slowly making progress but going to have to wrap it up soon for the season due to weather. Wanted to field advice on the fuel tank. It’s a Moeller 36 gallon. They don’t appear to make this model anymore - it’s been almost 30 years so I’m not surprised. Dims are 48” x 29” x 8” to main top surface + ~ 1.75” for fill inlet. Looks like the Moeller 39 gallon is a bit too long for the cavity and I plan on rebuilding the boat to factory dims. Anyone know of a tank that would work without going smaller? Looks like Moeller makes some smaller units but I’d rather not give up capacity. Or, should I just put this tank back in the boat when the time comes? If so, could use advice on how to clean it. I’m pumping out the fuel through an in-line filter and there’s some sediment getting picked up, so would want to clean it before reinstalling. Thanks!
 

Attachments

  • 96CC6FA6-9BF5-413F-B9AE-D6E0273F2033.jpeg
    96CC6FA6-9BF5-413F-B9AE-D6E0273F2033.jpeg
    3.1 MB · Views: 13
Top