1992 Malibu Sunsetter Euro F3 rebuild seeking advice

Diamondb33

Cadet
Joined
Apr 6, 2021
Messages
12
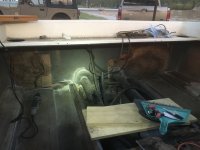
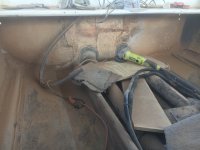
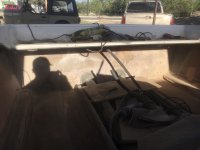
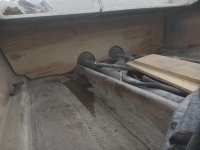
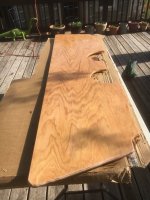
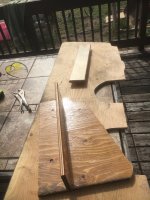
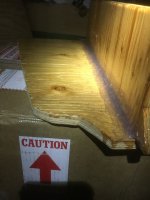
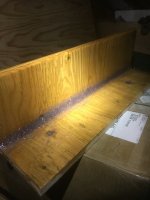
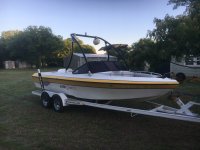
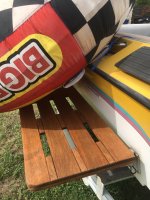
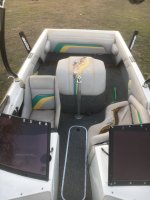
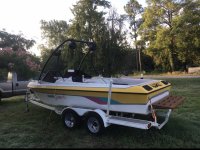
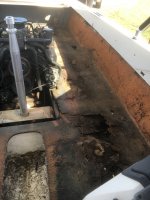
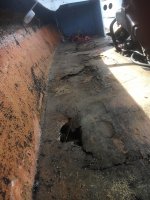
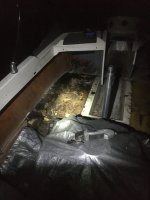
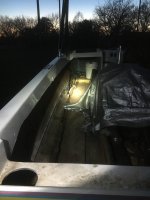
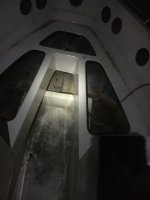
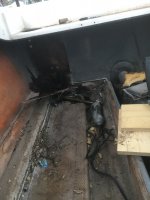
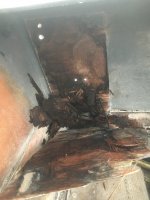
Hey guys, first time to post. I’ve gleaned tips and processes off of you guys while lurking in the wings for years however. I have acquired a 1992 Malibu Euro F3 which myself and my family absolutely love. We ran it every weekend last season and had a blast. Well... I went to upgrade interior and new carpet job turned into entire floor rotted with the floatation foam being the only sturdy part of the floor. The final verdict on replacement is entire floor (even bow section under glassed in bow seats), two outside stringers, and transom. My question is... i am replacing the transom which is 3/4 marine plywood. I will not be cutting through the outside of the hull. Once I have the entire transom painstakingly removed and prepped, I planned on using peanut butter to bond the new transom core to the existing hull. I have a feeling I will be needing some type of clamp to apply pressure to this area while the peanut butter kicks and cures. Any pics or advice on contraptions I can fab up to accomplish this. (I will not be splitting the boat in half so I have to maneuver around the top side of the transom to accomplish this task. Thanks in advance.
 

Attachments

  • 6068F445-D2E7-4F32-B242-D1F8159C2F75.jpeg
    6068F445-D2E7-4F32-B242-D1F8159C2F75.jpeg
    2.7 MB · Views: 25
  • 3A027093-730B-42F9-9428-5C55E884127C.jpeg
    3A027093-730B-42F9-9428-5C55E884127C.jpeg
    1.9 MB · Views: 24
  • 25136B77-C1A6-4B13-BE7F-6E602F89A55A.jpeg
    25136B77-C1A6-4B13-BE7F-6E602F89A55A.jpeg
    1.6 MB · Views: 22
  • 68E3449B-6B79-4681-BC28-0D2E5B6ED9E1.jpeg
    68E3449B-6B79-4681-BC28-0D2E5B6ED9E1.jpeg
    199.4 KB · Views: 21
  • B8FD4BCA-CB6B-4222-95EF-FC0F3610AD6B.jpeg
    B8FD4BCA-CB6B-4222-95EF-FC0F3610AD6B.jpeg
    1.9 MB · Views: 24
  • D5F0CCC8-354D-4C6B-B733-CBAE887741CC.jpeg
    D5F0CCC8-354D-4C6B-B733-CBAE887741CC.jpeg
    2.2 MB · Views: 22
  • C5A18A27-1876-4011-B9B1-D5E4924C234A.jpeg
    C5A18A27-1876-4011-B9B1-D5E4924C234A.jpeg
    2 MB · Views: 21
  • 673310D5-AC8D-427B-9C69-46F029A56828.jpeg
    673310D5-AC8D-427B-9C69-46F029A56828.jpeg
    1.9 MB · Views: 20
  • 68F8193B-999F-41D3-8146-D0AAEF72BB8B.jpeg
    68F8193B-999F-41D3-8146-D0AAEF72BB8B.jpeg
    1.6 MB · Views: 20
  • 7B82DDBF-455A-426C-92D0-6CC551BD8863.jpeg
    7B82DDBF-455A-426C-92D0-6CC551BD8863.jpeg
    1.8 MB · Views: 19
  • 3F9C79B0-E3EE-4602-A8A4-5A3126ACC2B9.jpeg
    3F9C79B0-E3EE-4602-A8A4-5A3126ACC2B9.jpeg
    1.5 MB · Views: 18
  • 73F2BE51-BF6A-4BE7-A62B-AD7818A79AE0.jpeg
    73F2BE51-BF6A-4BE7-A62B-AD7818A79AE0.jpeg
    1.7 MB · Views: 24

Superchief

Cadet
Joined
May 13, 2013
Messages
21
Yikes that’s a lot of work, I like the old Malibu’s, I want a mid 90s response as a project someday.

Couple thoughts on the transom bond. Could you inflate a ballast bag against it to push it in?

I would consider through boltping the thing down, until it cures then remove hardware and cover the holes on the outside with gelcoat.

I also wonder if you save more time by lifting the cap off at least the rear. than working blind and upside down on that transom.
 

todhunter

Canoeist
Joined
Sep 15, 2020
Messages
1,247
Drill holes and thru-bolt, then patch holes is one option. Mine is an I/O, so I already had a big hole in the middle of my transom to bolt my braces through. Doesn't look like you'll have that luxury with yours being an inboard.

Or you could build braces off of the stringers to add pressure to the new transom...assuming you can get to a place on the stringers that isn't too rotten to take a thru-bolt.

Someone else may have some other cool ideas...these are just what I've seen done / what I did.
 

Diamondb33

Cadet
Joined
Apr 6, 2021
Messages
12
Wow thanks for the quick replies guys. I just came in from grinding some of the wet but still intact wood on the transom down to the glass. While I was out there I got to looking at the pre existing bolt holes for my rear eyelets and my swim deck brackets and I think I can drill through and bolt 2x4’s to the inside and outside, top and bottom of the transom and keep it secured while the peanut butter cures... I had ideas earlier today at work of bottle jacks connected to the grill guard of my truck parked behind the boat and some other wild ideas but four 2x4’s and some bolts sounds much better. Apologies in advance, this is my first rebuild so I may ask some seemingly obvious questions. I learn quick but I’m definitely a noob at this. I’ll post progress pics as I go. Here’s one of the two main areas that water penetrated through the swim deck mounts. The whole transom is wet but these two spots were the worst. Thanks again guys!!!!!
 

Attachments

  • 6841A9EA-3C3B-41F7-BDE3-8E3F67C979BD.jpeg
    6841A9EA-3C3B-41F7-BDE3-8E3F67C979BD.jpeg
    2.7 MB · Views: 14

Superchief

Cadet
Joined
May 13, 2013
Messages
21
Don’t be afraid of filling holes in the exterior gel, it’s really simple, my friend drilled a 1” hole for a tower in a mastercraft that was 3 inches off. We ordered a small gel repair kit and you can barely tell where the hole was. That was in 2012. I think drilling and bolting it down while curing is a solid plan. You don’t want voids that trap water.
 

Diamondb33

Cadet
Joined
Apr 6, 2021
Messages
12
Don’t be afraid of filling holes in the exterior gel, it’s really simple, my friend drilled a 1” hole for a tower in a mastercraft that was 3 inches off. We ordered a small gel repair kit and you can barely tell where the hole was. That was in 2012. I think drilling and bolting it down while curing is a solid plan. You don’t want voids that trap water.
Haha, I didn’t blink an eye when I started tearing the inside out but you are spot on... I am very nervous about anything through the hull that needs to be filled. I’ve got several spots on the list to patch before I’m finished with the whole rebuild, I just haven’t watched any videos on it so I’m balking. Lol
 

Diamondb33

Cadet
Joined
Apr 6, 2021
Messages
12
I’ve only had a few hours this week to work on getting this rotten caboose out. It is very tedious. I found that using a 40 grit flap wheel on an angle grinder to get down to the last couple layers and then carefully prying with a 4 inch putty knife in sections is about the best way I can get it out. Hoping to finish removal of the transom tomorrow and then start prepping all the areas in the boat that will receive new glass.
 

Attachments

  • F001E260-73B8-459A-91E0-989F6E3EA59F.jpeg
    F001E260-73B8-459A-91E0-989F6E3EA59F.jpeg
    2.5 MB · Views: 10

GSPLures

Chief Petty Officer
Joined
Sep 3, 2019
Messages
564
Keep up the good work! For the angle grinder if you have a harbor freight by you buy a cheap one from there. The fiberglass dust is a tool killer, I am on my third grinder the first one that broke was my good one.
 

Diamondb33

Cadet
Joined
Apr 6, 2021
Messages
12
Transom is out!!!!! A few hours of grinding around where the stringers were and where the deck meets the hull and then I’ll have a clean work space for the rest of the build as opposed to this sawdust/ fiberglass dust filled mess I’ve been laying in.
 

Attachments

  • 0247B459-7C8B-4E3F-B9CE-2890E5EC930D.jpeg
    0247B459-7C8B-4E3F-B9CE-2890E5EC930D.jpeg
    2.8 MB · Views: 11

Baylinerchuck

Commander
Joined
Jul 29, 2016
Messages
2,726
I agree with the Harbor Freight, no need in messing up good tools with fiberglass dust. The 40 grit flap wheels are great from there. Also I found a vibrating tool to be pretty useful in tight areas cutting out stringers. A sawzall is a bit too wildly and my cause a puncture through the hull if not careful.
Looking good!!
 

todhunter

Canoeist
Joined
Sep 15, 2020
Messages
1,247
Chuck - just curious how many flap discs you think you went through? On mine (18.5 ft boat), I went through about 25 discs, but I was buying cheaper discs from Amazon. Looks like the HF discs are about $4.50 each. I was buying 10 packs from Amazon for $16 ($1.60/disc). I felt like they held up good enough and were cheap enough that I wasn't too worried about plowing through them.
 

Timr71

Petty Officer 1st Class
Joined
Jul 19, 2012
Messages
326
this is a great restoration project. I love watching these old tournament ski boats get rebuilt.
 

buxmj

Petty Officer 1st Class
Joined
Jun 9, 2018
Messages
294
One piece of advice I would like to add that I have learned and I do still think I am a noob also is wherever you end up drilling a through hole be sure to over drill it and fill it with peanut butter and then redrill to the smaller size you need. This will ensure that even if water gets into the hole it won't contact any wood and should outlast quite a bit longer than the factory job.
 

Diamondb33

Cadet
Joined
Apr 6, 2021
Messages
12
Only had a few hrs this week in the boat unfortunately but I got some additional grinding done, the transom cut, routed and dry fitted. I’m pretty pleased with the result.
 

Attachments

  • FA9C7E2D-9573-47FA-8BDC-5CC3E41FA5E6.jpeg
    FA9C7E2D-9573-47FA-8BDC-5CC3E41FA5E6.jpeg
    3.7 MB · Views: 6
  • B48694A8-F252-483D-885F-2B475D510F09.jpeg
    B48694A8-F252-483D-885F-2B475D510F09.jpeg
    2.5 MB · Views: 6

Diamondb33

Cadet
Joined
Apr 6, 2021
Messages
12
Got the transom and a couple other pieces coated with catalyzed resin today. I plan on starting the csm encapsulation of the transom tomorrow night or maybe the next, depending on what time I get off work. As this is my first time ever working with glass, I built a mock up stringer to practice on. Mixed peanut butter for fillets for the first time tonight as well. Fun stuff!!!
 

Attachments

  • A59CEA73-A7DA-4D6E-B49B-20CF56CECB01.jpeg
    A59CEA73-A7DA-4D6E-B49B-20CF56CECB01.jpeg
    1.8 MB · Views: 7
  • 6CC9E749-B82A-4FC3-9304-054ED3F91FB2.jpeg
    6CC9E749-B82A-4FC3-9304-054ED3F91FB2.jpeg
    2 MB · Views: 7
  • AB56BA1B-F9D9-441E-AB08-0B00FDDB716B.jpeg
    AB56BA1B-F9D9-441E-AB08-0B00FDDB716B.jpeg
    1.7 MB · Views: 7
  • B47BBFF9-8A71-4393-AF08-8AAF933601E9.jpeg
    B47BBFF9-8A71-4393-AF08-8AAF933601E9.jpeg
    1.7 MB · Views: 7

Diamondb33

Cadet
Joined
Apr 6, 2021
Messages
12
Ok, I’ve got another newbie question... when you are laminating 3/4 marine plywood with CSM prior to it going into the boat... What is the best way to laminate the end grain and is it vital to have mat on all the end grain? I practiced on a small piece tonight where I cut the mat an inch wider than my piece and worked it around my routed edges and over to the other side. It was a mess. The edges actually looked ok but I couldn’t access the underside of the piece where it wrapped around well enough to lay it up properly. I’m going to have to grind it extensively tomorrow before I can do the other side. I’ve consider turning my pieces on their sides and doing the end grain first in small strips and then coming back on the flat side with a large piece that slightly overlaps right up to the edge but that doubles the number of steps in the process at a minimum. Am I overthinking the lamination process? Should I not worry so much about having mat on every square centimeter of my end grain? Is there a specific method any of you prefer that is the most efficient and effective way to laminate all sides of the wood before it gets bedded into the boat? Any input will be GREATLY appreciated. Lol
 

todhunter

Canoeist
Joined
Sep 15, 2020
Messages
1,247
I like to have everything encapsulated. If you router both edges, you can do as you suggested by laying a small piece of CSM to wrap around the edge and then come back after that cures and lay up your flat faces, slightly overlapping the first layup. Yes, it will take 3 layups unless you get creative.

For laying around the edge, I like to start in the center of the mat/cloth (on the edge of the board) and work it evenly down each face of the board, instead of trying to go up one side, around the bend, then down the other. ...if that makes sense.

What tool are you using to apply the resin? For edge work I've gone exclusively to a 2" chip brush with the bristles cut down to ~1". I only use rollers on big flat areas.
 

Diamondb33

Cadet
Joined
Apr 6, 2021
Messages
12
I like to have everything encapsulated. If you router both edges, you can do as you suggested by laying a small piece of CSM to wrap around the edge and then come back after that cures and lay up your flat faces, slightly overlapping the first layup. Yes, it will take 3 layups unless you get creative.

For laying around the edge, I like to start in the center of the mat/cloth (on the edge of the board) and work it evenly down each face of the board, instead of trying to go up one side, around the bend, then down the other. ...if that makes sense.

What tool are you using to apply the resin? For edge work I've gone exclusively to a 2" chip brush with the bristles cut down to ~1". I only use rollers on big flat areas.
Thanks for the quick response! I am using a 2” chip brush. I think cutting the bristles down to an inch will be very helpful. I will do that tonight when I get off work and start glassing again. I was planning to reserve the roller for when I apply the 1708 as a final layer on the installed transom and deck. I had considered doing the end grain first like you said but I had not seen any videos using that approach so I was afraid I was creating more work for myself. As I am only able to work on the boat from about 9pm to midnight during weekdays it will be a tad slower than I was hoping with the extra steps but I think it will be better in the long run. You’re the man!!!! Thanks!!!!!!
 

todhunter

Canoeist
Joined
Sep 15, 2020
Messages
1,247
Yeah, having the bristles shorter and all the same length makes a huge difference. You can use the brush to tap the resin into place and to push the mat/cloth around if needed. Make sure to tear the edges of your CSM instead of cutting it - that will do a better job of hiding the seam and making the overlap less bulky.
 

Diamondb33

Cadet
Joined
Apr 6, 2021
Messages
12
Yeah, having the bristles shorter and all the same length makes a huge difference. You can use the brush to tap the resin into place and to push the mat/cloth around if needed. Make sure to tear the edges of your CSM instead of cutting it - that will do a better job of hiding the seam and making the overlap less bulky.
Todhunter, I worked on getting end grain done this evening. Things went much better! I’ve got a couple questions. My secondary stringers that I’m replacing are 3/4 marine grade. My plan for them was to encapsulate with csm, bed them, tab them in with 2 inches of csm, then 2 layers of 1708 tabbing at 4 then 6 inches, followed by 1708 over the top of the stringer down overlapping the tabbing. Is this overkill for secondary stringers? If they’re totally covered with 1708, can I just coat them with catalyzed resin before I bed them in or do I need that layer of csm all the way around as well? What laminating schedule would be effective yet efficient with my time? (I’m getting 2-3 hrs at night on it which makes my work day 19-20 hrs total)
 
Top