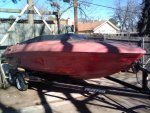
1990 Phantom 20' Just starting this project

Joined
Jan 16, 2011
Messages
26
This is going to be a big one. I was on Iboats about 5 years ago when I was restoring an old Chaparral 21 xlc. If it wasn't for this site and all the great help and reads I would have made a disaster of that boat. I learned a ton on that project but this one is going to be a challenge.
I have a nice Mercruiser Engine and new outdrive sitting in my shop for 3 years or so and I just bought this Phantom to put it in.

Has anyone ever heard of this boat before? I have searched and could not come up with a picture of an original.
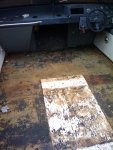
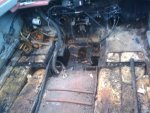
I removed the interior all has to be replaced. I pulled the engine, it is junk (cracked everything)
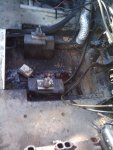
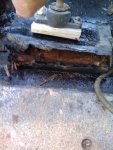
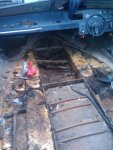
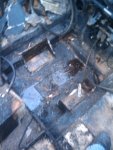
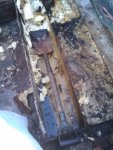
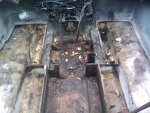
I started ripping out the floor today. Pretty bad, alot of the stringers are mush and most of the foam is saturated and wet. Engine mounts were repaired before with west systems and failed. I got those out today. The transom is good, I have to dig a little further to see if I have to replace the stringers in aft area.

Any advice on the foam replacement/just remove it. Also, It has a full tank of 5 year old gas! Any ideas on how to dispose?
I plan on taking alot of pic's and keeping up here with the progress.

Thanks for looking
 

Attachments

  • phantom2.jpg
    phantom2.jpg
    40.1 KB · Views: 0
  • 2011-01-08 15.14.22.jpg
    2011-01-08 15.14.22.jpg
    137.6 KB · Views: 0
  • 2011-01-08 12.38.58.jpg
    2011-01-08 12.38.58.jpg
    145.4 KB · Views: 0
  • 2011-01-08 15.14.30.jpg
    2011-01-08 15.14.30.jpg
    138.3 KB · Views: 0
  • 2011-01-17 10.47.18.jpg
    2011-01-17 10.47.18.jpg
    145.4 KB · Views: 0
Joined
Jan 16, 2011
Messages
26
Re: 1990 Phantom 20' Full Restore in Progress

Re: 1990 Phantom 20' Full Restore in Progress

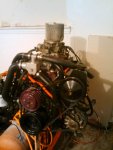
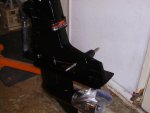
Here's some more pics. The previous owner did begin sanding and some hull prep for paint. I plan on painting it back red. Going to be a while on that. This boat does have a new gimble bearing and bellows. The outdrive is a fresh rebuild but it's going on my other boat. It has twins and the straboard side is leaking. Thats a big part of why I bought this Phantom is for the outdrive. The outdrive in the pic is a generation 2. It will adapt to an older gimbal with a little grinding and a gen 2 shift shaft. So it's going on the Phantom. I didnt want to mismatch the drives on my other boat so I'm taking the one that came on the Phantom and it"s going on my cruiser.
 

Attachments

  • 2011-01-17 17.15.16.jpg
    2011-01-17 17.15.16.jpg
    140.3 KB · Views: 0
  • 2011-01-17 17.15.25.jpg
    2011-01-17 17.15.25.jpg
    141.4 KB · Views: 0
  • 2011-01-17 17.43.54.jpg
    2011-01-17 17.43.54.jpg
    139.4 KB · Views: 0
  • engine.jpg
    engine.jpg
    140.2 KB · Views: 0
  • PICT0845.jpg
    PICT0845.jpg
    144.1 KB · Views: 0
Last edited:
Joined
Jan 16, 2011
Messages
26
Re: 1990 Phantom 20' Just starting this project

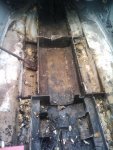
Making some progress, I've only been able to work on it for an hour or two a day. So far I've cut out the floor, removed the old fuel and pulled the tank. I used a roto zip to cut the floor as close to the hull as possible. What a peice of crap, I returned it as soon as I finished.
I dug out all the foam, it weighted well over 300 lbs it was so saturated. You can see in the pics my tool of choice for foam removal.

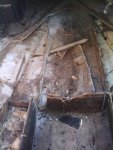
Today I bought a reciprocating saw and began stringer removal. Never done this before so I've been reading up on this site trying to get ann idea on how to do this. I plan on doing this a few sections at a time to avoid hull warp.

I do have a question about how to glass the new one's in. Do I have to go back on top of the old ridge or can I leave it there and place the new one beside it. I do plan on using something to space the stringer off the hull "foam/adhesive".

Thanks for any help!
 

Attachments

  • 2011-01-19 16.24.46.jpg
    2011-01-19 16.24.46.jpg
    139.4 KB · Views: 0
  • 2011-01-19 16.31.49.jpg
    2011-01-19 16.31.49.jpg
    145.2 KB · Views: 0
  • 2011-01-23 13.28.12.jpg
    2011-01-23 13.28.12.jpg
    147.7 KB · Views: 0
  • 2011-01-23 13.28.35.jpg
    2011-01-23 13.28.35.jpg
    145.9 KB · Views: 0

ezmobee

Supreme Mariner
Joined
Mar 26, 2007
Messages
23,767
Re: 1990 Phantom 20' Just starting this project

Sharp boat. That's going to be a real looker when it's fixed up. I have no valueable advice to give so I'll just wish you luck on your project.
 
Joined
Aug 17, 2009
Messages
941
Re: 1990 Phantom 20' Just starting this project

Sup,

Nice looking boat. Good job on the tear out. Regarding the stringers replace what you have where is. Most of what I see should be completely removed and ground down smooth and flush. Speed boats of this vintage generally are borderline on hull support so I would plan on making some of the stringers and bulkheads beefer. When you install the stringers use PL Premium or a PB mix to bed them in. No need for foam or anything like that. Is the floatation foam structural in this boat?

 
Joined
Jan 16, 2011
Messages
26
Re: 1990 Phantom 20' Just starting this project

Thanks, it is a lot of work but it should be a good end result. Not sure on the foam. It was poured in through a bunch of small holes all over the floor. How do you determine if it's for structure or floatation. I was planning on filling it back with the pink sheet foam. The floor was sitting on the foam so it was somewhat structural.

Thanks for the help on the stringers! I'm sure I'll have plenty more questions as I get further along.
 
Last edited:

Friscoboater

Captain
Joined
Jul 3, 2009
Messages
3,095
Re: 1990 Phantom 20' Just starting this project

Cool looking boat man. The foam in these boats add alot of structural qualities and cut down on noise. The trick is to figure out how to drain the foam when water gets in there. I am in the thick with you on my Sea ray project.
 
Joined
Jan 16, 2011
Messages
26
Re: 1990 Phantom 20' Just starting this project

So as I"m cutting these stringers out I realize it would be easier to just cut them all out at once, grind and then replace. Is there a large risk of some type of warping if I cut them all out at once?
Figured I'd add some nice pics on the water. Looking at pics of a dirty, rotten boat hull dosent make boating seem that fun.
Thanks again!
 

Attachments

  • 2011-01-25 16.43.08.jpg
    2011-01-25 16.43.08.jpg
    145.8 KB · Views: 0
  • 2011-01-25 16.43.47.jpg
    2011-01-25 16.43.47.jpg
    141.9 KB · Views: 0
  • 2009-09-19 19.25.25.jpg
    2009-09-19 19.25.25.jpg
    132.6 KB · Views: 0
  • 2009-11-13 17.36.45.jpg
    2009-11-13 17.36.45.jpg
    129.1 KB · Views: 0
Joined
Aug 17, 2009
Messages
941
Re: 1990 Phantom 20' Just starting this project

No not really. Try to support the hull the best you can especially where you are stepping on it. When I did my restore I rebunked the tailer before getting to far into the rebuild portion just to make sure the hull was pretty well supported and I made sure I tried to step where the bunk was when doing work to make sure I didn't deflect the hull much. Honestly once you get the stringers bedded in you will fine from there on out.
 

zach103

Commander
Joined
Mar 11, 2008
Messages
2,233
Re: 1990 Phantom 20' Just starting this project

i put two ratchet straps over the top of mine when i was cutting out the strings just for some support.. i would deff add the foam back in.. if you glass it right no water should ever find the foam. i would replace the stringers to the original dimensions as best you can if thats what you were talking about in the posts above.. other than that it looks really good so far.. tearing it apart is deff the worst part but you get past it and just look at it as progress.. keep up the good work.
 
Joined
Jan 16, 2011
Messages
26
Re: 1990 Phantom 20' Just starting this project

Think I'll do both, redo the bunks and add some straps for extra support. Soon I can move on to the install questions, types of matt, resin how much ect. I just read friscoboater thread today and we're close on the same questions and repairs needed so I'll be reading up there also for help.
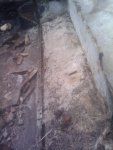
One thing I noticed today is the center stringers run alongside runers, strakes (sorry, not comming up with the correct name) that are part of the mold. There's a 1" space between that and the stringer. I know fimerglass is hard to lay in small square areas like this. Should I fill it in with something?
It would be nice to place the stringer up against it and then tab it there.
 

archbuilder

Vice Admiral
Joined
Sep 12, 2009
Messages
5,697
Re: 1990 Phantom 20' Just starting this project

Nice project, can you post a picture of the last question?

I agree on putting the foam back, it was there for a reason......or they wouldn't have spent the money on it! Also it will stiffen up the hull even if it was only intended for floatation.

I used 4 layers of 2 oz mat to glass mine in, but I know a lot of people like the cloth better. I haven't had any issues with mine, and I like how the mat distributes the stress in multiple directions. the cloth only transfers it in two directions due to the nature of its weave. The best would probably be to use a little of both.
 
Joined
Aug 17, 2009
Messages
941
Re: 1990 Phantom 20' Just starting this project

Think I'll do both, redo the bunks and add some straps for extra support...

One thing I noticed today is the center stringers run alongside runers, strakes (sorry, not comming up with the correct name) that are part of the mold. There's a 1" space between that and the stringer. I know fimerglass is hard to lay in small square areas like this. Should I fill it in with something?
It would be nice to place the stringer up against it and then tab it there.

Sup,

If your cap is still on the boat then adding the straps probably won't do much. You generally use straps when you take the cap off to maintain the hull shape for measuring and installing the deck. But your choice. Often the stringers run in chines that are molded into the hull bottom. These provide for a fairly flat area to bed your stringers. You can place your stringer anywhere in that flat area. Either way bed your stringers in with whatever you decide to use. Once they are set then you will have to add a PB mix along both side of the stringer at the hull to create a rounded fillet. This should take care of any gaps and will allow the glass to lay nice from the stringer to the fillet to the hull bottom with no lifting due to sharp inside corners.
 

SawDust{RM}

Petty Officer 3rd Class
Joined
Nov 30, 2010
Messages
83
Re: 1990 Phantom 20' Just starting this project

Have the Cap on the boat when setting the sub deck structure, bulk heads, setting stringers, foam & sub floor, if done properly you might not need the lid on when you lay the new deck, depends on the hull. Be prepared to pop the cap many times during the whole process.

However use a ladder for hopping in & out of the boat, don't use the hull as a hand rail without the cap being on.
 

zach103

Commander
Joined
Mar 11, 2008
Messages
2,233
Re: 1990 Phantom 20' Just starting this project

Sup,

If your cap is still on the boat then adding the straps probably won't do much. You generally use straps when you take the cap off to maintain the hull shape for measuring and installing the deck. But your choice. Often the stringers run in chines that are molded into the hull bottom. These provide for a fairly flat area to bed your stringers. You can place your stringer anywhere in that flat area. Either way bed your stringers in with whatever you decide to use. Once they are set then you will have to add a PB mix along both side of the stringer at the hull to create a rounded fillet. This should take care of any gaps and will allow the glass to lay nice from the stringer to the fillet to the hull bottom with no lifting due to sharp inside corners.

oops my bad ya forgot to add that i didnt have the cap on when i had the straps.. i had to remove the cap because i have a bow rider.. i had a closed bow like you do on my last project and didn't need to remove it.. sorry should have said that in my last post..
 
Joined
Jan 16, 2011
Messages
26
Re: 1990 Phantom 20' Just starting this project

All good Zach, so I shouldn't need the straps then. But if I ever remove a cap I now know what to do!
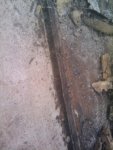
I was able to get the stringer cut down the the chine area that Greg described (thanks!). I cleaned out the wood, now it shouldnt take much grinding to get it flush. This is only one a section of the stringers but I'm getting the picture on how this is done.
So in these pictures I have cut the stringer down and there is a valley/space between the hull and the stringer. This is what I was speaking of in the above post. When I reinstall new ones should I fill this area in with the PB mix.

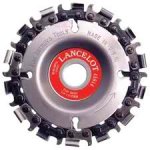
Bought this cutting disc at Harbor Freight, cut like a charm! It dulled after a bit but you can resharpen it like a chainsaw.
 

Attachments

  • 2011-01-26 16.31.51.jpg
    2011-01-26 16.31.51.jpg
    136.9 KB · Views: 0
  • 2011-01-26 16.30.38.jpg
    2011-01-26 16.30.38.jpg
    132.1 KB · Views: 0
  • imagesCA9U1B83.jpg
    imagesCA9U1B83.jpg
    10 KB · Views: 0
Joined
Aug 17, 2009
Messages
941
Re: 1990 Phantom 20' Just starting this project

Yeah just filler up. Bed the stringer first and then fill in and leave a nice curved bead.

Cool cutting wheel. Never saw that at HF. Does that go on a 4-1/2" grinder?
 
Joined
Jan 16, 2011
Messages
26
Re: 1990 Phantom 20' Just starting this project

It does go on a regular grinder. Seemed to cut good, I'll report back on it if it holds up or not.
 

archbuilder

Vice Admiral
Joined
Sep 12, 2009
Messages
5,697
Re: 1990 Phantom 20' Just starting this project

Just watch your fingers! Ouch!
 
Top