1990 4.3 Century 2000 - Floor,Transom,Stringer,Upholstery Project

Chris51280

Ensign
Joined
Jan 24, 2018
Messages
911
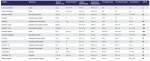
Thanks, Here is a list of what it did cost me to get the boat in shape again. Just the rebuild of the floor, not the modifications and other misc. things

2lbs Foam Kit 80lbs - $264
22yd 1708 biaxial 50” - $183.25
30yd 1-1/2oz mat 50” - $96
6x 435 Poly Resin 5gal - $759
1x ¼ chop strand 4lb - $11.85
13yd 6oz 60” cloth - $79
2x Cabosil 4gal – $45
1x 3M Glass Bubbles 5qt – $9.95
1x Surfacing Wax pint – $6.85
1x MEKP pint – $9.95
1x Halyard Pigment 4oz – $6.80
Non Skid Sand – $17.50
3x Gelcoat white 1gal - $135
50x 32ox Mixing Cups – $31.00
Detail Roller ½”x4” – $7.70
PVA 1Gal – $18.35

4x ¾” 4x8 ACX Plywood - $160
4x 5/8” 4x8 BCX Plywood - $120
4 large tubes of PL Glue - $35
Titebond glue - $20
3M Filter 100P - $10
2x 3M Filter 6009 - 20
3M Mask - $20
Disposable Suits - $20
Brushes - $30
Acetone - $30
Grinding Discs - $30

Total – Approx. $2150
 

Chris51280

Ensign
Joined
Jan 24, 2018
Messages
911
So I thought about installing my trim tabs. I'm not sure my transom will allow for it or be effective. Any takes?
 

Attachments

  • photo320801.jpg
    photo320801.jpg
    221.5 KB · Views: 2
  • photo320802.jpg
    photo320802.jpg
    241.4 KB · Views: 2

Chris51280

Ensign
Joined
Jan 24, 2018
Messages
911
In the process of cleaning the keel from the anti fouling.

After contacting nauticus they said to mount it near the outdrive where the transom is not that angled. It will be a tight fit and I have to move the pitot tube.

I need to look into boat cover material. Any body has experience with the materials like sunbrella, top gun, surlast.
 

Attachments

  • photo321043.jpg
    photo321043.jpg
    202.6 KB · Views: 0
  • photo321044.jpg
    photo321044.jpg
    265.1 KB · Views: 0

sopwithcamel74

Petty Officer 1st Class
Joined
Aug 15, 2018
Messages
203
In the process of cleaning the keel from the anti fouling.

After contacting nauticus they said to mount it near the outdrive where the transom is not that angled. It will be a tight fit and I have to move the pitot tube.

I need to look into boat cover material. Any body has experience with the materials like sunbrella, top gun, surlast.

I can't speak for the other two but sunbrella is seen as good quality stuff by most everyone. When in doubt, go with familiarity.
 

Chris51280

Ensign
Joined
Jan 24, 2018
Messages
911
So I started fixing the ujoints and the seal. The seal was the only thing I had not changed and of course it was leaking. I dreaded taking the bearing pack apart since I don't have the torque wrench with the low torque setting. I think the new seal will be ok since it has the double lip. I don't want to use the sleeve yet.
Is there a trick on getting the new ujoints in? One ear is bend inward a little while pressing the cup in from the other side. It is not much. Maybe less than 0.5mm. I will try and use the press abd press it back a little.
I watches achris video and MadProps on how to do all this but could not find a solution.
 

Attachments

  • photo327701.jpg
    photo327701.jpg
    160.5 KB · Views: 2
  • photo327702.jpg
    photo327702.jpg
    135.7 KB · Views: 2
  • photo327703.jpg
    photo327703.jpg
    140.8 KB · Views: 2

achris

More fish than mountain goat
Joined
May 19, 2004
Messages
27,468
If the drive is 1990, as in your signature, then I think it uses the rolling torque method of bearing preload set up. If you don't use a torque INDICATOR (not a wrench!), then it's likely you won't have the right preload on the bearings, and they will fail quite quickly.

For unis, I use an F-clamp and some sockets of the right size. That gets over the press hitting the tabs issue. Trying to hold the uni bearing cup, and the socket, while adjusting and screwing in the clamp can be 'challenging'... I may get some gene therapy and grow a third arm when I need to do the job in future. Good luck.

Chris........
 

Chris51280

Ensign
Joined
Jan 24, 2018
Messages
911
Thanks achris . I will try to hunt one down. Maybe they have one here at my work place. This is not something people use alot.

Should it still leak, where can I find the speedy sleeve you have shown in your video?
 

achris

More fish than mountain goat
Joined
May 19, 2004
Messages
27,468
... where can I find the speedy sleeve you have shown in your video?

'Speedi Sleeve' was a Rawhide company, but is now owned by SKF. You should be able to get them through a bearing shop.

Chris....
 

Chris51280

Ensign
Joined
Jan 24, 2018
Messages
911
Ok. Got everything back together. I had the spacer in between the bearings and therefore i was able to torque to 80ftlbs. Pressure tested overnight and it went from 9 to 8 psi. I read before that 15 min is enough. Oh well.

. I know when I bought the boat the prop shaft was bent and I straightened it back out at a machine shop to be within specs.

2 years ago I hit a tree stump in the lake with an aluminum prop. I cannot remember if the splines were twisted before or not. It held up the last 2 years with no issues.

This is the shaft going into the upper unit.

Run it till it snaps?

I have another lower unit that I can rebuild for future use

This looks like it was hit very hard. Like with a Stainless prop. I did not run mine with the ss prop. The aluminum prop lost 2 blades out of 4
 

Attachments

  • photo327907.jpg
    photo327907.jpg
    103.8 KB · Views: 1
Last edited:

achris

More fish than mountain goat
Joined
May 19, 2004
Messages
27,468
....This is the shaft going into the upper unit.

Run it till it snaps?...

Which won't be very long. I can already see the fractures starting in the splines. I'd replace it before going any further.

Chris.....
 

Chris51280

Ensign
Joined
Jan 24, 2018
Messages
911
I fixed the second spare lower unit I had laying around. New forward and reverse bearing. I measured the old bearing and the new bearing height to make sure that the backlash would not change. I did a sanity check with an indicator to check the backlash anyways. Was spot on. So I have a good lower unit now. Pressure tested as well.
 

Chris51280

Ensign
Joined
Jan 24, 2018
Messages
911
Been sanding off the anti fouling. Using 220 grit and the will go to finer sand paper. Then polish. Hope it will come out ok
 

Attachments

  • photo329480.jpg
    photo329480.jpg
    208.1 KB · Views: 0

Chris51280

Ensign
Joined
Jan 24, 2018
Messages
911
So I need a boat cover for trailering and storage. I don't have a carport so it will most of the time be in the open. The boat had a custom cover before. I have a good idea on the material I want to use.
The Top Notch 9 is comparable to the sunbrella in weight oz. I don't think the 11oz will be much better and it cost about $7 more per yard. The Sunbrella is about $25 and the Top Notch 9 is about $15. I will use the 3/8 snap ins on the underside of the rub rail. I see a lot of newer boats have the snaps on top and the bow with the rest of the boat separate. I will also use a pole in the center so water will not puddle. In the winter i will throw a tarp or a second cover that I currently use over the boat.

I will use my old school singer I used for the upholstery. Thread will be V69 UV and a #18 needle.

Any reasons why I should use the 11oz over the 9oz?
 

Attachments

  • Capture.JPG
    Capture.JPG
    71.3 KB · Views: 1

Chris51280

Ensign
Joined
Jan 24, 2018
Messages
911
Installed the trim tabs today. I know they are to close to the outdrive but after checking with the manufacturer, this is what he said i should do. It will touch the trim rams very slightly when you turn it completely in one direction and the trim tab would be raised. I set it to the strongest level since this boats azz is always in the water. We will see how this is vs the hydro foil I had.
the speedo tube needs to go right next to the trim tab towards the center.
 

Attachments

  • 0629202020_HDR_copy_873x1164.jpg
    0629202020_HDR_copy_873x1164.jpg
    283 KB · Views: 3

Chris51280

Ensign
Joined
Jan 24, 2018
Messages
911
So cover is done. There was alot of taking off and putting it back on. Its not the prettiest out there with some wrinkles but it beats the generic cover. Its alot heavier in thickness. I also installed the guide poles. Made my own bracket. Its a 35mm hydraulic pipe with a sch40 pvc pipe. Held together with a clip so I can take them off.
because of the trim tabs, I had to relocate the Speedo sensor. I hope the location won't give me too much trouble. We will be going camping on a lake on Sunday for a week. We will see how it will perform and if I will be loosing my cover onthe way. I know some people drive without one, but I will be storing some things in the trailer.

Oh, and i replaced the fuel filter in the mechanical pump. Didn't know there is one in there. Good thing i did, because it was assembled wrong. The spring was in the hole and not on top pushing down. Makes the filter completely useless.
 

Attachments

  • photo335354.jpg
    photo335354.jpg
    186.4 KB · Views: 2
  • photo335355.jpg
    photo335355.jpg
    211.1 KB · Views: 2
  • photo335356.jpg
    photo335356.jpg
    369.9 KB · Views: 2
  • photo335357.jpg
    photo335357.jpg
    268.6 KB · Views: 2
  • photo335358.jpg
    photo335358.jpg
    337.5 KB · Views: 2

Chris51280

Ensign
Joined
Jan 24, 2018
Messages
911
Boat worked good So far. I have to adjust the tabs a little bit better. The tarp, I need better snaps. The ones were they come off when you only pull in one direction. I got the dot brand but even them, only one side stayed on. The other flapped around on the way there. Had another strap on it so it would not fly off
 

Attachments

  • photo335811.jpg
    photo335811.jpg
    340.7 KB · Views: 5
Top