Had a good week visiting family, and got back home on the 30th, so I still had 6 days to make some progress before I went back to work this past Thursday.
I started with installing two braces at the rear to tie the transom and sides together. I saw this in some photos of another model boat (maybe a SS 16 or 18?) and thought with my slightly overpowered motor it would be good, so a 1x3x 1/8” angle was bolted to the transom and is awaiting riveting to the sides (Pic 1). You can also see the extra little tabs I riveted on last summer to support the rear of the floor, for some reason the floor had zero support for the back 12”, which seemed silly to me.
The foam was already cut and glued together last summer, and I was diligent about labelling the sections, so it all went in fairly quickly, although I did have to build a small brace at the rear to hold keep the foam from sliding to the centre of the bilge since the stringers don’t go right to the rear (Pic 3). The new brace was riveted on to the stringers and the new floor support tabs.
I started with the floor install using 3/16 all aluminum wide flange rivets with a 1” grip. My extra bracing under the floor made this super simple, I just marked each side where the braces were and then ran a straight edge to know where to drill. Each rivet was dipped in 5200 before install to help seal the wood edges, although not much ended up in the holes since a lot was scraped off when I inserted the rivets. I had a bit of 5200 that pushed out around the flange of one rivet when I popped it, and I want to warn against using acetone to clean it up, turns out the acetone removes the colour from Nautolex! You can kind of see the whiter spot in Pic 4 behind the driver seat post. I also had two rivets which the gun didn’t pull the shaft, so I cut the shaft off and will be grinding it flush since I didn’t want to drill them out and replace them.
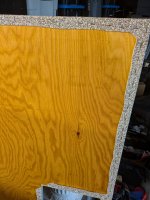
I also realized that I made a mistake when wrapping the Nautolex on the floor panels: I did a great overlap on the edges, but I should have made sure the overlap was on the edges that face the boat sides and not the edges that butt together, it turns out that one extra layer of vinyl on each piece results in the centres of the boards being having a 1/16” gap once installed (Pic 5). I hate the gap but it would be completely cost and time prohibitive to redo the Nautolex and install, so I’ll live with it.
And finally I placed my consoles to get an idea of how to make the height correct. This week I will be dragging my windshield out of storage so I can adjust everything correctly, but from my initial placement it looks like the centres are way too high despite using 1/2” plywood for the floor (Pic 6). I am assuming the extra bracing I put under the floor is causing the difference, but it won’t be an issue since I already had to chop off the bottoms of the console sides to clean up the PO’s hack bending job, so I can just cut off a bit more until it is correct.
Next steps beside the console install are:
- get longer bolts to use as my placeholders in the holes for the passenger B2B seat box so I can remove the nails.
- install the splashwell, which will also require me to clean up and paint the sheet of aluminum that goes against the inner side of the transom. I will also be adding a small piece on either side that will cover the inner side of the transom above the storage boxes on each side of the splashwell since I didn’t want to paint the transom wood, I prefer the look and durability of an aluminum skin instead of painted wood.
- start on the framing for the front seats and rear boxes.
What sort of screws should be used to screw the splashwell to the transom? I have a bunch of 1” SS pan heads, would that be sufficient? I will be using more pop rivets to secure the splashwell and console legs to the floor unless there is risk of the rivet pulling back through since it will just be popped against the wood?