1989 Rinker Captiva 186 Resto"wreck"shun

Status
Not open for further replies.

Nortron

Cadet
Joined
Dec 19, 2017
Messages
9
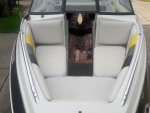
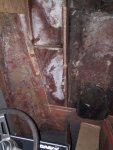
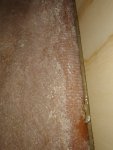
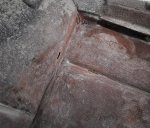
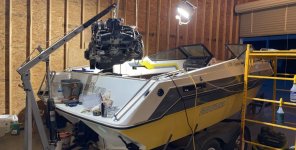
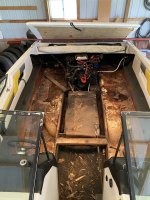
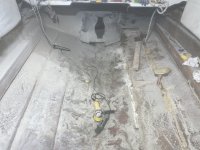
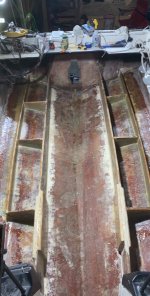
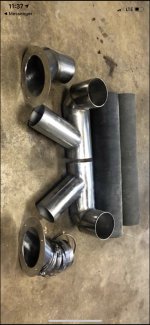
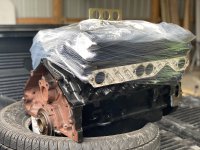
Hello my name is Nate and I reside in central Ohio. I have spent the last three years reading and enjoying the many restoration threads on this forum. This is my first post and I will say I am much better swinging hammers than using computers. I am grateful for all the info this forum has provided for me to start a boat restoration of my own. I purchased this victim/ patient a couple of years ago for $600 and spent that summer getting it to where I could do a few water tests and diagnose its issues. The previous owner had just had the motor rebuilt and did not realize the installers did not get a good seal at the transom. The marina he docked at called and said the boat was starting to drop in the water. Long story short, I knew I was getting a project boat but the fresh engine and the size of this boat was attractive enough to pull the trigger. I sold my Terrycraft bass boat which could only hold 2 to 3 people, for a boat I hope to turn into a fishing/water-sport hybrid that holds 4 to 6 people depending on the activity. The current state of the boat is stripped and on the bunk trailer. Stringers, transom and motor mounts are out and the GRINDING of the boat and my teeth has begun. I have many questions but will wait until I can post pix. Once again many thanks to this forum and its members. Nate
 

Nortron

Cadet
Joined
Dec 19, 2017
Messages
9
Thanks Chris I have been following your thread incognito. I have 30 plus years in the automotive and heavy equipment industry , and I am used to the issues with mass production and planned obsolescence. I scheduled three days off this week and am in the middle of grinding. I started with flap discs but seemed to go through four rather quickly. I switched over to resin-coated discs in 24 Grit with a rubber backing pad. I think my boat was put together on a Friday afternoon by a trainee. But from a lot of the threads I have read it seems like a few people have felt that way. Nate
 

Nortron

Cadet
Joined
Dec 19, 2017
Messages
9
So after a day of grinding I have a question. It appears that woven roving was the fabric of choice in the construction of this boats hull. Obviously it was not installed with the precision and care like I have seen on this forum. That means there are a lot of humps and air pockets/ bubbles. So far my method has been to grind these out until I am at a solid (pink surface). Then I feather these areas out into good glass surrounding them. I am wondering if I need to aim for a smooth surface through the length of the hull or if I need to fill these dips with new glass before I am installing my stringers and tabbing? So far I don't feel like I have cut into what I perceive to be the base/ original hull that the factory began their layups on. I will update hopefully with pictures tomorrow. Nate
 

Chris51280

Ensign
Joined
Jan 24, 2018
Messages
932
Some areas I did go down to the woven. It just happened since I got rid of the loose stuff and then I feathered it in. Not all bubbles are gone either. If you wanted to get rid of all of them the you would have to grind everything down to woven and this is simply not needed. If the glass is solid and not loose you are good to go. If you see a larger void where the glass is not attached to the woven fabric of the hull, then this needs to go as well. I can show you some pictures tomorrow.
 

Nortron

Cadet
Joined
Dec 19, 2017
Messages
9
Thanks for the info Chris. I was concerned with removing too much and creating more work than is needed. I tend to do that. Here are some pictures of the boat. I am a Cleveland Browns fan with a boat that screams Pittsburgh Steelers. Rinker Captiva 186.jpgRight side.jpg
 

Attachments

  • Bow seating.jpg
    Bow seating.jpg
    489.2 KB · Views: 8
  • Below helm.jpg
    Below helm.jpg
    933.3 KB · Views: 8

Chris51280

Ensign
Joined
Jan 24, 2018
Messages
932
Yup, the white areas are de-lamination. Next to it you see the pink and that is ok. you need to grind every square inch regardless to get rid of the wax surface and to rough up the resin for better adhesion when you lay your glass down.
I'm located in west central OH.
 

Nortron

Cadet
Joined
Dec 19, 2017
Messages
9
Like I said I am better with hammers than computers. I am still learning how to size picture files to fit the site. When I would preview my post it looked different than what I actually posted. It only took two days poking at it here and there. I am grateful for our cool and slightly damp weather as it seems to make wearing PPE while grinding not so bad. Plus the dust isn't flying everywhere. I will try a couple of more pics of the stringers and transom. Demolition.jpgStarboard by motor mount.jpgTransm rot.jpgTransom detail.jpg
 

Nortron

Cadet
Joined
Dec 19, 2017
Messages
9
I just found out how shoddy the construction of this boat is. As I was grinding out air pockets in the left rear corner of the boat I broke through the hull . It looks like I have some repair work to do. That is a shot of the left rear Chine about a foot and a half from the stern of the boat . I guess we were riding around on a piece of paper LOL . 20190329_140837.jpg
 

Chris51280

Ensign
Joined
Jan 24, 2018
Messages
932
wow, that is thin. don't you just love it when work just keeps piling on for no reason
 

Chris51280

Ensign
Joined
Jan 24, 2018
Messages
932
Here is a good example on where my stringer is and how far I ground back to glass and where I feathered it in. Most likely around where the stringers are tabbed is loose csm from the factory and it needs to go.
 

Attachments

  • photo309745.jpg
    photo309745.jpg
    210.7 KB · Views: 7

Nortron

Cadet
Joined
Dec 19, 2017
Messages
9
Thanks Chevy. I have been reading your thread throughout the whole process. You have done a lot of work and should be proud. We also share an interest in Astro/ Safari vans. I am on my third one. Currently a 2000 Safari AWD. I was disappointed to say the least, when I ground through the hull but felt like I am needing to remove any glass that is not secure. I think I am on a steep learning curve of how fiberglass boats are constructed. At this point I don't know if I am 1/3, 1/2 or ? done with the grinding process. My plan so far was to replace the transom, motor mount, deck and stringers up to the front of the cockpit/ helm area. Test holes seemed dry from there forward and the deck is solid. I would sister the new stringers to the old at that point. I have left a lip of deck for reference and will cut that out after the stringers are back in. Another discovery is that Rinker installed three boards in the hull. One is over the keel and the other two are in the area of the strake? chine? that seem to correspond with the bunks on the trailer. My biggest question/ concern is that since I cut through the hull, should I just do spot repairs where I have had to grind out large amounts of glass? Or should I consider doing a complete layer through the whole hull then move forward with stringers/ bulkhead/ transom? I currently think I am doing this in epoxy but may reconsider due to costs. I have two options for supplies. One is about an hour west of my location and the other is about 2 hours north at Lake Erie. I am posting pics that I hope show some of the current state of things.I am open to any input
 

Attachments

  • photo309965.jpg
    photo309965.jpg
    1.7 MB · Views: 6
  • photo309966.jpg
    photo309966.jpg
    1 MB · Views: 5
  • photo309967.jpg
    photo309967.jpg
    1.6 MB · Views: 6
  • photo309971.jpg
    photo309971.jpg
    1.7 MB · Views: 6

chevymaher

Commander
Joined
Mar 29, 2017
Messages
2,919
Yep I got the safari Van. Mom and dad got it new I inherited it 20 something years ago when it was shot that time. it has lived several lives since then. She is my driver. Dash is very similar to a chevelle and that is the thing I like about it. I have owned the safari and the chevelle longer than anything in my life. I had the chevelle 2 weeks longer than the van.

I always stopped grinding before I got to the heavy woven material. I kinda figured I wouldn't go through if I did that. Once it is solid not dry your done. I had some dry layups they literally peeled out.
 

Bshoot

Cadet
Joined
Jul 12, 2020
Messages
16
Thanks Chevy. I have been reading your thread throughout the whole process. You have done a lot of work and should be proud. We also share an interest in Astro/ Safari vans. I am on my third one. Currently a 2000 Safari AWD. I was disappointed to say the least, when I ground through the hull but felt like I am needing to remove any glass that is not secure. I think I am on a steep learning curve of how fiberglass boats are constructed. At this point I don't know if I am 1/3, 1/2 or ? done with the grinding process. My plan so far was to replace the transom, motor mount, deck and stringers up to the front of the cockpit/ helm area. Test holes seemed dry from there forward and the deck is solid. I would sister the new stringers to the old at that point. I have left a lip of deck for reference and will cut that out after the stringers are back in. Another discovery is that Rinker installed three boards in the hull. One is over the keel and the other two are in the area of the strake? chine? that seem to correspond with the bunks on the trailer. My biggest question/ concern is that since I cut through the hull, should I just do spot repairs where I have had to grind out large amounts of glass? Or should I consider doing a complete layer through the whole hull then move forward with stringers/ bulkhead/ transom? I currently think I am doing this in epoxy but may reconsider due to costs. I have two options for supplies. One is about an hour west of my location and the other is about 2 hours north at Lake Erie. I am posting pics that I hope show some of the current state of things.I am open to any input
 

Attachments

  • 129E7AEE-1EC7-4B21-835E-B57C878D48EF.jpeg
    129E7AEE-1EC7-4B21-835E-B57C878D48EF.jpeg
    348.7 KB · Views: 10
  • CF6CD62E-8108-45A7-93CA-E25CE35583BE.jpeg
    CF6CD62E-8108-45A7-93CA-E25CE35583BE.jpeg
    2.1 MB · Views: 10
  • CEFD8E8D-89C1-4CFE-ACD9-0749280F1392.jpeg
    CEFD8E8D-89C1-4CFE-ACD9-0749280F1392.jpeg
    4.1 MB · Views: 9
  • 08D89298-388B-42C5-9B60-29A552A3EEA2.jpeg
    08D89298-388B-42C5-9B60-29A552A3EEA2.jpeg
    549.1 KB · Views: 9
  • D2C87AE9-AE49-4E15-8EC9-B9BFE59CDEFF.jpeg
    D2C87AE9-AE49-4E15-8EC9-B9BFE59CDEFF.jpeg
    347.9 KB · Views: 8
  • 8966DB63-F10E-4870-B0C4-C103667FFED6.jpeg
    8966DB63-F10E-4870-B0C4-C103667FFED6.jpeg
    2.1 MB · Views: 9
  • 0AF4C364-529B-4F36-9DD8-FC25B879E18D.jpeg
    0AF4C364-529B-4F36-9DD8-FC25B879E18D.jpeg
    3.2 MB · Views: 9
  • 3D189343-14FA-4246-A2AE-639B19404725.jpeg
    3D189343-14FA-4246-A2AE-639B19404725.jpeg
    317.2 KB · Views: 7
  • 1F57847C-E473-4F6C-BE37-E2C344163AEA.jpeg
    1F57847C-E473-4F6C-BE37-E2C344163AEA.jpeg
    94.7 KB · Views: 7
  • 46F51423-1BB1-497A-8017-4BB00B569673.jpeg
    46F51423-1BB1-497A-8017-4BB00B569673.jpeg
    1.1 MB · Views: 7
  • E8C5E8FA-2107-4EA2-9C9A-75F19A01D7B7.jpeg
    E8C5E8FA-2107-4EA2-9C9A-75F19A01D7B7.jpeg
    2.7 MB · Views: 8
  • 7A2FD590-77EA-4EFF-B79F-58E700D24D90.jpeg
    7A2FD590-77EA-4EFF-B79F-58E700D24D90.jpeg
    2.2 MB · Views: 7

GA_Boater

Honorary Moderator Emeritus
Joined
May 24, 2011
Messages
49,038
This thread has been dead for almost 2 years. Only the OP can restart the thread.
 
Status
Not open for further replies.
Top