1989 donzi ragazza 25' cap removal stringer repair questions

Joined
Jul 22, 2015
Messages
16
Hey everyone,

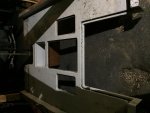
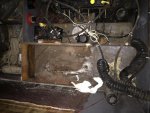
It's definitely been a while but i haven't given up! October and November were crazy busy and led right into the winter... Springs starting to break and I'm trying to get back out there. Just recently picked up some core components for the engine build (other deal fell through, dragged my feet too long.) hopefully that will re-motivate me. My question to you guys is on the gas tank.. I want to get it out without destroying the surrounding walls so that when I eventually free the walls from the hull I can easily measure the new pieces, however it seems the tank does not want me to do that. So far I've cut along each side (about 2.5' down, tall tank!) and I've tried to rock the tank with a pry bar, even tried lifting with a hoist.. No such luck. My guess is that the surrounding foam has some serious adhesion to the bottom of the tank.. Any ideas are appreciated!
Thanks in advance,
Mike
 
Joined
Jul 22, 2015
Messages
16
gas tanks out!!! turns out the fuel sender was very incorrect... there was still about 50 gallons of gas left in it when me and my buddy lifted it out of its hole, now we know why it was so heavy! on a good note tho everyone's gas tanks are now full. now i just have to get the engine out, its all unbolted just ran out of room with my hoist. once thats out its time to start cutting
IMG_9448.JPG IMG_9449.JPG IMG_9453.JPG IMG_9451.JPG IMG_9452.JPG
 
Joined
Jul 22, 2015
Messages
16
just realized i never posted some of the other pics i took. ill put them up for reference incase anybody else can use them. i was really surprised at how poor the construction was on this boat. most of the stringer/bulkhead joints weren't even bonded together and the upper halves of them weren't sealed, no wonder the rot is everywhere.
IMG_8260.JPG IMG_8264.JPG IMG_8268.JPG IMG_8266.JPG IMG_8319.JPG IMG_8322.JPG IMG_8320.JPG IMG_8324.JPG IMG_8325.JPG
 

Attachments

  • IMG_8267.JPG
    IMG_8267.JPG
    90.8 KB · Views: 5
  • IMG_8267.JPG
    IMG_8267.JPG
    90.8 KB · Views: 5
  • IMG_8267.JPG
    IMG_8267.JPG
    90.8 KB · Views: 4
  • IMG_8260.JPG
    IMG_8260.JPG
    74.4 KB · Views: 5
  • IMG_8261.JPG
    IMG_8261.JPG
    91.3 KB · Views: 9

Vintage Rider

Seaman
Joined
Mar 6, 2016
Messages
62
Well. as that ledgenary boatbuilder Confucius once said, "A jorney of a thousand miles begins with the first step." It looks like you've got a fair start on your journey already. Keep on truckin' and when you get to the point (points?) when you start thinking this might not have been one of your better ideas, know that there will be multiple thousands of us green with envy when you're done.
 

goin70

Cadet
Joined
Oct 6, 2007
Messages
19
Great project! I just started following and you will have a solid boat when you are finished. These projects always take much longer than folks expect. The life saver is having this peer group of boat restoration enthusiasts that can give you guidance when and if needed as well as encouragement on your journey. It is a daunting task but can be accomplished and highly rewarding when completed. You have given me the inspiration to start a project. Thanks for posting and sharing your journey.
 

White90GT

Petty Officer 2nd Class
Joined
Jul 5, 2011
Messages
161
Nice boat, looks similar to the SeaRay SRV-260 that I recently picked up and am going to have to probably do similar work to if I decide to go with it.
 

mickyryan

Rear Admiral
Joined
Apr 18, 2016
Messages
4,216
cool boat imma be watching as I only went with a 17 to get my feet wet in the repair side however I'm starting to think just about any boat I buy in future will need this done unless its brand new.
 
Joined
Jul 22, 2015
Messages
16
ok guys i know its been a while again since i had any kind of update but i made some good progress today!! Hopefully everyone had a great 4th of July. Soo i cleaned all of my mess up inside the boat for the most part and i removed the gimble housing and all other accessories attached to the engine bay. i also pulled out all of the foam that surrounded the gas tank and started cutting out the ski locker floors.. its really quite interesting to try and figure out how these people (Donzi) built this boat.. it seems as the whole stringer/bulkhead was created as an assembly then dropped into the hull before the cap was put on. I only say that because the bottoms of the ski lockers were completely glassed in and the only way they could have done that was with some kind of access from the bottom. another clue you should be able to see in the pictures is that only the outside of the ski locker box is tabbed to the hull the inside is not because of the lack of access once the assembly was installed. I started to get a little overwhelmed thinking about how to exactly recreate what was there but then realized that this is the beauty of completely re building the boat to my own standards:becky:. i was going to ask you guys what you think about the transom but after looking at everything else there's no way that any part of that boat is going to be any good and at this point there's no point in trying to save anything. I am looking for ideas to maintain the stringer height once i cut everything out as the floor floats on them. so far i am going to mark the height on the sides of the hull and maybe run some string across at the set height then make templates before cutting my wood.. idk, open to ideas, been watching a lot of friscoboater on youtube.. so helpful! anyway heres the pics let me know what you think!!
 
Joined
Jul 22, 2015
Messages
16
IMG_9737.JPG IMG_9734.JPG IMG_9735.JPG IMG_9738.JPG IMG_9744.JPG IMG_9745.JPG
transom pics

IMG_9781.JPG
left side ski locker floor removed

IMG_9792.JPG
where a stringer is supposed to be, under the ski locker

IMG_9784.JPG
parts of that stringer

IMG_9782.JPG IMG_9797.JPG
right side ski locker

IMG_9795.JPG IMG_9788.JPG IMG_9789.JPG
good evidence that the inside of the ski locker was never tabbed in. also the stringer that was supposed to run thru the middle never even bedded into that glue there

IMG_9801.JPG IMG_9798.JPG IMG_9802.JPG

end of day all cleaned out.. nice and itchy!
IMG_9803.JPG
 

Attachments

  • IMG_9737.JPG
    IMG_9737.JPG
    372.6 KB · Views: 5
  • IMG_9749.JPG
    IMG_9749.JPG
    124.4 KB · Views: 4
  • IMG_9800.JPG
    IMG_9800.JPG
    99.3 KB · Views: 5
Joined
Jul 22, 2015
Messages
16
got a little more work in today.. let me just say it is not a pleasure trying to do this in 90 degree weather with like 70%+ humidity. I got some more of what im gonna call the "sub deck" out and i still cant believe how poor the build quality was. i also cut one of the motor mounts out just because i was curious what i would find.. as soon as i got the blade through the glass i had a steady stream of water coming out. Not too many other surprises.. i did find some real wood today that was a little bit of a surprise.. i took a couple pics just to keep the process fairly well documented so ill post them up. IMG_9879.JPG IMG_9877.JPG IMG_9878.JPG IMG_9876.JPG IMG_9875.JPG IMG_9874.JPG
 
Top