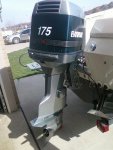
1987 Evinrude 200hp outboard resto/rebuild

j_k_bisson

Lieutenant Junior Grade
Joined
Oct 6, 2010
Messages
1,082
Re: 1987 Evinrude 200hp outboard resto/rebuild

Wow...!!! Great Job on the re-build..!! and nice work to all who chimed in with helpful hints..!!

I've got an '87 Evinrude 200XP (STL) that I'm trying to get running right. This thread has helped me get more motivated to dive in, and finish. I started last month, then took some time for important matters... now it's time to finish. It's also prompted me to ask a few questions regarding parts of this project as it relates to my own.

First question... are 'new' carb kits 'better' than older ones..??? I just bought some kits off Ebay that I *think* are 'older' (not sure how old) kits.... are the gaskets in 'old' kits more succeptable to damage from ethanol than 'newer' kits...???

Second, is the black tool that appears 'hinged' for removing the 'caps' off the trim pins..??? If so, where can I get one and how much do they cost..?? I built a four pin 'tool' from a piece of galv steel pipe, and with a big pipe wrench could not turn the pin 'caps'... instead it bent the 'nubs' on the 'pipe/tool' I had made... (!?!?!?!!!) My pins are corroded, and chewed the seal causing an oil 'leak'... I've replaced these pins/gaskets before. Used a buddy's pin 'spanner' tool... but don't remember having a hard time removing the caps.

Third, while I would, by my nature, replace each carb to it's original location after installing the kits, it appears that some of the carbs MAY have different jets installed..?? Need I worry what jets are in the carbs..??

And... what size/type/brand of hose should be used for all the air lines..??

Lastly... I stopped using the VRO 15 yrs ago, but have never rebuilt the 'fuel pump'... any 'test' that might determine if the pump isn't performing..??

Thanks for any help...!!! Jeff, GREAT JOB..!!! Can't wait to 'hear' (about) that puppy firing up..!!!!

1) After you look at the kits and the part for the carbs the answer will reveal it self to you. The gaskets are the same. I also tested the idea with the old parts when I rebuilt them. I put all the rubber gaskets into a butter container of ethenol gas. They did not deteriate.

2) It did show up. But I never used it. I bought it off ebay. They are going for around 20 bucks plus shipping now. I actually found a grinder nut wrench from a cheap Canadian Tire grinder (made in china) that fits the holes perfectly. You might want to check to see if you have a wrench before you buy one. At my local dealer they use a wrench like the one you made. That way they can use a impact one it. My unit was not in very bad shape so I did not need the impact. Just a rubber mallot and a few taps.

3) Yes you should be very concerned where each carb comes from. My project is one hold right now. I plan on rechecking the main jets and locations while on hold. But I'm rebuilding an ATV for a buddy so it is truely on hold. One of my first things to do when I get back to it.

4) I went to the dealer and bought the right hose. It is all ethenol and marine rated. It cost around a hundered bucks when I was done though. But it is done right. With all I seam to get into, you would be suprised to know how many times it was a colapsed hose that was the issue on anything I worked on. Buy the right stuff. It is the right stuff for a reason.

5) I just rebuilt the fuel pump because I was going through everything. All you are replacing is a diaphram, a couple of o-rings, and actuator rod in the rebuild. No test, just preventative mantainence.

Just ask away, I'm always will to help out anyway I can. It's like returning the favor!
 

OldPcGuy

Seaman
Joined
Feb 21, 2011
Messages
58
Re: 1987 Evinrude 200hp outboard resto/rebuild

Thanks..!!! I've now got 6 coils+plug wires on the way... That's an 'easy' one.

Do you have a link to SOPs for checking stator..?? My buddy mentioned to me yesterday that he 'thinks' I had the stator replaced 15 yrs ago just before I stored it. (I'm trying to email my old mechanic to see if he can 'easily' check his work logs.)

His point being, he 'thinks' my stator should be fine....

I noticed in your posts, that you got some tools/stuff at Harbor Freight... while I buy plenty of 'serious' tools (nothing like GOOD tools) which many would argue are not available at HF.... It sure is a lot of 'fun' going to Harbor Freight..!!! They are GREAT for getting stuff you don't use that much, or need only once, or for when people 'borrow' tools...etc. We drive from the NE to Florida every month, 8 months per year, so twice per month we stop at the Harbor Freight warehouse store in Carolina.... Yippeee..!!! It's a nice way to stretch ones legs during the drive, and shop for stuff like magnifying lenses that clip onto your glasses..!!! Or like you found, tiny brushes... which is what I'm headed to the local HF for in an hour..!!!

Have you found a solvent you like (better) to clean carbs/parts with..?? I have my arsenal of toothbrushes, toothpicks, and fine needles (that I sanded/filed to put on a rough texture... carefull..!!) and want to dive into the carbs ASAP.

As others mentioned, I like the "175" on your cowling..!!! My thoughts are to leave ALL decals off mine when I repaint it..!!! Or put on some cryptic lettering.

Do you remember where you got your trim-pin 'cap' removing tool..?? $20 is a great price. Don't know if the 'salt' environment or what, but while the 'pins' themselves are SS, the electrolysis gets them. Even with plenty of sacrificial zinc in action, the pins get 'eaten'. It took replacing 3 sets in 5yrs for me to learn a quick "trick". After tying up, trim up... set the 'trailer lock', then run the pins back down into the trim unit. This kept the shafts of the trim pins safe from electrolysis. Any damage was kept to the 'tops' of the pins which never contact the seals/wipers, so no leaks. New trim pins are $155+shipping EACH..!!!!!!

Soon enough, I'll need to address the trim/tilt unit.. for a new motor, and possibly a seal kit for the tilt piston... and I'm dreading it (!!!) I've seen the units come apart 'easy' and I've seen guys 'heat-and-beat' for DAYS...!!!!

On a related subject... I saw a 4' Tarpon in the canal the other day... right off the dock..!!! My neighbor said "That's one of the 'little' ones..!!" HA..!!
 

j_k_bisson

Lieutenant Junior Grade
Joined
Oct 6, 2010
Messages
1,082
Re: 1987 Evinrude 200hp outboard resto/rebuild

Like you said I love shopping at Harbour freight, but look at their tools as disposable. They have thre difference brush kits that I bought. Two round style and one typical style brush kit. The three kits have brass, stainless, and plastic brissels distributed among them so I bought them all. They where only 5 buck a kit. Also I distryed 50% of them using them where I souldn't of. But hey thats why I bought them at harbour frieght!

As to solvent I like using the old fashion varsol (low order). And if the part is really caked I use carb cleaner. I let the part soak for 5-10 minutes then start scrubbing. Blow them off with compressed air and then sray down with carb cleaner. Then another round of compressed air. So basically not smoking in my garage while doing it! Don't really need to drink either! You'll be fealing pretty good after you are done with a mask on!.

Good tip on the pins I'll deffinately will keep that in mind when using the boat.

So you like the sleeper effect. My one buddy thinks I'm cheating, but he is the competition so it does not count!. Plus never entered a fishing tourny where motor hp was a requirement.

Here is a link to the cheap ones I was talking about, They are called face spanner wrenchs or gland nut wrenchs,
http://cgi.ebay.com/ebaymotors/ADJU...Z220718159186QQptZMotorsQ5fAutomotiveQ5fTools
The one I got was a OTC name brand, don't know what the difference is to this one.
Here is the one from Austrailia,
http://cgi.ebay.com/ws/eBayISAPI.dll?ViewItem&item=200576408994&ssPageName=STRK:MEBDIX:IT

I bought the seal kit for the trim unit off ebay. Just need to search part number and names to truely find any though. It was cheap, like 15 bucks for the seal kit.

I've never sean a Tarpon other than in a pic. I'm a fresh water fisherman. Biggest fish I caught so far is 14lbs lake trout and a couple 10lb walleyes. Hoping to try salmon fishing in lake Ontario this summer. They get up to 40-50lbs. Some day I would love to go to Flordia and go salt water fishing! The problem with that one is by the time I get down there the buget is blown on Disney.... Thats what you get with having 4 kids. lol
 

OldPcGuy

Seaman
Joined
Feb 21, 2011
Messages
58
Re: 1987 Evinrude 200hp outboard resto/rebuild

Wow...!!! Great Job on the re-build..!! and nice work to all who chimed in with helpful hints..!!

I've got an '87 Evinrude 200XP (STL) that I'm trying to get running right. This thread has helped me get more motivated to dive in, and finish. I started last month, then took some time for important matters... now it's time to finish. It's also prompted me to ask a few questions regarding parts of this project as it relates to my own.

First question... are 'new' carb kits 'better' than older ones..??? I just bought some kits off Ebay that I *think* are 'older' (not sure how old) kits.... are the gaskets in 'old' kits more succeptable to damage from ethanol than 'newer' kits...???

Second, is the black tool that appears 'hinged' for removing the 'caps' off the trim pins..??? If so, where can I get one and how much do they cost..?? I built a four pin 'tool' from a piece of galv steel pipe, and with a big pipe wrench could not turn the pin 'caps'... instead it bent the 'nubs' on the 'pipe/tool' I had made... (!?!?!?!!!) My pins are corroded, and chewed the seal causing an oil 'leak'... I've replaced these pins/gaskets before. Used a buddy's pin 'spanner' tool... but don't remember having a hard time removing the caps.

Third, while I would, by my nature, replace each carb to it's original location after installing the kits, it appears that some of the carbs MAY have different jets installed..?? Need I worry what jets are in the carbs..??

Lastly... I stopped using the VRO 15 yrs ago, but have never rebuilt the 'fuel pump'... any 'test' that might determine if the pump isn't performing..??

Thanks for any help...!!! Jeff, GREAT JOB..!!! Can't wait to 'hear' (about) that puppy firing up..!!!!
 

j_k_bisson

Lieutenant Junior Grade
Joined
Oct 6, 2010
Messages
1,082
Update 04-06-2011

Update 04-06-2011

Well finally heard from Bay Mfg reguarding the 5" extension kit. It should be shipping by the end of the week. Thanks GOD almighty! Finally!.

So we are off hold. Started finishing off all the little projects still outstanding. Going to keep the main jets at 62ds. Went into the local dealer and was talked out of changing the bottom two to 64ds. They said it was not required.

The boat comes home this weekend from storage. So I can mount the motor and finish off all the little stuff to get the boat ready for the maiden voyage. Not much left to do. The only thing outstanding is this ATV of my buddies that I have been playing with. Can not get thing to start with the electric start and throtle correctly. Rebuilt the carb 4 times. Might be something more than obvious wrong with it. It's on hold now.....

I'll start posting again this weekend when I start getting things done.
 

j_k_bisson

Lieutenant Junior Grade
Joined
Oct 6, 2010
Messages
1,082
Re: 1987 Evinrude 200hp outboard resto/rebuild

Well stopped and picked up the boat from where I had it stored. Brought it home last night and started working on it. I'll post those improvements over on the boat thread untill I mate up the botor to the boat. I'll keep posting the motor specific improvements/developments here.

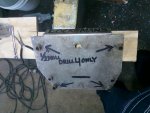
So I also stopped at my local deal yesterday to borrow their drill jig for the transom mounting holes for the motor. Nice jig, a bit worn, but at least it will kee my bits straight while I drill the bolt holes int he transom. Here is a pic of the drill jig.

SSPX0050.jpg

While I was there I asked to buy the four mounting bolts. I was shocked that the bolts cost $40 buck a bolt. Also they stated that they are special 1/2" stainless bolts, possibly hardened. I did not buy them, but when to a bolt whole saler in the metro Detroit area and asked a few questions about possible hardened stainless steel bolts.

Here is the outcome after a few calls to a couple bolt manufactures. The "Hardened" stainless bolts are actually grade "410" (might not have the exact number right". they have more carbon and steel content in the metalurgy. But the hare not harder. They are pretty much equal to the Grade "304" regualar stainless bolts. Where the difference is the "410's" are more corosion restistant then the "304's". They pretty much have the same torque specs, within 5-10 ft-lb's. So I went with the grade "304's" at a cost of $3 a bolt.

Please chime in if I have this wrong and they bolt suppliers steered me wrong.

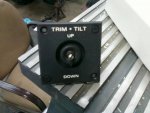
Also asked the dealer about wiring for this...

SSPX0051.jpg

They stated that I could use 18ga wire when I wire this in. I bought 16ga one step up. Is this enought guage for this application. I believe this is only runing the signal to the relays to activate and not the amerage to run the trim motor.

Please chime in here is this thinking is wrong.

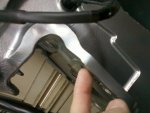
My last thing is I still have to mount the molding around the splashwell to hide the split line on the boat halves. I am using 1/8" thick aluminum angle for this. My problem is I need to gouge/remove material out the trim mount bracket here....

SSPX0055.jpg

The angle interfers here. The dealer told me to notch out the angle for the mount. I want the angle to stop water intrusion for I'll modify the mounting bracket and repaint. It is better than adding washers or aluminum plate to make up the height difference.

So the plan for today while it is not raining is to finish up the splaw well capping then moun the motor trim mount only. Still waiting for the 5" extension to come in. I think it is sitting on my desk at work right now, but not going to go and pick it up. It'll wait till Monday.

Also have a few things to finish up on the boat for this weekend.
 

j_k_bisson

Lieutenant Junior Grade
Joined
Oct 6, 2010
Messages
1,082
Update 04-14-2011

Update 04-14-2011

Getting to the end of this thread. Seeing tonight I will mount the power head and hook up everything to the motor. So tomorrow will probably be the last post for this thread for a while. I will post the final start up when it happens next week though.

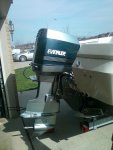
Last night finished the installation of the Bay Mfg extension kit. Also worked on a few other small things before going out for the evening. Here is a few pics of the motor as it sits.

SSPX0072.jpg

SSPX0075.jpg

Like I said tonight the power head gets installed and the controlls get hooked up. We'll see how that goes. I also still need to do the linc and sinc. The carb flaps are sinced, just need to confirm the timing aspect.

Do I need to have fuel running through the motor to confirm the timing? Or will a nice sray job of fogging oil work?
 
Joined
Aug 17, 2009
Messages
941
Re: Update 04-14-2011

Re: Update 04-14-2011

Jeff,

Motor looks awesome. Great work! I am pretty sure you need to be able to run the engine to complete the link and sync.
 

j_k_bisson

Lieutenant Junior Grade
Joined
Oct 6, 2010
Messages
1,082
Re: Update 04-14-2011

Re: Update 04-14-2011

Thanks. If I need to run the motor how do I know the timing is set right before I fire it up? Is there some special way? I read the service manual a couple of times and it is a bit confusing. I did not change anything other than the settings on the spring tube to the timer base. The screw on the end I took out and cleaned. I think I got it close to where it was. Also removed the timer base and reinstalled. Did not touch any of the screw settings on that system though.

Just want to make sure that I do scre this thing up now.....
 

j_k_bisson

Lieutenant Junior Grade
Joined
Oct 6, 2010
Messages
1,082
Re: Update 04-14-2011

Re: Update 04-14-2011

I was just reading the Joe Reeves Timing proceedure and it states to pull spark plugs so Motor does not need to be running.

So my question is still. If I spray fogging oil in all the cylinders will this stop any distruction of the rings while turning it over to set timing? Also If I spray fogging oil in the cylinders will this screw up the breakin proceedure?
 
Joined
Aug 17, 2009
Messages
941
Re: Update 04-14-2011

Re: Update 04-14-2011

I was just reading the Joe Reeves Timing proceedure and it states to pull spark plugs so Motor does not need to be running.

So my question is still. If I spray fogging oil in all the cylinders will this stop any distruction of the rings while turning it over to set timing? Also If I spray fogging oil in the cylinders will this screw up the breakin proceedure?

Sorry I wasn't totally clear. You can link and sync with just spinning up the motor under no compression but I wouldn't do that right after a new rebuild. That is why I suggested getting it close and then run the engine some to break in a little. The engine should run if it's close. If you are off on the advanced timing a little then all that will happen is loss of power while the boat is in the water. I would run it, break it in, link and sync out of the water and then double check the link and sync and timing advance while in the water.
 

j_k_bisson

Lieutenant Junior Grade
Joined
Oct 6, 2010
Messages
1,082
Re: Update 04-14-2011

Re: Update 04-14-2011

How do you know you are close? The service manual does not mention how to achive this. Is there some "close settings" that I can find some where?

No trying to be cute or anything, not that any one would ever find me "cute", just want to make sure things do not go hey wire fast......
 
Joined
Aug 17, 2009
Messages
941
Re: Update 04-14-2011

Re: Update 04-14-2011

Jeff,

My shop manual is for a 1983. I think the timer base, stator and fly wheel only go on one way, and the linkage from the timer base to the throttle shouldn't have been changed from when you disassembled the power head (I hope). The timing adjustment screw should have an initial setting of 3/8"-7/16" (dimension of the amount of threads sticking out from the back of the timing pointer bracket when adjustment nut is tightened). There should be a picture of it in your shop manual in section 3. From here the motor should run well enough to break in some. Once that is done then you need to run it up to 4300-4600 rpms and recheck the advancement.
 

j_k_bisson

Lieutenant Junior Grade
Joined
Oct 6, 2010
Messages
1,082
Update 04-15-2011

Update 04-15-2011

I was actually able to go over quite a few things last night and made some progress on the motors assembly.

I was able to mount the power head in place and start the installation of all the controlls. I did run into a couple pf situations where I need to pick up some parts. Like 3/8" fuel line for the fuel system, and #10-32 nylok nuts for the control cable studs on the motor. But over all things did go well. Was even able to turn the power on and crank over the motor. She turns over very nicely. Did nto chek for spark or anything. Just hit the starter. Not fuel is running to system right now. Also I did run into one problem with the wiring I did. The trim system is running constantly in the down direction. So I hook something up wrong there. I just unplugged the trim motor for right now.

So tonight weather permitting I will finish the fuel and controll system installations. And then trouble shot the electrical system (both the trim wiring and weather I am getting spark). After that I will finish the kicker motor manufacturing and start the paint process on that. Using rustolium product for painting and prime so that will take a couple of days.

Also this weekend I want to clean my old rub rail and insert. I want to get it ready for installation next week. I am holding off until the hand rail in fully installed. No point in ripping apart my buddies hand with all the screws I am going to be putting in for the rub rail.

Sorry no pics today. Nothing really to look at other than control cables and wiring....

So it will be a long and joyus weekend. I am actually looking forward to it! Can not wait to get this thing done and on the water!
 

j_k_bisson

Lieutenant Junior Grade
Joined
Oct 6, 2010
Messages
1,082
Update 04-26-2011

Update 04-26-2011

Well finally got it started today. At first I thought I had installed the water pump wrong because nothing was coming out of the peep hole. So shut it down and tore the lower unit off to check everything out. Nothing wrong that I could see so called my local dealer and found it takes a bit to get going.

Also once I restarted the motor and let it heat up the temp guage spiked to max and stayed there. I check all around the block head with an infered temp probe and the max readin I got was 164'F so I need to investigate that issue some more.

Also tried to set the idle to 1200rpm but could not get it to go that high. No matter how much I turned in or turned out the screw in the timing spring cylinder the rpm stayed at 650-750rpm.

How do you set the idle timing. and what is the timing I am looking for at idle?

Also when I shut it down I did a compression test and all the cylinders where within 1 psi. *0 was the reading but |I was using a harbour feight compression gage so I do not trust the reading but the spread should be right on.

Only ran the motor for 10-15minutes on muffs. Need to find out how to set the timing at idle before going anywhere more with the running.
 

daselbee

Commander
Joined
Jan 20, 2009
Messages
2,765
Re: Update 04-26-2011

Re: Update 04-26-2011

Well Jeff...
You probably don't want to hear from me. But....here it is anyway.

I think you did a fine job on the resto...but you are way too anal about some of these details that make no difference at all.

Wow...did I say that? Sure I did...

Now down to nitty gritty....

DO NOT sweat the idle timing. It is not important at this point, and will NOT hurt your motor.
DO NOT worry about spraying pre-mix in the plug holes, and screwing up your break-in. NOT GONNA HAPPEN!!!!

These engines are very tough. They have to be. They are simple and tough and tiny minute things are not gonna bust them.

So, your link and sync is wrong. Go over it again, paying special attention to these points:

All butterflies are absolutely closed at idle position. This is done with the idle pickup roller NOT IN CONTACT with the cam. Loosen that screw and move the roller away. Tap on the butterfly plates listening...the plate that is open will sound different. Get them adjusted where they are all closed. Watch the #5 and #6 plates as they are independently adjustable.
Operate the butterflys manually, let em snap back...re-tap to see if they are all closed...keep at it...takes me about 30 mins to be absolutely sure when I do it.

YOU CAN START IT AT THIS POINT to see how it idles....!!! Just start it up. With all butterflies closed, if it idles way high, look at the timer base and turn that adj screw on the cigar tube linkage clockwise to move the timer base counterclockwise, slowing the idle.

If it still races...with all butterflies closed, you got much more wrong....
OR if you cannot make it change idle speed...then the cigar tube plastic linkage device is broken. You should be able to SEE the timer base move as you trun that screw. Just look up under there...

Rotate the roller assy back over to the cam, and make sure the mark aligns with the roller center. Tighten temporarily for now, as you may be going back to it later.

Now, the idle stop screw....you must be sure that it is not propping the butterflies open when the linkage is at idle. No way around it. You cannot use the idle stop screw to set the idle speed.

Adjust the idle stop screw in conjunction with the throttle roller position so that you are not propping the butterflies open, and that the mark is in the center of the roller and there is no pressure or tension on the linkages when at idle position. It will take some fiddling to get it right.


Go to the WOT stop screw. Move linkage to WOT position and set the screw so that the butterflies do not go past the 180* to throttle bore position. Make sure they don't "over-open". That's a simple adjustment, and you will never have to make again.

I dunno...there is so much to cover in a link and sync...the idle settings are independent of the WOT settings....and the only setting that will hurt your motor is the WOT timing asjustment, and only over quite some time of running. Not just a few minutes...

I will be glad to detail some of this out more if you want. Too much to type here.

Oh...you have a OMC manual, right? Not Clymer, Not Seloc.
 

j_k_bisson

Lieutenant Junior Grade
Joined
Oct 6, 2010
Messages
1,082
Re: Update 04-26-2011

Re: Update 04-26-2011

Well Jeff...
You probably don't want to hear from me. But....here it is anyway.

I think you did a fine job on the resto...but you are way too anal about some of these details that make no difference at all.

Wow...did I say that? Sure I did...

I know I know. I can be very obsesive compulsive. But hey most good engineers are! lol

Now down to nitty gritty....

DO NOT sweat the idle timing. It is not important at this point, and will NOT hurt your motor.
DO NOT worry about spraying pre-mix in the plug holes, and screwing up your break-in. NOT GONNA HAPPEN!!!!

These engines are very tough. They have to be. They are simple and tough and tiny minute things are not gonna bust them.

So, your link and sync is wrong. Go over it again, paying special attention to these points:

All butterflies are absolutely closed at idle position. This is done with the idle pickup roller NOT IN CONTACT with the cam. Loosen that screw and move the roller away. Tap on the butterfly plates listening...the plate that is open will sound different. Get them adjusted where they are all closed. Watch the #5 and #6 plates as they are independently adjustable.
Operate the butterflys manually, let em snap back...re-tap to see if they are all closed...keep at it...takes me about 30 mins to be absolutely sure when I do it.

This part is good. No problems up to here. They all check out.

YOU CAN START IT AT THIS POINT to see how it idles....!!! Just start it up. With all butterflies closed, if it idles way high, look at the timer base and turn that adj screw on the cigar tube linkage clockwise to move the timer base counterclockwise, slowing the idle.

The motor did not idle too high. I could not get it high enough. The 1200rpms with adjusting the cigar tube screw. While playing with this screw I noticed that I am advancing and retarding the timing. Not the fuel air mixture. So that is why the question. What is the timing required for idle?

Did not touch butterflies or any other adjustment screws on the motor. So my linc and sync is still good.

If it still races...with all butterflies closed, you got much more wrong....

Rotate the roller assy back over to the cam, and make sure the mark aligns with the roller center. Tighten temporarily for now, as you may be going back to it later.

Now, the idle stop screw....you must be sure that it is not propping the butterflies open when the linkage is at idle. No way around it. You cannot use the idle stop screw to set the idle speed.

Adjust the idle stop screw in conjunction with the throttle roller position so that you are not propping the butterflies open, and that the mark is in the center of the roller and there is no pressure or tension on the linkages when at idle position. It will take some fiddling to get it right.

I have all this set perfectly. Took over two hours.

Go to the WOT stop screw. Move linkage to WOT position and set the screw so that the butterflies do not go past the 180* to throttle bore position. Make sure they don't "over-open". That's a simple adjustment, and you will never have to make again.

Right now I can go over by 4-5 degrees approximately. Best I could do. Every time I tighten the jam nut the angle changed. I quite and drank a beer and stared at it for an hour. Then went and got what I have now.

I dunno...there is so much to cover in a link and sync...the idle settings are independent of the WOT settings....and the only setting that will hurt your motor is the WOT timing asjustment, and only over quite some time of running. Not just a few minutes...

I will be glad to detail some of this out more if you want. Too much to type here.

Oh...you have a OMC manual, right? Not Clymer, Not Seloc.

I'm just wondering is if I hook up a timing light at idle what the timing should read. By chance you know?
 

j_k_bisson

Lieutenant Junior Grade
Joined
Oct 6, 2010
Messages
1,082
Re: Update 04-26-2011

Re: Update 04-26-2011

Yes I have the OMC manual. I have tried the other manuals before for other motors. They are garbage.
 

ezmobee

Supreme Mariner
Joined
Mar 26, 2007
Messages
23,767
Re: Update 04-26-2011

Re: Update 04-26-2011

My 90 starts pumping water even while still cranking......I suppose that could be better pressure to the muffs or something though.
 
Top