1986 Ebbtide Dynatrak 150 Restoration

Status
Not open for further replies.

jfas

Seaman Apprentice
Joined
Sep 5, 2013
Messages
47
Evening all,

I have been lurking and debating weather or not to share my project with the world. Since being a user here, I have learned a ton and figured it would be innapropriate not to share. I hope everyone enjoys!

So, about the boat. Back in August of 2013, I scoured Craigslist for a smaller bass boat mostly for fishing, but also as a tender for our cabin cruiser. I found a 1986 Ebbtide Dynatrak 150 with a 70hp Johnson. The engine had trim and tilt, the boat had 2 livewells, and a bunch of storage for a 15 footer. It was also in pretty bad shape. I knew going in that it most likely needed at least a transom and a floor, so I was prepared for some work. What I didn't know was that the engine had bad crank bearings, a bad crankshaft, and was running lean due to an air leak between the block and cylinder head. Long story short, after the holiday weekend and the summer ended the boat was parked in my garage for a major overhaul.

I began with the intention of rebuilding the motor, fixing the floor and transom. Then came the cap removal, stringer removal, grinding, wiring, etc etc.

So, I'm now finally at the point of reconstruction. Which is where I need some help.

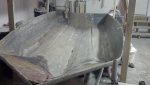
I'm going to upload a bunch of pictures that detail how I got to where I am now, but the first thing I need help with is how to patch the keel. The boat had been beached so much that when I removed the center stringer and ground the bedding out I was left with some holes in the hull and very thin fiberglass. So, what say you on repair thoughts?

My initial plan is to clean the interior hull a little better, acetone all done the keel, and lay in alternating layers of csm and 1708. At this point, I'll continue the interior of the hull. When the interior is complete, I was thinking I would block the hull and complete the repairs from the underside. Grinding, sanding, glass if needed and gel.

So, I leave you with the current state of my project. More to come!

JFas
 

Attachments

  • IMG_20140126_175856_428.jpg
    IMG_20140126_175856_428.jpg
    135.6 KB · Views: 8

jfas

Seaman Apprentice
Joined
Sep 5, 2013
Messages
47
Re: 1986 Ebbtide Dynatrak 150 Restoration

Morning,

So, here's how she looked before all of the tear down and deconstruction.

1383349036515.jpg
1383349037994.jpg
1383349037418.jpg

Then came the removal of the rub rail.

IMG_20131224_143413_000.jpg

This is how I removed the cap from the hull. I picked up some 3/16" angle iron and lag bolted across two trusses and used straps to hoist the cap as high as I could without interfering with the garage door.

IMG_20131230_191613_149.jpg

More to come!

JFas
 
Last edited:

glnbnz

Chief Petty Officer
Joined
Oct 4, 2011
Messages
458
Re: 1986 Ebbtide Dynatrak 150 Restoration

Welcome to IBoats! I look forward to watching your restoration.

Not too sure about what to do with the keel. Hopefully someone will comment on it.
 

jfas

Seaman Apprentice
Joined
Sep 5, 2013
Messages
47
Re: 1986 Ebbtide Dynatrak 150 Restoration

Thanks for the welcome Glen!

Hoping someone can chime in or recommend someone to PM regarding the keel repair.

So to continue I have more photos of the tear down process. Enjoy!

The next step in lifting the cap from the hull.
IMG_20140104_122757_785.jpg

You can see that the front 2x4 is flexing in this pic, I address that in the next step.
IMG_20140104_125634_978.jpg

Supported by 2x4 frame while still also supported by straps to the trusses.
IMG_20140104_143514_185.jpg

First look at the hull with the cap fully removed. I can tell I have a lot of work to do at this point.
IMG_20140104_143536_168.jpg

More coming soon!
 

Woodonglass

Supreme Mariner
Joined
Dec 29, 2009
Messages
25,924
Re: 1986 Ebbtide Dynatrak 150 Restoration

You plan for the keel repair is sound. You'll be bedding the stringer with PB so that will also bulk up the keel and strengthen it. You'll finish up on the outside.
 

jfas

Seaman Apprentice
Joined
Sep 5, 2013
Messages
47
Re: 1986 Ebbtide Dynatrak 150 Restoration

Thanks Woodonglass, I really appreciate the affirmation. I was planning on using PL for bedding versus PB, but I really don't have a better reason than convenience. Do you have any thoughts on that?

JFas
 

jfas

Seaman Apprentice
Joined
Sep 5, 2013
Messages
47
Re: 1986 Ebbtide Dynatrak 150 Restoration

Thanks much for your feedback Woodonglass. I read through the thread linked and it was very informative.

So, on with the update. I actually attempted laying my first glass yesterday. For the first time it wasn't too bad, but I'm thinking it's going to have to come off and I'll have a do-over. For some reason the resin didn't cure very well (thinking mixing or temps) even with a space heater right on it. I also had quite a few air bubbles in the glass even after using the special glass roller. I'm sure I'll get the hang of it.

Anyways, back to the details on getting to where I am now.

From another angle. She's in pretty bad shape. No idea why the manufacturer didn't extend the additional thickness of the transom all the way to the keel. :confused:
IMG_20140104_143546_256.jpg

Yuck!
IMG_20140104_151232_037.jpg

Pile of debris from the inside, mostly the flooring.
IMG_20140104_170525_334.jpg

Floor is mostly cut out, looking at the saturated foam.
IMG_20140104_170543_648.jpg

Well, that's it for now. If anyone has any advice for improving my glassing skills, I'm all ears.

Jfas
 

Woodonglass

Supreme Mariner
Joined
Dec 29, 2009
Messages
25,924
Re: 1986 Ebbtide Dynatrak 150 Restoration

What and where did you attempt to Glass??? What were the temps? What kind of resin and glass did you use? What ratio of Resin and catalyst did you use?
 

jfas

Seaman Apprentice
Joined
Sep 5, 2013
Messages
47
Re: 1986 Ebbtide Dynatrak 150 Restoration

Wood,

I attempted to repair a hole in the rear keel near the transom. I placed a piece of wax paper over the hole from the bottom of the hull and placed tape and a thin piece of plastic over to provide a smooth surface for the glass form into. The temp was approximately 70 degrees in my heated garage. The resin was 435 poly from us composites and MEKP used as hardener. I made a batch of 8 ounces of resin and then added approximately 1/16 of an ounce of MEKP. I stirred for less than 2 minutes (maybe 45 seconds to a minute). I cut my first section of glass (CSM) just slightly larger than the hole. Cleaned the whole area really well with acetone and laid the CSM. As of this morning with direct heat from a space heater the resin was still tacky.

Appreciate any feedback. I'm thinking the temps were a little low, and I didn't mix thoroughly enough. The MEKP was also stored in my garage which could have made that cooler than the resin which was stored inside my house. Perhaps I should add a little more MEKP also.

JFas
 

jbcurt00

Moderator
Staff member
Joined
Oct 25, 2011
Messages
24,883
Re: 1986 Ebbtide Dynatrak 150 Restoration

8oz Resin to 1/16th oz MEKP is not enough MEKP. At 2% MEKP catalyzation, you should have added 2.56/16ths. In lower temps, use the 2% ratio. As temps get higher, you can adjust the ratio down to as low as 1%.

8 oz X 16 = 128/16ths total volume of resin

128 X 0.02 = 2.56 (the #s of 16ths MEKP needed)

2.56/16 = 2% of 8oz

You under catalyzed by 2.5times, roughly. Use 2% on the next layup & it should kick the under catalyzed 1st layer.


Math error & inaccuracy in volume estimates is 1 of the main reasons to use the metric system. 8oz = approx 250ml

2% of 250ml is 5ml, use a small needle-less syringe to measure the MEKP. 1ml = 1 cc (often cc's are the units on syringes)

So 250ml of resin 'needs' 5ml of MEKP for 2% catalyzation.

2.5ml for 1% catalyzation

And everything, boat hull, glass, resin, MEKP, air temps, mixing container EVERYTHING, needs to be above 60F thru the resin kicking
 

jfas

Seaman Apprentice
Joined
Sep 5, 2013
Messages
47
Re: 1986 Ebbtide Dynatrak 150 Restoration

Jbcurt,

Thanks for the lesson, makes total sense. I ended up laying down 1708 over the csm, can I just mix up some resin to brush in to get the csm and 1708 to kick off?
 

Woodonglass

Supreme Mariner
Joined
Dec 29, 2009
Messages
25,924
Re: 1986 Ebbtide Dynatrak 150 Restoration

Yup ^^^^ Also did you Grind or sand the glass on the inside to get to fresh glass so the new glass would adhere better?
 

jfas

Seaman Apprentice
Joined
Sep 5, 2013
Messages
47
Re: 1986 Ebbtide Dynatrak 150 Restoration

Yea, the glass is clean. Thanks again guys!
 

Woodonglass

Supreme Mariner
Joined
Dec 29, 2009
Messages
25,924
Re: 1986 Ebbtide Dynatrak 150 Restoration

Give a few more days, It'll prolly eventyally harden. If not you'll have to grind it off and start over with the proper mix ratio. Like JBC says, USE the Metric System...Mucho Ezeerio!!!!
 
Last edited:

glnbnz

Chief Petty Officer
Joined
Oct 4, 2011
Messages
458
Re: 1986 Ebbtide Dynatrak 150 Restoration

Yes definitely use the Metric system for mixing resin :) I had the same problem but when I switched to the Metric I never had slow kicking resin again!

For small batches you can get some measuring syringes for exact amounts. 1CC = 1ML
 
Last edited:

jfas

Seaman Apprentice
Joined
Sep 5, 2013
Messages
47
Re: 1986 Ebbtide Dynatrak 150 Restoration

Thanks again guys for the great feedback. I'm a bit of a perfectionist and the glasswork that I ended up with is pretty sub par in my opinion, so I'm likely just going to grind it off and try again.

In the meantime, some more progress pics.

Here's another angle of the floor mostly out with the foam and stringers looking pretty ugly.
IMG_20140104_170600_109.jpg

Almost done cutting out the foam flotation boxes in the aft sides of the boat. It appears that the manufacturer formed one layer of CSM and then poured the foam inside of the glass. There was no wood supporting the boxes. Odd.
IMG_20140105_131353_199.jpg

A closeup of how rotten the stringers were. The glass was completely gone and the wood was pretty much dust.
IMG_20140105_131404_053.jpg

And the foam removal party begins!
IMG_20140105_135720_674.jpg

That's all for now. I'll keep everyone posted on the glassing progress or maybe upload a pic or two for another opinion.

JFas
 

jfas

Seaman Apprentice
Joined
Sep 5, 2013
Messages
47
Re: 1986 Ebbtide Dynatrak 150 Restoration

Time for another update!

Here's a shot of 1 layer of CSM and one layer of 1708 after the resin finally cured (4 days). The CSM laid down really nice, but the 1708 has a few air pockets in it. This is a patch to a hole in the hull near the transom. Feedback on the air pockets and durability of the 1708? I plan on laying down another layer of CSM and 1708 for a total of 4 layers. Is this good to go, or should I grind it off and re-do it?

IMG_20140206_083538_827.jpg

Back to history.

There's so much foam in these boats. It doesn't look like much at first, but it really piles up.
IMG_20140105_135725_890.jpg

All the foam out of the hull with the exception of the sides of the hull.
IMG_20140105_153741_391.jpg

Another shot of the completely degraded center stringer.
IMG_20140105_153803_257.jpg

That's all for today. Any feedback on that glass work would be much appreciated.

Next up, transom removal!

Jfas
 

Woodonglass

Supreme Mariner
Joined
Dec 29, 2009
Messages
25,924
Re: 1986 Ebbtide Dynatrak 150 Restoration

Grind out the big bubble in the middle and cut a patch of 1708 to fit and lay it in when you put the next layer of CSM down. Let that tac up and then put the final layer of 1708 down. When you do, wet out the hull first and then use a Chip brush with 1/2 the bristles cut off and DAB don't brush the resin on. This will make the resin below come up and penetrate the cloth to wet it out. Once it goes clear use the bubble roller and start from the middle and roll it out to the edges. You won't get bubbles doing it that way. Once you've done a few yards of this stuff you'll get the hang of it.:D
 

jfas

Seaman Apprentice
Joined
Sep 5, 2013
Messages
47
Re: 1986 Ebbtide Dynatrak 150 Restoration

Afternoon,

Well, I'm glad to say that my glassing skills are improving. Switching to measuring using the metric system and increasing the amount of catalyst to 2% definitely helped. I'm still finding cure times to be in the 1 hour range or a bit longer depending on how much resin I'm applying. Is this typical? I'm working right at 70 degrees, and curing 250ml to 500ml at a time.

Anyways, on to the progress pics!

So, when we left off I was working on removing the transom. Here's what it looked like during the process. Again, I'm not quite sure why the manufacturer didn't extend the full thickness of the transom to the hull. I ended up using several tools for this job. The air chisel, pry bar, wood chisel, and paint scraper seemed to work the best. Overall, it only took me about an hour or so.

IMG_20140105_162402_538.jpg

Here is what the transom looked like after most of the wood was removed and I started grinding to remove the rest of the peanut butter and wood.

IMG_20140105_181301_509.jpg

All the wood and resin is gone. I'm left with a nice clean transom.

IMG_20140117_175906_569.jpg

Oops! The previous owner must have hit something here and I ground through. This isn't the last time this happened. The glass in this boat is all hand laid, but it's pretty thin. Most of it is only about 3/16" thick.

IMG_20140117_175915_839.jpg

That's it for now, I'm getting to the fun part when I get to actually start re-building the boat.

JFas
 
Status
Not open for further replies.
Top